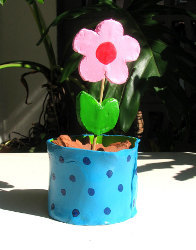
Flower and Pot Project
Create a fun clay flower and pot all on your own! The kids will love getting creative and coming up with their own designs. This kids' clay pot project is a fun one for all ages!

Materials:
- Cold clay (1/2 kg 17,6 OZ) package (DAS)
- Acrylic paint (Americana)
- Water base varnish – Polycyclic protective finish
- Bamboo skewers
- Cutting molds in flower and leaf shape, optional
- knife
- Nylon thread
- Ruler
- A glass or other round container to mark circle on clay
- Rolling pin
- Flat 1" soft brush
- Round #10 soft brush
- Sand paper #0
- Baking sheet
- Tray
- Filling of pot ("soil") broken Terracotta tiles or all kind of Nuts (with the shell) is also nice.
Pattern
Steps:
Pot
- Take about 1/2 the clay and knead a bit like dough, Roll out with rolling pin to a rectangle , size about – 4 X 12", thickness 5/16" (0.8cm). Cut from it a rectangle of 3" X 11.5". (see pattern).
- Knead the leftover with some more clay to a square about 3.5". Mark a circle using the circle from the pattern or use a glass. The circle diameter is 3 5/16", thickness 5/16".
- Assembly of pot – Pull the react out, carefully, the rectangle from your work surface and wrap vertically around the circle base. Tighten contact between base and the surround. Try to make the overlapping straight. Waite about 5 minutes and with the help of the nylon threat separate the pot from the working table. Now move the pot to a tray covered with baking sheet.
Flower
- From the rest of the clay, roll out a rectangle. Size about 4X5.5" thickness 5/16". Place the pattern of flower and leaves and cut around it with a knife. If you can find a cutting mold in the right size at a craft or kitchen goods store, I recommend it for smoother borders.
- Assembly of flower: Take the bamboo screw and insert it into to middle of the leaves – do it gently the dough tends to tear. You should insert till you have about 2.5" left to insert the flower. Now insert carefully the flower. Put flat on the baking sheet to dry.
- Drying takes about 2 days. The clay is dry when it becomes white. When you see the clay is dry on 1 side turn the flower upside down to dry. Do the same with the pot.
- Before painting check the pot and flower. If there are rough edges or flows in the clay rub with the sand paper until surface is smooth. Dust it and clean a bit with wet cloth.
- Painting – With the flat brush paint the inside of the pot in any color you choose. Paint one side of the flower with a round brush. When it dries, paint the outside of the pot with flat brush in your choice of color and paint the other side of the flower. When color is dry you can paint the pattern on the pot with the round brush. Dots, stripes, whatever you like.
- When pot and flower are dry brush them with thin layer of polycyclic varnish. Repeat 2 or 3 times. Let dry before you apply a new layer. It takes about 2 hours but you should check the supplier instructions'.
- Assembly – fill the pot with your chosen filling and place the flower inside. Now you have a nice plant – no need to water this one!
- If you find out that its difficult for a child to make the pot, I suggest you buy a simple clay pot and paint it like instructed above.