This project was submitted by one of our readers, just like you.
Easy To Sew Removable Cushion Covers

Easy To Sew Removable Cushion Covers
"I’ve sewn tailored seat cushions before, with custom piping and hidden zippers, and let me tell you something. Unless you are an expert sewist, they can be tricky. That’s why, when my daughter-in-law asked me to make some bench cushions, I devised a new strategy for making easy-to-sew removable cushion covers that would still deliver tailored results. And I just love these! The foam is thick and the cushions are easily removed for washing. Check it out."
NotesFor more photos, see this tutorial on my blog.
Project TypeMake a Project
Time to CompleteIn an evening
Sewn byMachine

Materials List
- 3" thick foam
- home decor fabric
- sewing machine
Instructions
-
Don’t be lazy. If you want cushion covers that can be removed and washed (especially practical if you have pets), then don’t skip this step. You don’t want the covers to shrink with that first washing!
-
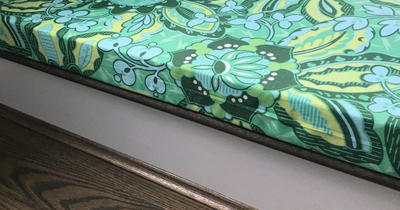
Mel wanted two cushions, each measuring 48″ x 16″ x 3″ thick. Yes, she’s a girl after my own heart – precise and organized! If you’ve never cut foam before, remember to use a serrated knife or better yet an electric carving knife.
-
Cut one piece of fabric for each cushion, using this formula to determine correct cutting size: 2(width) + 2(height) + 8 = WIDTH length + 2(height) = LENGTH For example, my foam measures 48″ x 16″ x 3″. Here is how I calculated the correct size to cut my fabric: 2(16) + 2(3) + 8 = 46″ WIDTH and 48 + 2(3) = 54″ LENGTH. Therefore, I cut a piece of fabric 46″ x 54″.
-
Next, press the fabric to remove wrinkles. For both long edges of the fabric, turn over about 2″ and stitch down, creating a hem.
-
Fold the fabric, with right sides together, so that the long edges overlap. Using a tape measure, adjust so that the folded width equals {2(foam height) + 2(foam width)} divided by 2. For example, see my calculation below for my cushion (yours will be different): (2 x 3) + (2 x 16) = 38 38 divided by 2 = 19 I suggest placing your folded fabric on an ironing board, measuring and pinning as you work. Once the fabric is folded to the correct width and pinned in place, stitch both ends closed. Reinforce by stitching over the seams a second time. To determine the finished length of the cover, use the following formula: foam height + foam length = finished length of cover. For example, for my cover I added 3 + 48 = 52 finished length.
-
Before turning the cover right side out, slip it onto the foam cushion. Pin corners as shown below. Remove and stitch. Reinforce seam with a second stitch; trim.
-
Stitch velcro tabs onto the cover, so once the cover is on the foam, the opening can be sealed. The best way to do this is to place the folded cover, right side out, onto the ironing board. Use measuring tape to ensure that the folded cover is the correct width (as determined in step 5). Then pin the two back overlapping pieces together at several places, marking where to sew the velcro tabs.
-
Now you are done! And wasn’t that a lot easier than adding zippers and piping? In case you are wondering, this adorable fabric I used is a home decor fabric by Amy Butler. I love her modern vintage prints!

Read NextEasiest Bag, Purse Or Pouch