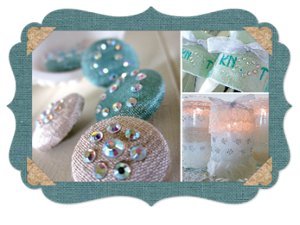
Buttons and Borders
Create customized borders, buttons, and more with the help of Craftwell and their Buttons and Borders tutorial. With this easy how-to guide, you'll learn how to use your eCraft machine to create beautiful embellishments for all your crafting needs.
Materials:
- Artistic Suite V6
- Dongle
- External Mouse
- eCraft Electronic Cutting System
- USB Memory Stick
- Template Material
- Backing Board
- Transfer Tape
- Assorted Sizes of Crystal AB
- Rhinestones
- Plastic Tray
- Positioning Brush
- Iron and Ironing Board
- Silicon Press Sheet
- Press Cloth or Handkerchief
Instructions:
-
Open Creative DRAWings 6 > Create New > Next .
-
Then Select Standard Normal Light > Next .
-
Select New Graphic > Finish.
-
Left click on the Create Shape to expand the selection. Select Create Ellipse.
-
Hold down the Control key at the same time you left click and pull a circle on the screen. This will create a perfect circle.
-
Select the circle. Adjust the Width to .375 (3/8”)
-
Change the Fill to None.e page.
-
Change the Line to Crystal.
-
Change the size to 10.
-
Select the Crystal tool. Adjust the size to 16. Place a crystal in the center of the circle to create a cluster.
-
File > Export > Crystals/Cutter.
-
Load the template material into the cutter and cut the template.
- NOTE: This is the perfect size for covering a 3/4” or 7/8” button form.
Once the crystal cluster is created, duplicate a number of clusters to create a border. The alignment tools keep everything level and evenly spaced! Here’s how:
-
Select All (Control A).
-
Right click on the cluster and select Group.
-
Change the Zoom to 100%. The screen will have a ruler at the upper edge to help us place our clusters of crystals.
-
Use Duplicate to add clusters. Create a row of clusters about 8” long.
-
Select All (Control A). Click on Align Bottoms.
- The clusters are now all in a straight row. Next, click on Equal Horizontal Spacing. This creates a perfectly spaced border of crystals, ready to export to the cutter.
But there’s more! We can use the same set of alignment tools to create a border with multiple rows by grouping our first row, and then using Duplicate to create more rows. Position the rows, and use Equal Vertical Spacing to perfectly space the wide border.
-
Load the template material into the cutter and cut the template.
-
We used clusters of crystals for the first two lessons, but there are other shapes that are beautiful as buttons and borders. For our third lesson, let’s create a small heart. Here’s how it’s done:
-
Our heart is drawn freehand. Select the Bezier tool. Click on the screen, creating a heart shape.
-
Right click when the shape is complete. Use the Edit Nodes tool, adjust the shape until you have the perfect heart. Size the heart to .50 in width. This combination of tools can be challenging, but practice makes perfect.
-
Change the Line to Crystals. Adjust the size of the crystals to 10.
-
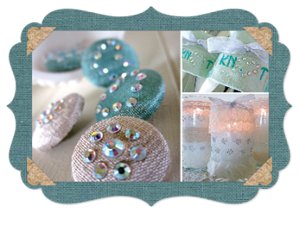
This is the perfect size for 7/8” button forms shown in our samples. It is also the perfect little heart accent as shown on the Sew4Home ‘Tie the Knot’ napkin wraps.
-
Just like the cluster, we can create borders by duplicating the heart motif and using the alignment tools. Or alternate the heart and the cluster for a more elaborate border.
- Export the file to the cutter. Be sure to check ‘As One Template’ because of the two sizes of crystals used in the design.
Applying Crystals:
-
Peel the template material from the backing & adhere to template backing. Notice that there are two sizes of holes in the template.
-
Place the template in a tray, pouring a generous amount of size SS 16 crystals over the template. Use the positioning brush to move the crystals from side to side over the template. The crystals position themselves in the larger template holes right side up.
-
Carefully lift the template from the tray and pour the remaining crystals back into their container. Place the template back in the tray.
-
Repeat the process with size SS 10 crystals.
-
Cut a piece of transfer tape the size of the template. Position the tape over the crystals and smooth in place. Gently lift the tape with the crystals adhered.
-
Position the transfer tape and crystals over the fabric.
-
Place the silicon pressing sheet on the surface of the Artistic Press, or if using an iron and ironing board, place the silicon sheet on the ironing board.
- Position the fabric with transfer tape and crystals on top of the silicon sheet, and cover with a press cloth or handkerchief. Apply pressure with the Artistic Press or iron. Heat for approximately 40 seconds.
Read NextButtons and Borders