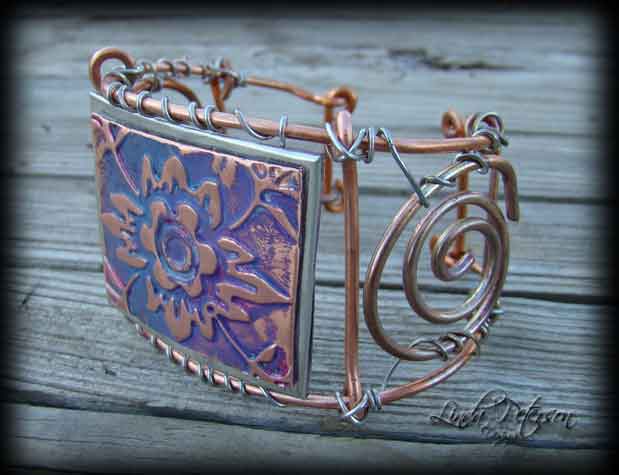
Copper Wire Cuff Bracelet
Create a unique copper cuff bracelet from AMACO, with copper wire and patina coloring. Silver wire wraps artfully around the bracelet and frames the copper and pewter embossed design. You cannot go wrong with this free-form design.
Materials:
- Rub-N-Buff® patina
- WireForm® Medium Copper Rods
- ArtEmboss® Pewter medium and Copper Light
- Pasta Machine
- Double Stick Tape
- Heavy Cardstock
- Non-Tarnish silver wire – 20 gauge
- Embossing folder (Cuttlebug fancy corners or pattern of choice)
- Scissors
- Round nose jewelry pliers.
- Pliers
- Alcohol Based ink – magenta or pink (Pinata ink by Jacquard was used)
- Makeup sponge
- Sanding block - fine
Instructions:
- Designers Note: You can not make a mistake by wrapping the silver wire to secure the rods. The free form wrapping just adds to the design.
- Center Medallion: Cut a piece of copper to fit inside the embossing template. Place thru the number #6 setting of the pasta machine to emboss. Cut out pattern into a square. Apply double stick tape to back side.
- Randomly daub alcohol ink onto surface. Apply a very small amount of Rub-N-Buff® to surface. You will notice that it blends with inks creating purple and turquoise patina colors. Lightly sand with sanding block.
- Measure the copper piece and add 1/4” to the width and height measurements.
- Cut this square out of heavy cardstock.
- Apply double stick tape to one side. Remove adhesive backing.
- Lay flat onto pewter. Cut out leaving a 1/4” border. Clip corners diagonally. Fold to edges to back side.
- Cut two pieces of silver wire 12”. Wrap silver wire around full length copper rod leaving 1” extensions at each end. Coil ends. Press silver wire ends to back side of metal medallion. Repeat for other side.
- Cut a piece of pewter to the same measurement as card stock. Apply to back. . Smooth edges with wooden stylus. Center copper design and adhere to front of pendant.
- Cut copper rods accordingly: Two 2 1/4”, two 1 3/4”, two 1 1/2”.
- Create loops at the ends of each rod.
- Thread 2 1/4” rod onto bracelet and secure with wire.
- Cut a full length rod in half. Coil. Attach to bracelet with wire.
- Thread on 1 3/4” rod, secure with wire.
- Add the remaining length rod. Create a loop at the end of the bracelet to secure the last rod.
- Repeat for other side.
- When finished, curve bracelet to fit wrist.
Read NextTree of Life Ornament or Pendant


Thanks for your comment. Don't forget to share!
annheineck
Jul 02, 2013
Vague instructions.. this would be great as a video tutorial. There are WAY too many instructions to understand what you are trying to explain.
zinnia
Jul 25, 2010
Would you be able to clarify some of the center medallion instructions? I don't understand what the embossing template is and what thickness should the copper plate be? It's confusing about using the cardstock and pewter. There's no mention of using ArtEmboss Pewter medium and Copper Light in the instructions. There's no mention of pewter metal in the materials. Removing adhesive backing from what? I also don't understand about clipping corners and folding to edges to back. Then there's mention later of cutting more pewter and applying to back. How do you adhere the wires and pewter? Just with double stick tape? Hope you can help!
Report Inappropriate Comment
Are you sure you would like to report this comment? It will be flagged for our moderators to take action.
Thank you for taking the time to improve the content on our site.