Daisy Design Cardigan
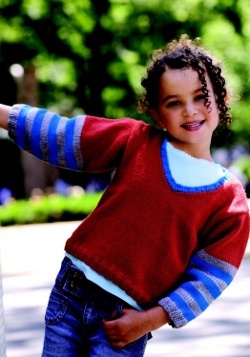
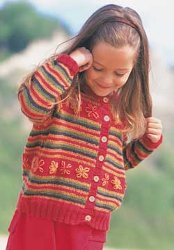
A beautiful striped cardigan from Patons with daisy embroidery, with perfectly rich colors for the Autumn season!
MATERIALS
- Patons Astra (50 g/1.75 oz)
- Main Color (MC) (Red)
- 3 3 4 5 balls
- Contrast A (Gold)
- 1 1 1 1 ball
- Contrast B (Dk Green)
- 1 1 1 1 ball
- Contrast C (Dk Grey)
- 1 1 1 1 ball
- Contrast D (Orange)
- 1 1 1 1 ball
- Knitting Needles: sizes 3.25 mm (U.S. 3) and 4 mm (U.S. 6) or size needed to obtain tension.
- St holder.
- 7 buttons.
SIZES - 4 6 8 1 0
Chest measurement
- 424 ins [ 61 cm ]
- 626 ins [ 66 cm ]
- 828 ins [ 71 cm ]
- 10 30 ins [ 76 cm ]
Finished chest
- 4 29 ins [ 73.5 cm ]
- 632 ins [ 81 cm ]
- 835 ins [ 89 cm ]
- 10 37 ins [ 94 cm ]
TENSION
22 sts and 30 rows = 4 ins [10 cm] with larger needles in stocking st.
INSTRUCTIONS
The instructions are written for smallest size. If changes are necessary for larger siz es the instructions will be written thus ( ).
BACK
With MC and smaller needles cast on 78 (86-90-94) sts.
1st row: (RS). K2. *P2. K2. Rep from * to end of row.
2nd row: P2. *K2. P2. Rep from * to end of row.
Rep last 2 rows (K2. P2) ribbing until work from beg measures 2 ins [5 cm] ending on a 2nd row and inc 2 (2-6-8) sts evenly across last row. 80 (88-96- 102) sts.
Change to larger needles and proceed in pat as follows:
1st row: (RS). With MC, knit.
2nd row: With MC, purl.
3rd row: With D, knit.
4th row: With D, purl.
5th row: With C, knit.
6th row: With C, purl.
7th row: With B, knit.
8th row: With B, purl.
9th row: With A, knit.
10th row: With A, purl.
These 10 rows form stripe pat.
Work a fur ther 10 rows stripe pat.
With MC, work 14 rows stocking st.
Beg on a 9th row, proceed in stripe pat until work from beg measures approx 8½ (9½-10½-11½) ins [21.5 (24- 26.5-29) cm] ending on a 6th (2nd-10th-8th) row of stripe pat.
Armhole shaping: Keeping cont of stripe pat, cast off 7 (8-9-10) sts beg next 2 rows. Dec 1 st each end of needle on next and following alt rows 0 (2-3-4) times more. 64 (66-70-72) sts.
Work 1 row even in stripe pat, ending on a 10th row of pat.
With MC, work 14 rows in stocking st, AT THE SAME TIME, cont dec 1 st each end of needle on next and following alt rows 4 (3-4-3) times more. 54 (58-60-64) sts.
Beg on a 9th row, proceed in stripe pat for 22 (22-24-26) rows, ending with RS facing for next row.
Shoulder shaping: Cast off 6 (7-7-7) sts beg next 2 rows, then 7 (7-7-8) sts beg following 2 rows. Leave rem 28 (30-32-34) sts on a st holder.
LEFT FRONT
**With MC and smaller needles cast on 38 (42-46-50) sts. Work 2 ins [5 cm] in (K2. P2) ribbing as given for Back ending on a 2nd row and inc 1 (1-1-0) st in center of last row. 39 (43-47-50) sts.
Change to larger needles and proceed in stripe pat as given for Back for 20 rows.
With MC, work 14 rows stocking st.**
Beg on a 9th row, proceed in stripe pat until work from beg measures approx 8½ (9½-10½-11½) ins [21.5 (24- 26.5-29) cm] ending on a 6th (2nd-10th-8th) row of stripe pat.
Armhole shaping: Keeping cont of stripe pat, cast off 7 (8-9-10) sts beg next row.
Work 1 row even in pat.
Dec 1 st at beg of next and following alt rows 0 (2-3-4) times more. 31 (32-34- 35) sts.
Work 1 row even in stripe pat, ending on a 10th row of pat.
With MC, work 14 rows in stocking st, AT THE SAME TIME, cont dec 1 st at armhole edge on next and following alt rows 4 (3-4-3) times more. 26 (28- 29-31) sts.
Beg on a 9th row, proceed in stripe pat for 6 rows, ending with RS facing for next row.
Neck shaping: Next row: Pat across 19 (21-21-23) sts (neck edge). Turn. Leave rem 7 (7-8-8) sts on a safety pin.
Dec 1 st at neck edge on next 4 rows, then on following alt rows 2 (3-3-4) times more. 13 (14-14-15) sts.
Work a further 7 (5-7-7) rows in stripe pat, ending with RS facing for next row.
Shoulder shaping: Cast off 6 (7-7-7) sts beg next row. Work 1 row even in pat. Cast off rem 7 (7-7-8) sts.
RIGHT FRONT
Work from ** to ** as given for Left Front.
Beg on a 9th row, proceed in stripe pat until work from beg measures approx 8½ (9½-10½-11½) ins [21.5 (24- 26.5-29) cm] ending on a 7th (3rd-1st-9th) row of stripe pat.
Armhole shaping: Keeping cont of stripe pat, cast off 7 (8-9-10) sts beg next row.
Dec 1 st at end of next and following alt rows 0 (2-3-4) times more. 31 (32- 34-35) sts.
Work 1 row even in stripe pat, ending on a 10th row of pat.
With MC, work 14 rows in stocking st, AT THE SAME TIME, cont dec 1 st at armhole edge on next and following alt rows 4 (3-4-3) times more. 26 (28- 29-31) sts.
Beg on a 9th row, proceed in stripe pat for 6 rows, ending with RS facing for next row.
Neck shaping: Next row: Slip first 7 (7-8-8) sts onto a safety pin. Rejoin yarn and pat to end of row. 19 (21-21- 23) sts.
Dec 1 st at neck edge on next 4 rows, then on following alt rows 2 (3-3-4) times more. 13 (14-14-15) sts.
Work a further 8 (6-8-8) rows in stripe pat, ending with WS facing for next row.
Shoulder shaping: Cast off 6 (7-7-7) sts beg next row. Work 1 row even in pat. Cast off rem 7 (7-7-8) sts.
SLEEVES
With MC and smaller needles cast on 34 (38-38-42) sts. Work 2 ins [5 cm] in (K2. P2) ribbing as given for Back ending on a 2nd row and inc 4 (4-8-8) sts evenly across last row. 38 (42-46-50) sts.
Change to larger needles and proceed in stripe pat as given for Back inc 1 st each end of needle on 7th and following 8th rows until there are 50 (56-62-68) sts.
Cont even in pat until work from beg measures 10 (11-12½-14½) ins [25.5 (28-32-37) cm] ending with RS facing for next row.
Shape top: Keeping cont of pat, cast off 3 (4-4-5) sts beg next 2 rows. Dec 1 st each end of needle on next and following alt rows until there are 24 (26-34-32) sts, then on every row until there are 10 (12-12-14) sts. Cast off.
Neckband: Sew shoulder seams. With RS of work facing, MC and smaller needles, K7 (7-8-8) from Right Front safety pin. Pick up and knit 14 (15-17- 18) sts up right front neck edge. K28 (30-32-34) from back st holder. Pick up and knit 14 (15-17-18) sts down left front neck edge. K7 (7-8-8) from Left Front safety pin. 70 (74-82-86) sts.
Beg on a 2nd row, work 7 rows in (K2. P2) ribbing as given for Back. Cast off in ribbing.
Buttonhole Band: With MC and smaller needles pick up and knit 74 (82-86-94) sts up Right Front edge between cast on edge and top of neckband.
Beg on a 2nd row, work 3 rows in (K2. P2) ribbing as given for Back.
4th row: (RS). Rib across 3 (4-3-4) sts. *Cast off 2 sts. Rib across 9 (10-11-12) sts (including st on needle after cast off ). Rep from * 5 times more. Cast off 2 sts. Rib to end of row. 7 buttonholes.
5th row: Rib, casting on 2 sts over cast off sts.
Work a further 2 rows ribbing. Cast off in ribbing.
Button Band: Work as given for Buttonhole Band, picking up sts along Left Front edge and omitting all reference to buttonholes.
Sew side and sleeve seams. Sew in sleeves. Sew buttons to correspond to buttonholes. Work lazy daisy embroidery on plain sections of MC as illustrated. Alternating flowers are worked with 1 strand of MC and 1 strand of D, or 1 strand of D and 1 strand of A.
Read NextEasy Kids Knit Poncho
Your Recently Viewed Projects
SylviaC
May 25, 2010
For craftlady64 - I hope this will help for copying for you. I see you left the query in January so I am 4 months late. When the whole set of instructions does not copy, I go to the picture I need, right click on it, select copy, then go back to the instructions already copied and right click again and select paste. Sometimes the pictures show up squished on the original copy, so I right click and copy, then without moving from that spot, right click and paste. The picture will possibly be huge and you just need to go to the corner and downsize it. There should be a square in each of the corners and when your mouse goes there it changes to an arrow, then you can resize the picture.
craftylady64
Jan 20, 2010
I WOULD LIKE TO KNOW IF ANYONE CAN TELL ME HOW TO PRINT THIS PATTERN AND GET THE PICTURES WITH IT. ALL I GOT WERE THE INSTRUCTIONS, AND NONE OF THE MEASURING GUIDES(PICTURES). I CLICKED ON PRINT, AND NOTHING HAPPENED.
Report Inappropriate Comment
Are you sure you would like to report this comment? It will be flagged for our moderators to take action.
Thank you for taking the time to improve the content on our site.

