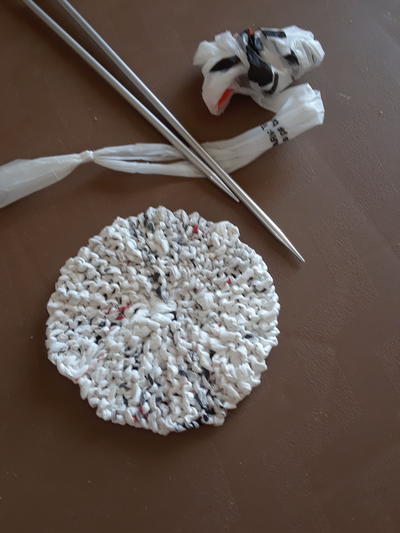
Knitted Plastic Bag Dispenser
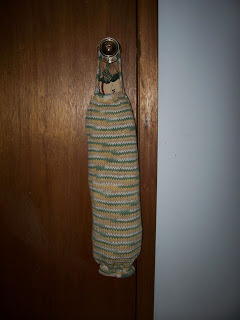
Save those extra plastic bags and keep them in a super handy spot for the future - all you need is this Knitted Plastic Bag Dispenser. Easy knitting projects are perfect for beginners, and this pattern really fits the bill. This quick and easy project is perfect for anyone who is knew to knitting. If you want to start with a fun and easy project, this is the perfect pattern for you. Soon you'll see that beginner knitting patterns don't have to be boring or impractical. Make one of these dispenser and hang it on a doorknob in your kitchen for easy access.
Primary TechniqueKnitting

Yarn Weight(4) Medium Weight/Worsted Weight and Aran (16-20 stitches to 4 inches)
Crochet HookG/6 or 4 mm hook
Knitting Needle Size7 or 4.5 mm
Materials:
- 50-100 g of WW yarn (I used leftover Acrylic/cotton in the picture so I am not sure if 50g would be enough)
- 2 hair elastics
- Size 7 double pointed needles (4)
- Size G crochet hook
- Yarn needle
Stitches used
CO – cast on
K – knit
BO – bind off
Abbreviations
SL ST – slip stitch
CH – chain
SC – single crochet
HDC – half double crochet
DC – double crochet
TC – treble crochet
Instructions:
Body
CO 60 stitches (or desired amount but it must be dividable by 5 if you want to do the crochet edge)
Separate stitches onto 3 needles and knit around using 4 needles
Knit until it reaches 18 inches in length (or desired length)
BO
Attach yarn to the end and SC around in each stitch on top of the hair elastic. BO Repeat on opposite end.
Handle
(I used crochet to do the handle, but I’m sure you could probably CO 4 stitches and knit it and then sew in the ends.)
Join yarn to where you want the side handle to start.
Row 1: Using crochet hook SC 4, CH1, turn
Row 2: SC in second ST from hook and remaining 2 ST, CH 1, turn
Repeat Row 2 until strap reaches 14 inches, or desired length.
Make sure the strap is straight and sew it to the other side using the yarn needle (or you could SC or SL ST it together but I thought it melded better by just sewing it)
Bottom (optional):
Row 1: SC around (60) SL ST to beginning SC.
Row 2: *CH 4, TC in next st, DC in next st, HDC in next st, SC in next st, SL ST in next st*. Repeat from * around. BO
Sew in ends.
Read NextBasic Cotton Dishcloth