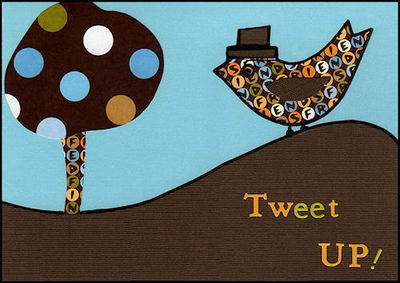
How To Create A Tweet Up Invite
Host your own "Twitter Meet Up" with this cute "Tweet Up" card designed by Alyice Edrich of The Dabbling Mum. Twitter has been a wonderful way to meet new people, to build business relationships, and to let the world know what you've been doing with your days. And as scary as our grandparents think it is, we've all met a Twitter friend or two in person. Heck, there are even "Twitter Meet Ups" happening all over the world. Now, you can host your own meet up with this cute "Tweet Up" card. Just remember to choose your guests carefully.

Materials:
- 1- Brown cardstock from the 8x8 Scrapbook Kits In A Stack
- 1- Blue cardstock from the 8x8 Scrapbook Kits In A Stack
- 1- Friends paper from the 8x8 Scrapbook Kits In A Stack
- 1- Polka dot paper from the 8x8 Scrapbook Kits In A Stack
- 7- Sticker letters from the 8x8 Scrapbook Kits In A Stack
- 1 - Sticker exclamation point from the 8x8 Scrapbook Kits In A Stack
- 1 - 5x7 Greeting Card with envelope
- 1 - Black marker
Tools:
- 1 - Double-sided tape or glue stick
- 1 - Scissors
Instructions:
- Cut the blue cardstock 5 inches high and 7 inches wide.
- Cut the brown cardstock 5 inches high and 7 inches wide.
- Cut the top of the brown cardstock in a curve, to create a hill.
- Cut a thin strip of the "friends" paper to create a tree trunk. (I cut mine approximately 3 1/3 inches tall and 1/4 of an inch wide.)
- Fold the blank greeting card in half.
- Place two strips of double-sided tape on top of the front of half of the card, then gently lay the blue cardstock on top of tape.
- Place a strip of double-sided tape on the back of the "friends" paper then adhere it to the blue cardstock. (I chose the left side of the hill because it was lower and left plenty of room for the tree top.)
- Place two strips of double-sided tape on the back of the brown cardstock (hill) and lay on top of the blue cardstock. (Your hill will cover part of the tree trunk; that's a good thing because it will look as though the tree is coming up from the ground.)
- Use your scissors to cut out the top of your tree. Don't sketch it and don't worry about creating little leaves and branches, just steady your scissors as you move the paper in a circular direction.
- Adhere the top of the tree to the tree's trunk with double-sided tape. Make sure to cover part of the trunk so that it appears to be going up into the tree top.
- Turn a piece of the "friends" paper over and draw an outline of a bird. Cut the bird, and adhere it to the blue cardstock. Make sure the bird's body does not touch the hill, leaving room will allow you to draw in some legs and feet.
- Draw a top hat and a single wing on the brown cardstock, cut them out, and adhere them to the bird's body.
- In the alphabet sticker page, you will notice that the letter "o" has a white center sticker. Instead of discarding it, use it for the bird's eye.
- Use a black marker to put a tiny dot in the middle of the bird's eye, then trace around the bird and the top hat. Add two legs and feet to the base of the bird's body, and draw a rim across the bird's hat. (I also traced the top of the hill, but you don't have to.)
- Grab the letters" t, w, e, e, t, u, p" and an exclamation point and write "Tweet Up!" on the front of the card, somewhere on the brown hill. (I chose to keep my words on the lower right side, but you could choose to use both sides, keeping the words on a single line.)
FTC Disclosure:
8x8 Scrapbook Kits In A Stack (Item SBK8Friend) and greeting card (Item 1103-66) was provided, free of charge, by Consumer Crafts.
Read NextHow To Create A Tweet Up Invite