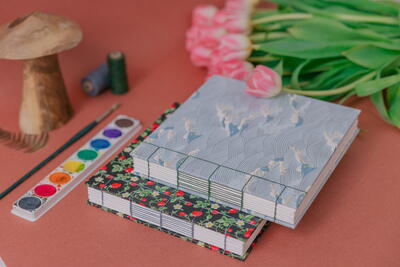
Lay-Flat Sketchbook

Books made with Coptic stitch binding have an exposed spine and can lay flat. I fell in love with the countless variations of the spine stitching that can be used to customize a book with this design. I’ve used Coptic stitch to make bullet journals, mixed media sketchbooks and watercolor sketchbooks. Coptic stitch is especially excellent for sketchbooks that hold wet media because they can lay flat during a painting session and allow for easy drying. This is one of the oldest binding methods originating from Egypt as early as 200 AD.
This project is a square sketchbook made with 100 percent cotton watercolor paper. Feel free to adapt these instructions with the paper of your choice or make a different size. You can use decorative paper or book cloth as the cover material.
Materials List
-
•2 square sheets of 7¾ x 7¾ inch (19.7 x19.7 cm) book board, 0.08–0.12 inch (2–3 mm) thick
•2 square sheets of 9¼ x 9¼ inch (23.5 x 23.5 cm) decorative paper
•2 square sheets of 7½ x 7½ inch (19 x19 cm) card stock paper, 80–100lb (216–270gsm) cover weight
•Waste sheets
•PVA glue
•4 sheets (22 x 30 inch [56 x 76 cm]) of watercolor paper
•Strip of stiff paper cut to 7½ inches (19 cm) in length and 2–3 inches (5–8 cm) in width
•Waxed linen thread, any gauge
-
Tools
•Pencil
•Glue brush
•Bone folder
•Utility knife
•Metal ruler
•Cutting mat
•Awl
•Scissors
•Needle, curved needle preferred
Instructions:
Making the Covers
-
Start by using a pencil to mark the direction of the paper grain on the sheets of book board, decorative paper and card stock endpaper. Draw an arrow pointing to the head of the book on the back side of all six pieces of cover material. When the papers are glued together, be sure to match the paper grain going in the same direction to prevent warping and to ensure that the covers remain flat.
-
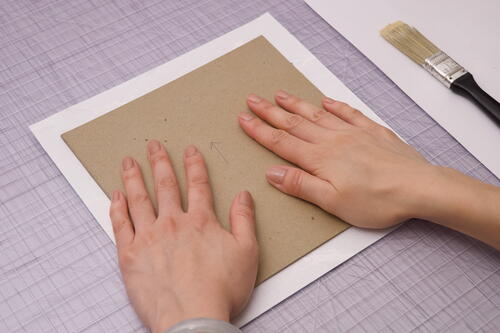
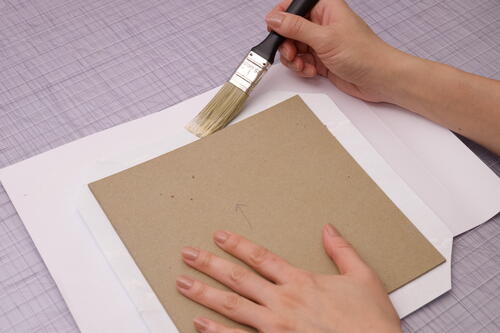
Let’s cover the book boards with decorative paper. Lay out a waste sheet on your workspace and grab the first book board. With a glue brush, spread a thin layer of glue on the front side of the board (the side without the arrow). Match the paper grain by ensuring the arrows of both pieces point in the same direction and place the board in the center of a sheet of decorative paper so that there is an even trim of paper around the edges. Press down gently, then flip the cover over so that the decorative side is facing up.
-
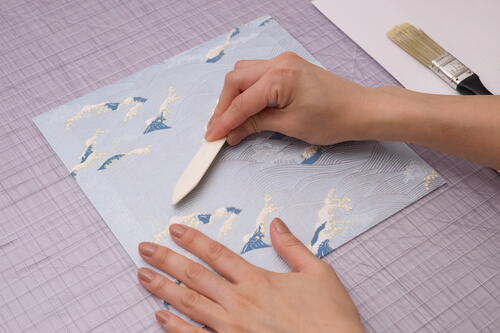
Rub on the decorative paper using the length of a bone folder with medium pressure. Gently rub outward from the center to smooth out any bubbles or wrinkles. You can also use your fingers and palms to press out the bubbles.
-
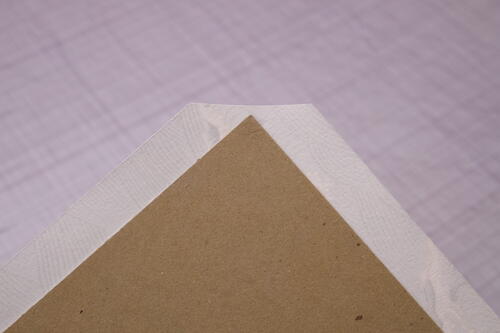
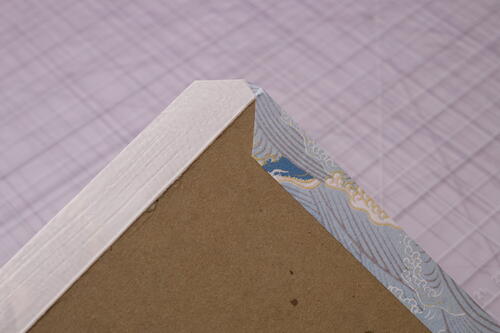
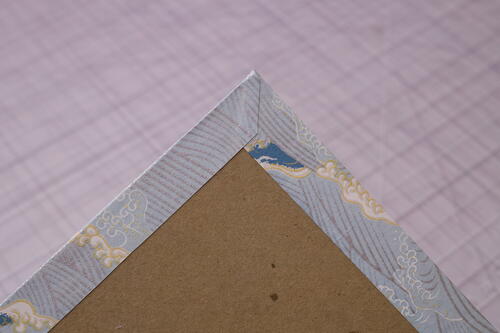
Flip the cover over. Cut each corner of the decorative paper at a 45-degree angle, leaving about 1/8 inch (3 mm) of excess. This tiny space should be slightly wider than the thickness of the board, and is important for the next step of neatly wrapping the cover material around the book board, also known as turn-ins.
-
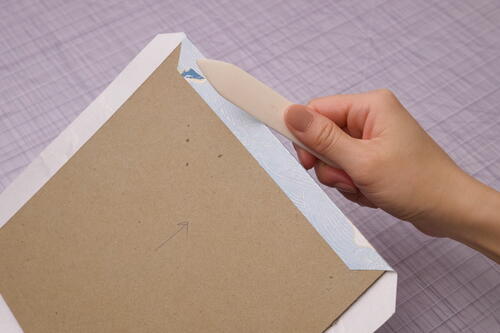
Starting at the top edge of the cover, brush a thin layer of glue onto the tab of decorative paper. Wrap the tab around the board and press firmly throughout. Smooth out the glued tab with a bone folder. Repeat for the tab on the opposite side of this cover.
Note:
When decorative paper is glued onto one side of book board, the board will start to bow outwards due to paper pull. Generally, gluing endpapers on the other side should balance out the pulling force on the book board,straightening it out when it's dry. -
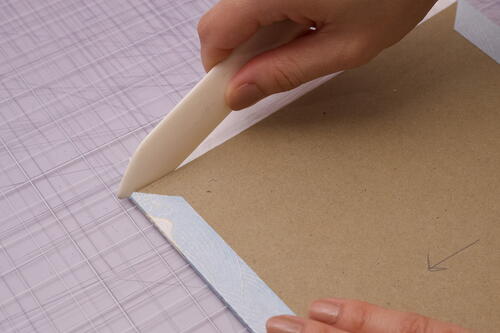
Let’s turn in the side tabs. Brush glue onto one of the remaining two tabs. Use the bone folder to tuck in and press the corner bits flat. Wrap the tab over the book board’s edge. Repeat for the last side tab.
-
Cover the other book board with decorative paper by following steps 2 through 6.
-
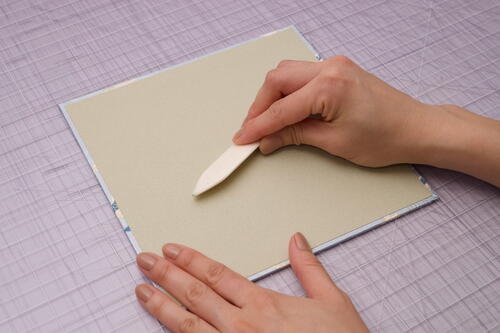
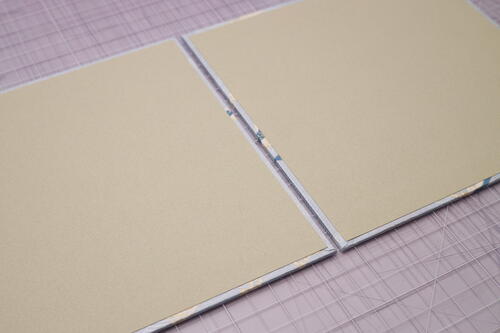
Finish the covers by gluing the card stock endpapers onto both boards. Remember to match the grain direction with the arrows pointing in the same direction. Rub them on with the bone folder from the center moving outward. Lay the covers flat to dry. Alternatively, you can lightly press the boards with weights on top to ensure they dry flat.
Preparing the Signatures
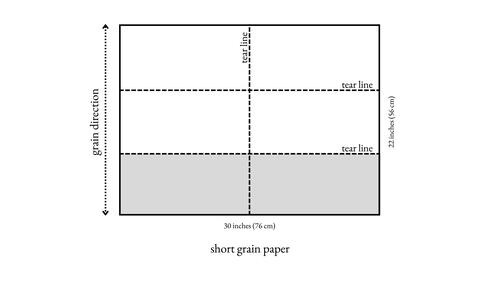
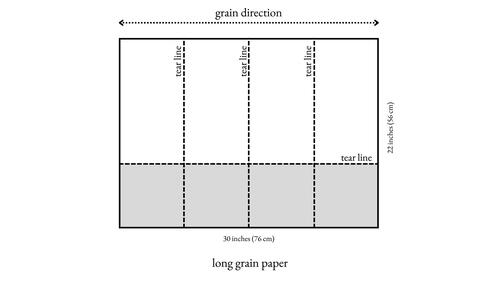
To make this sketchbook, I made eight signatures by tearing four 22 x 30–inch (56 x 76–cm) sheets of100-percent-cotton cold-press water-color paper by Fabriano® Artistico, which has a short grain running widthwise. Each signature consists of two 7½ x 15–inch (19 x 38–cm) sheets folded in half. The 100 percent cotton watercolor paper tears nicely, and the torn page edges are a beautiful feature for the sketchbook. I’ve included instructions for tearing long-grain paper as well. The grain will determine how the paper will be torn and folded for the signatures of the book. If you prefer straight edges, cut the paper with a utility knife.
-
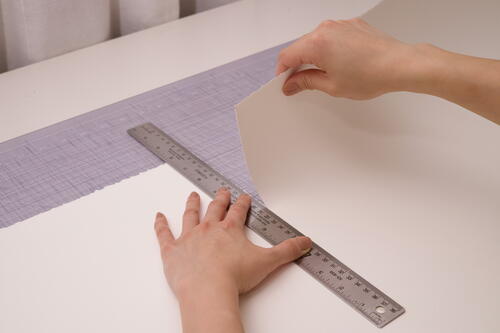
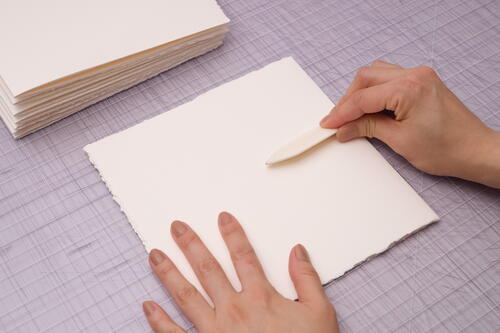
With a pencil, mark the halfway point on the 30-inch (76-cm) edge of the watercolor sheet and draw a line down the middle.
Note: some papers are manufactured slightly longer than 30 inches (76 cm), so the halfway mark may not be exactly at 15 inches (38 cm). Hold the ruler down firmly with your non-dominant hand, being careful not to shift the ruler or paper, and tear the paper against the metal edge with your dominant hand.
Time-Saving Tip:
If you have a large cutting mat with grid lines, you can use the lines as a guide to tear the paper. Measure and mark where you’d like to tear and line up the long edge of the sheet to a horizontal line on the cutting mat. Line up the mark and the edge of the ruler along a vertical line. Use the top 3 inches (7.6 cm) of the ruler to match the vertical line of the cutting mat. Tear the sheet along the line against a metal ruler. -
Short grain paper: Stack the two half sheets together and along the 22-inch (56-cm) edge and measure two points: 7½ inches (19 cm)and 15 inches (38 cm). Mark these points and draw tear lines along the width of the top sheet. Tear both sheets together along these lines with the metal ruler. You should now have four sheets of 7½ x 15–inch (19 x 38–cm) paper and two sheets of 7 x 15–inch (17.8 x 38–cm) paper.
Long grain paper: Stack the two half sheets together and along the15-inch (38-cm) edge, measure and mark the halfway point. Draw a tear line along the length of the sheet. Tear both sheets together along this line with a metal ruler. You should have four sheets of 7½ x 22–inch (19 x 56–cm) paper. Tear the sheets two at a time, to a length of 15 inches (38 cm). -
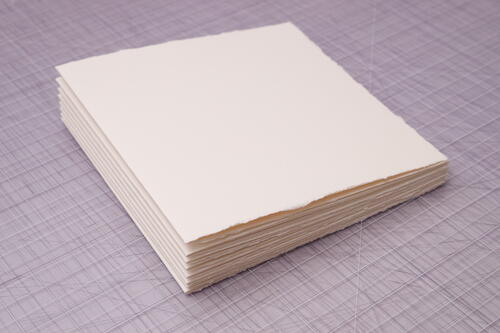
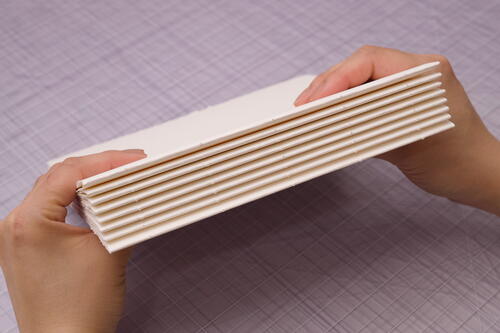
Take a stack of two 7½ x15–inch (19 x38–cm) sheets and fold them in half together. Crease the fold with the bone folder. This is your first signature. Make a second signature with the remaining two 7½ x15–inch (19 x38–cm) sheets.
-
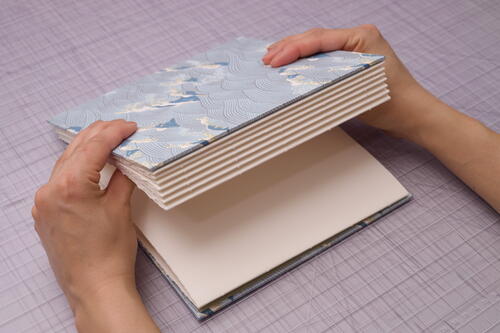
Repeat steps 1 through 3 with the remaining three watercolor paper sheets to create eight signatures in total. Stack all the signatures together and place them in between the front and back covers.
Tip:
Press the signatures under weights to flatten the folds further.
The sketchbook has all its main components. While the covers and signatures are still loose, flip through each piece and make sure the positioning is correct and desirable. For example, ensure the patterns on the covers are upright when flipping the book from front to back. From this point on, keep all of the pieces together and in order as you move on to punching the holes and sewing.
Punching the Holes
-
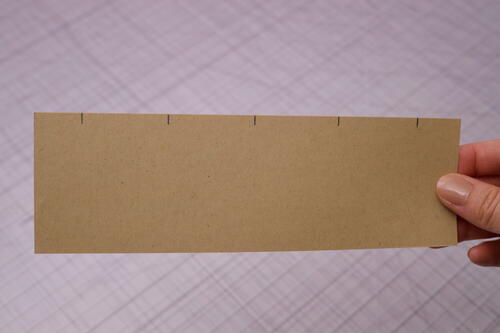
The strip of stiff paper, which is the same length as the signatures, will be your guide for punching holes. Measure and mark ¾ inch (1.9 cm) on the long edge from the left and right sides. Then mark three more points spaced 1½ inches (3.8 cm) apart in between the two end points for a total of five marks.
-
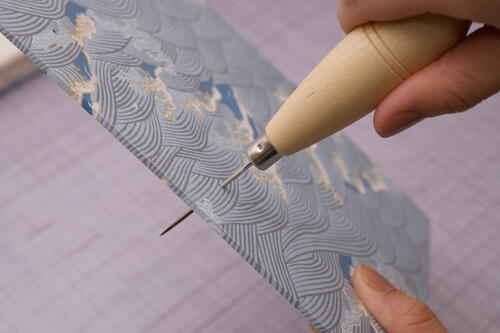
Working on the cutting mat, open the top signature and place the stiff paper guide up against the fold, or the valley, of the signature. Hold the awl at a 45-degree angle and punch holes through the fold at each point marked on the guide. Pierce the paper until the needle tip is visible on the other side and do not enlarge the holes. Repeat this step for all eight signatures. Hold all the signatures together and check that the holes are aligned.
-
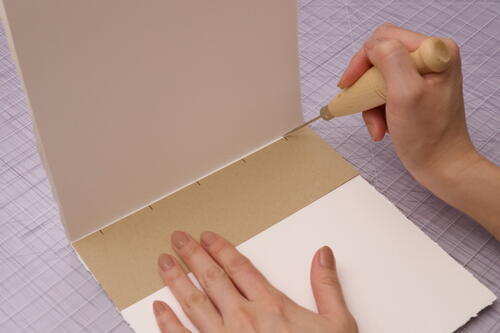
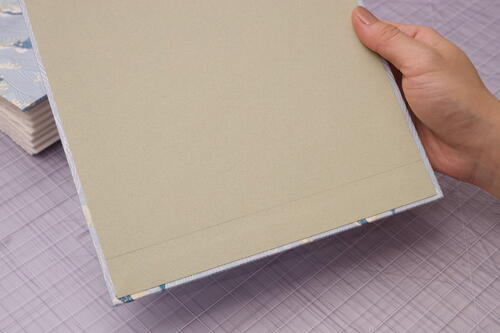
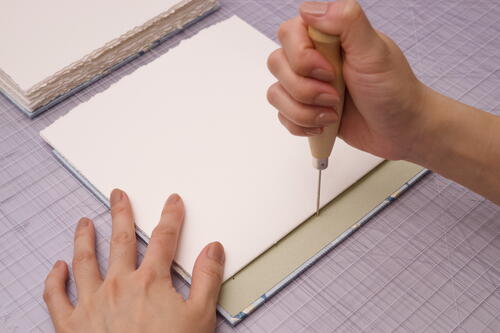
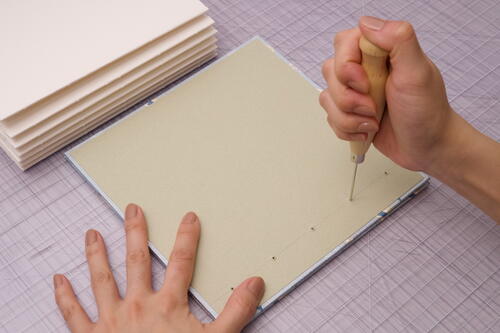
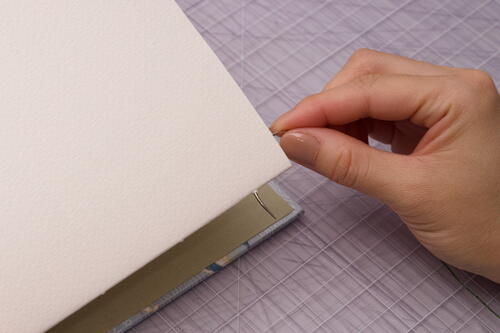
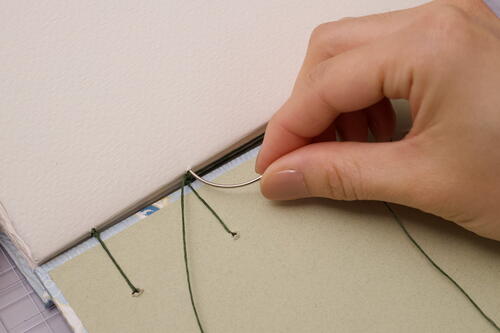
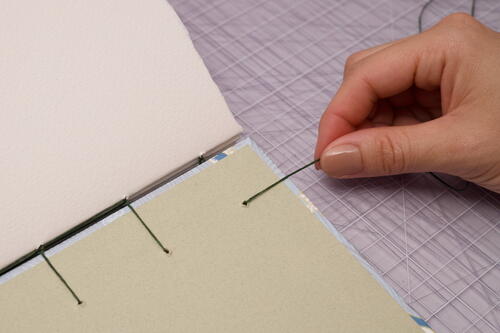
Draw a light pencil line across the back cover 1 inch (2.5 cm) from the spine edge of the board. Line up the bottom signature with the pencil line and center the signature between the head and tail edges of the cover. Using the awl, punch holes into the cover by following the holes of the signature. Since the book board is thick, you’ll have to use some muscle to twist the awl into the cover to create the holes. Push the awl from the front side to the back side of the cover, so that the extra board material will bulge on the inside.
-
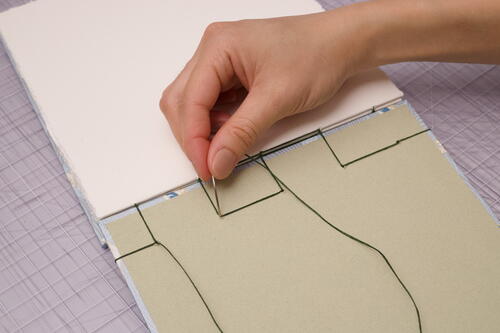
To create holes in the front cover, slide the front cover under the back cover, so that their decorative sides are facing one another and the spine edges are on the same side. Make sure all of the edges are flush. Mark the holes on the front cover by punching through the holes you made in the back cover with the awl. Twist the awl through all five holes of the front cover.
-
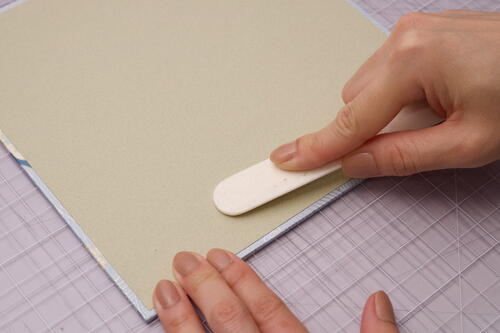
The cover holes may have some bulging from the board material being pushed through. With one end of the bone folder, rub and press the bulges flat so that the inside covers are more aesthetically pleasing. Erase the pencil marks.
To prepare for sewing, assemble all the pieces of the book together in the desired order, checking to make sure all of the holes line up vertically across the spine.
Sewing - Coptic Stitch Binding
You are now ready to sew! The book will be sewn from back cover to front cover, and bottom to top. Each hole in the signatures and covers will now be referred to as a sewingstation. Sewing stations are numbered 1 to 5 going from left to right.
-
Place the book on the desk with the spine facing you. Measure the waxed linen thread to ten times the length of the book and cut with scissors.
-
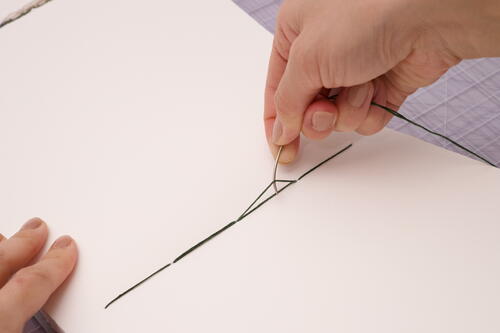
Tie a double overhand knot on one end, and thread the other end through a curved needle.
-
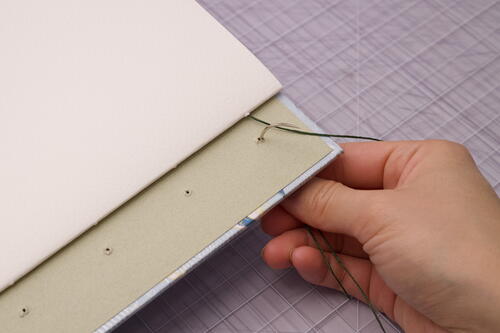
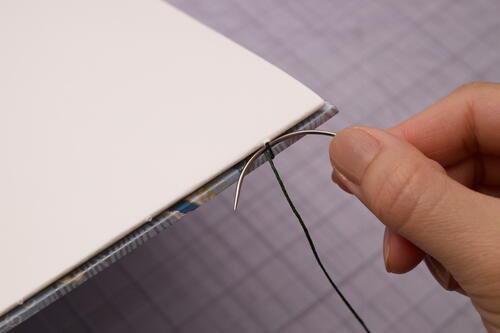
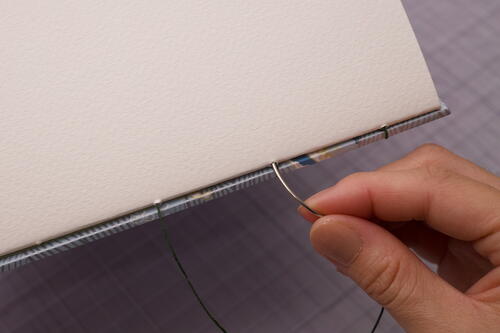
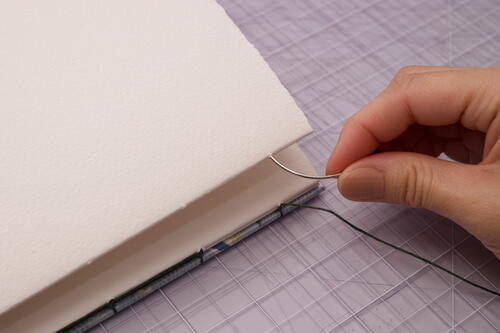
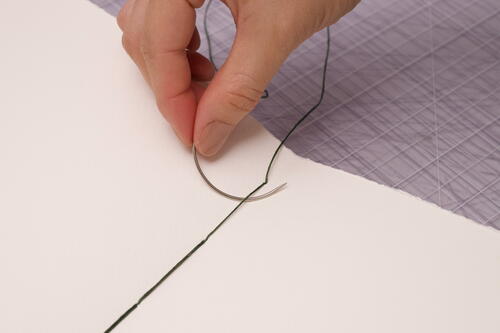
Pick up the front cover and seven signatures and flip them over in front of you. This is important because it is easy to mix up the alignment of the holes if the signatures are placed randomly. You will work on the back cover and remaining signature first, then add new signatures as you go along, ending with the front cover. With your needle, starting from the inside of the signature, sew out through the 5th (rightmost) station and pull the thread all the way to the knot.
-
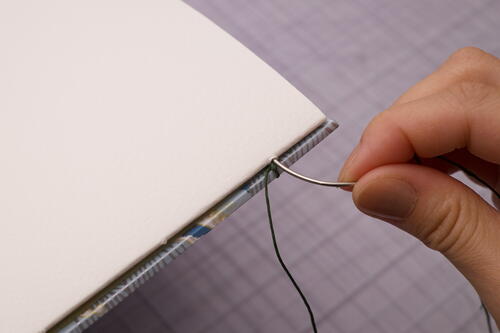
Sew up through the adjacent hole in the cover starting from the outside. Pull the thread taut, which will line up the signature with the cover. Your working thread should be on the left of the vertical stitch you just made. Hold the book firmly together with your non-dominant hand to prevent excessive shifting.
-
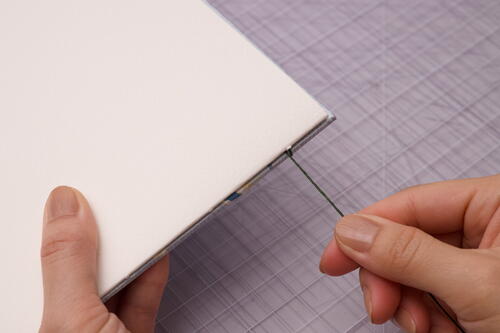
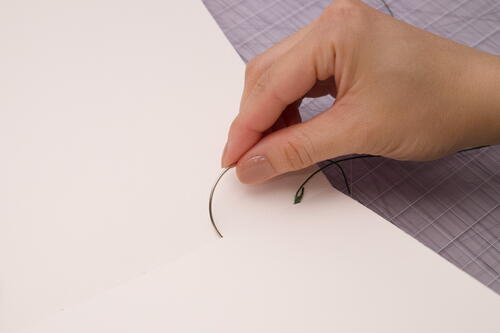
Sew behind the vertical stitch, bringing your needle from right to left in the space between the cover and signature. Pull taut.
-
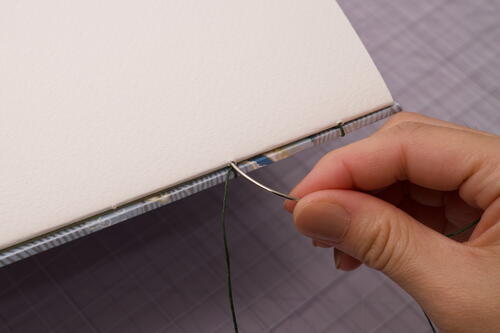
From the outside, sew back into the 5th sewing station of the signature and then come back out through the 4th station.
-
Repeat steps 4 and 5 with station 4. Sew back into station 4. Your needle should now be on the inside of the signature.
-
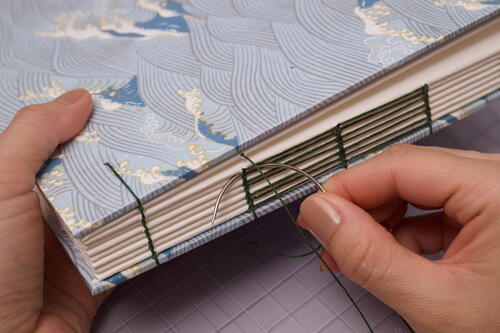
Now we’re going to create the ladder stitch aesthetic on the mid-spine. Sew out through station 3, then in through station 4, and back out through station 3. For this sketchbook, you’re going to make a ladder stitch between sewing stations 3 and 4, and stations 2 and 3 on each signature.
-
Repeat steps 4 and 5 for sewing station 3. Sew back into station 3. Create another ladder stitch by sewing out through station 2, then in through station 3, and back out through station 2.
-
Continue sewing on the cover by repeating steps 4 and 5 for station 2. Sew back into station 2 and then come back out through station 1. Repeat steps 4 and 5 for station 1. Your needle should now be on the outside of station1.
-
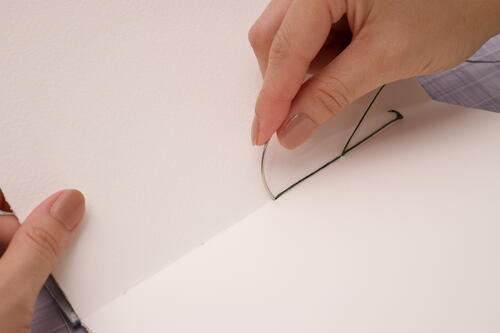
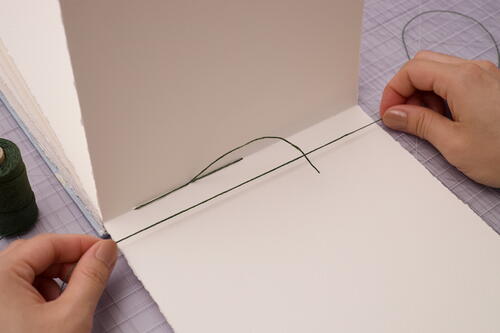
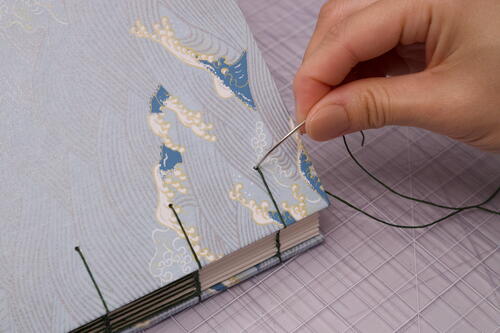
To add a new signature, flip the next signature from the stack onto the working book and match the alignment of the sewing stations at a glance. Starting from the outside, sew into station 1 of the new signature. Hold the book firmly together with your non-dominant hand to prevent excessive shifting.
-
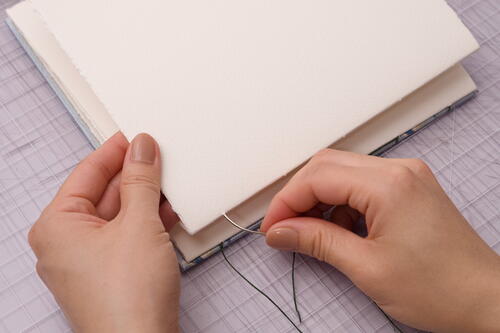
Sew out through station 2. Loop your needle behind the stitch connecting the cover and the 1st signature. You may have to open the book slightly to make room for your needle. Make sure you are not sewing under the stitch that attaches the back cover. Pull taut, then sew back into station 2.
-
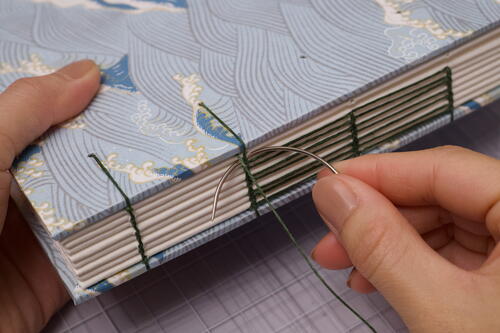
Create a ladder stitch by sewing out through station 3, then in through station 2, and back out through station 3. Loop your needle behind the stitch connecting the cover and the1st signature and pull taut. Sew back into station 3.
-
Create another ladder stitch by sewing out through station 4, then in through station 3, and back out through station 4. Loop your needle behind the stitch connecting the cover and the 1st signature and pull taut. Sew back into station 4. Your needle should now be on the inside of the signature.
-
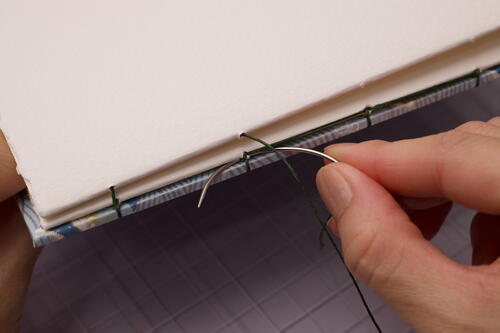
Sew out through station 5 and create a kettle stitch with the stitch directly below. For Coptic books, make a kettle stitch when you reach the end of every signature. To add odd-numbered signatures, start in sewing station 5 and end at station1.
-
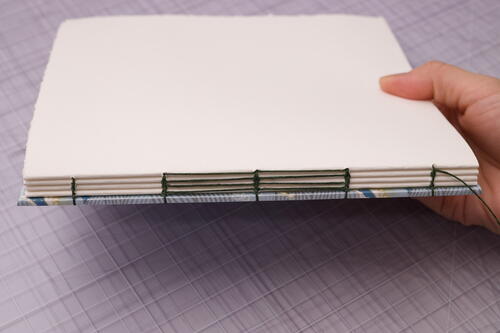
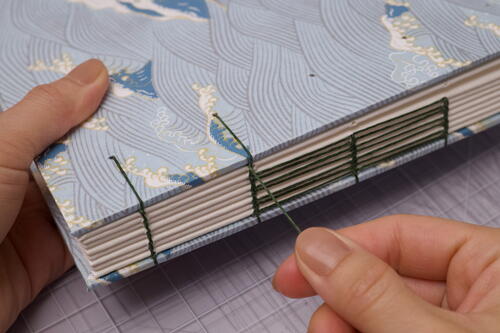
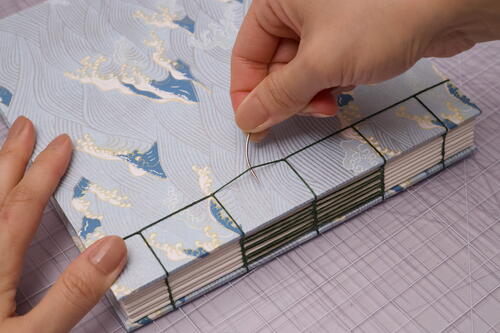
To add even-numbered signatures, start in sewing station 1 and end at station 5. Create ladder stitches between stations 2 and 3, and stations 3 and 4. Continue to add new signatures until you've reached the last one as that signature will be sewn along with the front cover. Be sure to loop stitches directly below the new signature. You’ll start to see vertical chains form on the 3rd and subsequent signatures.
Note:
After finishing signature 4, you will be running low on thread. When you’re down to your last few inches of thread (minimum 2 inches [5 cm]), make sure the thread is on the inside of a signature, and somewhere in between sewing stations 1 and 5. Measure and cut another piece of thread that is ten times the length of the book. Connect the ends of the old thread and the new thread together with a weaver’s knot.
Tip:
You can increase thread tension at any point of the sewing by using your needle to pull the previous stitches taut from inside the current signature you're working on. Be sure to not pull the thread with enough force to rip the paper along the fold. Coptic book spines are naturally slightly loose, and the stitching should allow the spine (the folded edges of the signatures) to be aligned and square. If the spine is curved inward, the sewing tension is too tight. -
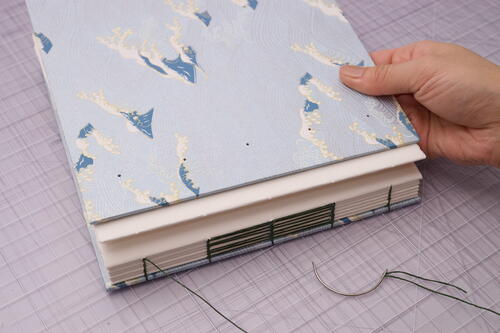
After you finish sewing on the 7th signature, add the final signature and front cover to the book. It’s tricky to get the thread tension right at this next stage, so take your time and remember to not over-tighten stitches.
-
Sew down through station 1 of the cover from the outside. The thread should be on the left side of the new vertical stitch. Pull the thread taut while aligning the spine. Loop your needle behind the stitch between the 7th and 8th signatures.
-
Now sew into station 1 of the 8th signature, then out through station 2. This stage requires some coordinated handling of the loose pieces with your non-dominant hand while you sew.
-
Loop your needle behind the stitch connecting the 6th and 7th signatures and then sew the needle down through station 2 of the cover. Pull the thread through the spine on the left side of the stitch and close the cover. Pull taut while ensuring the spine remains in alignment.
-
Loop your needle behind the stitch connecting the 7th and 8th signatures and sew back into station 2 of the 8th signature.
-
Create a ladder stitch by sewing out through station 3, then in through station 2, and back out through station 3. Repeat steps 20 and 21 for station 3. Your needle should now be on the inside of the signature.
-
Create another ladder stitch by sewing out through station 4, then in through station 3, and back out through station 4. Repeat steps 20 and 21 for station 4, then come back out through station 5. For station 5, repeat step 20 only. Your needle should now be on the inside between the cover and 8th signature.
-
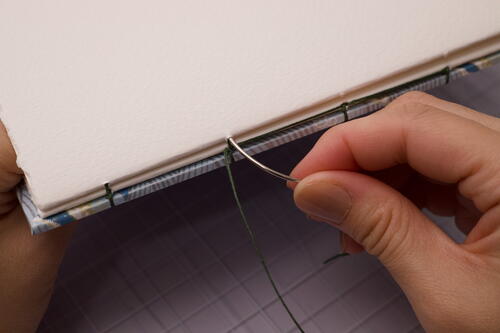
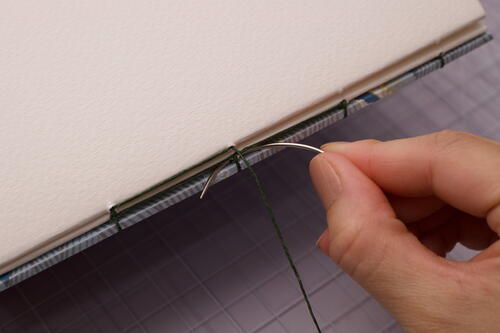
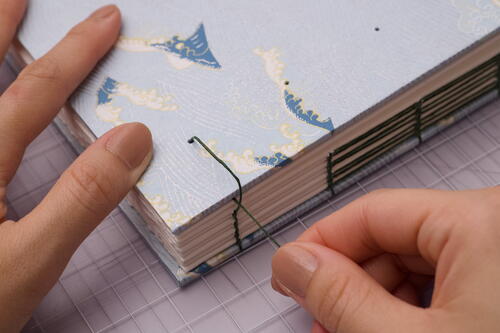
For this step you’ll be working with the stations on the cover to create the decorative stitching that resembles stab binding. Pull the thread to the right-side edge of the spine, bring it around to the front and sew back into station 5. Sew out through station 4, in through station 3, out through station 2, and in through station1. Bring the thread up over the top edge of the book and back in through station 1. Weave through all sewing stations until you are on the inside of station 5.
-
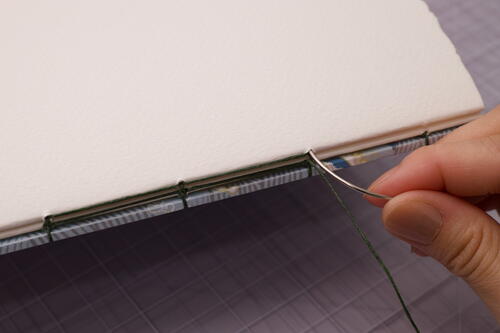
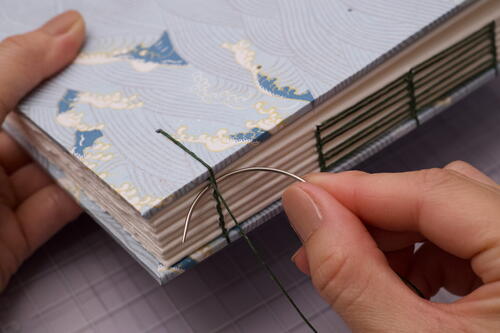
Bring the needle through the spine on the left side of station 5’s stitch. Create a kettle stitch with the stitch connecting the 7th and 8th signatures and sew in through station 5 of the 8th signature.
-
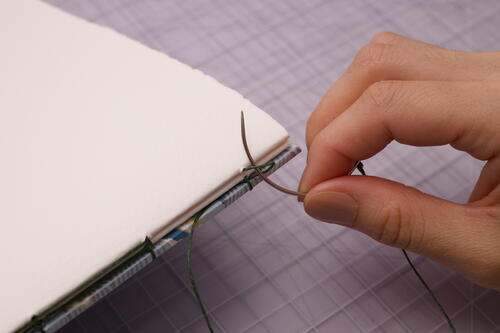
Using your needle, pull the decorative cover stitches taut starting with the stitch wrapping the bottom edge of the cover, then pull the stitch between stations 3 and 4, then between stations 1 and 2, then the top edge, then between stations 2 and 3, then between stations 4 and 5, then the stitch at station 5 on the inside cover, and finally pull the working thread on the inside of the 8th signature.
Note:
You may have to temporarily thread the needle for this step. -
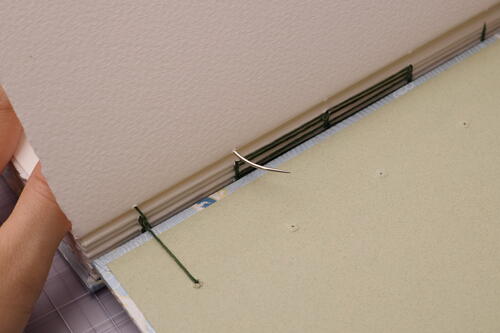
With the book open to the middle of the 8th signature, rethread the needle and bring it under the stitch between stations 4 and 5. Tie a half hitch knot through the loose loop you just created. Make one more knot like this and pull taut. Cut the excess thread.
-
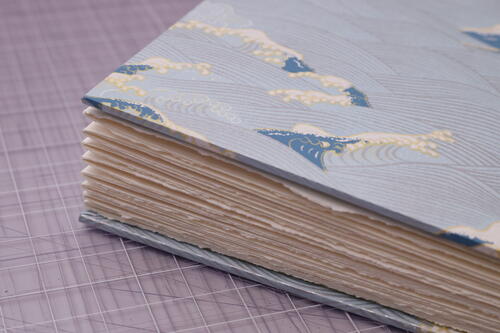
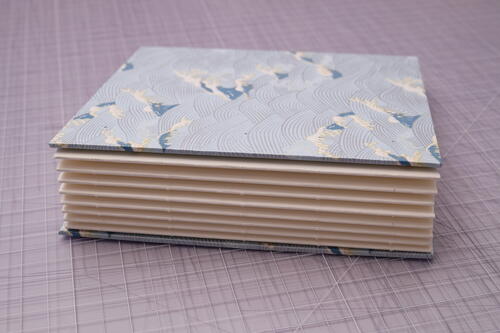
Close the book and admire your work! Check your thread tension. If it’s too loose, you may need to tighten more often as you sew. With the right amount of tension, it is normal for the book to not close completely as the sewing is still fresh. You can weigh down or lightly press your book for at least half a day so that the binding can relax before using it. The binding will also relax naturally as the book is used over time. With any exposed spine bindings, it is also normal for the signatures to shift or have some wiggle room. Even if the binding loosens, the book will not come apart if you used strong thread.
-
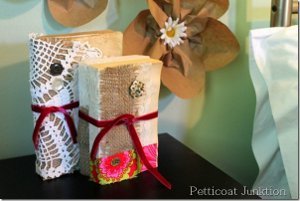
Closure option:
I like to use a journal band to wrap the book. It’s a great way to complete the book design and provide extra support for the spine stitching.
Credit:
Reprinted with permission from Handmade Books at Home by Chanel Ly. Page Street Publishing Co. 2023. Photo credit: Chanel Ly.

Read NextSpace Mini Journal