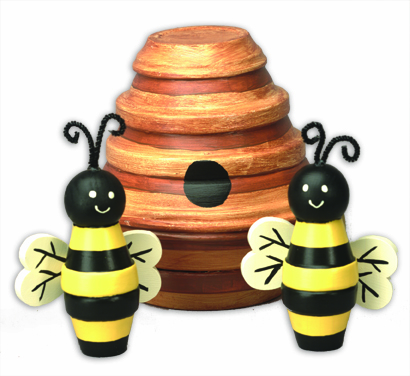
Bees and Hive Outdoor Decor
Add a bit of whimsy to your garden, patio or outdoor decor with this painted bee hive and bees set. This is an easy painting project that kids can help create.
Materials:
DecoArt Products Required
Patio Paint
- DCP01 - Pinecone Brown
- DCP15 - Daisy Cream
- DCP21 - Wrought Iron Black
- DCP28 - Fiesta Yellow
Supplies
- Foam plate
- 3/4" to 1" wide flat brush
- 6 or 1/2" flat brush
- Liner brush
- 1-1/4", 3/4" and 3/8" round foam pouncer brushes
- E6000 or other industrial strength craft adhesive
- Lo-temp glue gun
- Black chenille stems
- 1-1/2" wooden ball (one for each bee head)
- 2" wooden hearts (two for each bee)
- 3" terra cotta saucer
- 4" terra cotta saucer
- Two 5" terra cotta saucers
- Two 7" terra cotta saucers
- Two 1-1/2" high pots with 1-1/4" rims (for each bee)
Instructions:
BEEHIVE:
1. Using adhesive, glue rim of one 5" saucer to bottom of one 7" saucer. Glue rims of two 7" saucers together to complete beehive base.
2. Glue rim of remaining 5" saucer to base section; glue rim of 4" saucer to bottom of 5" saucer. Glue rim of 3" saucer to bottom of 4" saucer. Allow adhesive to dry thoroughly before painting.
3. Basecoat beehive Daisy Cream; allow paint to dry after each coat.
4. Using 1/2" flat brush and thin coat of Pinecone Brown, paint stripe around beehive just below rims of top four saucers. Paint stripe around rim of bottom saucer; allow paint to dry after each coat. Repeat to apply second thin coat of paint on stripes.
5. Use widest brush to paint coat of Pinecone Brown over beehive and allow to dry.
6. Use large pouncer brush and Wrought Iron Black to paint hole for beehive; allow paint to dry.
BEE:
1. Use adhesive to glue rims of two pots together; glue wooden ball to center bottom of one pot. Allow adhesive to dry thoroughly before painting.
2. Use 1/2" flat brush and Daisy Cream to paint all sides of wooden hearts; allow paint to dry. Use liner brush and Wrought Iron Black to paint wing details on hearts and allow to dry. Set wings aside.
3. Use wide brush and Fiesta Yellow to paint bee body; allow to dry between coats.
4. Use 1/2" flat brush and Wrought Iron Black to paint wooden ball head on each bee. Paint stripe around body on upper pot above rim, paint rim and bottom 1/2" of base pot. Allow all to dry.
5. Use end of brush handle dipped in Daisy Cream to paint eyes; use liner brush to paint smile. Allow to dry.
6. Cut 4" length of black chenille stem and fold in half; use lo-temp glue gun to glue fold into hole at top of head for antennae. Use fingers to form spiral ends on antennae.
7. Use lo-temp glue gun to glue wings at back of bee body.
For more great garden crafting ideas, click here for our garden crafts eBook!
Read NextRobin’s Egg Painted Rock Magnets
Your Recently Viewed Projects


Thanks for your comment. Don't forget to share!
SmartMomsSavingMon ey
Apr 17, 2013
Super cute! I am going to try this with my grand-daughter soon, she loves bumble bees. :)
Betson
Jun 17, 2010
Click on Garden and Outdoor and scroll down to see pic. It's cute! great project for the grands.
memaw
May 30, 2010
Still not able to see the close up pic of the bee and hive.. Any help would be appricated
Betty Boop
May 01, 2010
This site for the bee hive still isn't working. My son owns his business in pest control and I thought this would be nice for his yard. Also seen a crochetd bee on the site. Betty
Crafter 9053922
Apr 21, 2010
The picture of the bee hive craft is not showing up. Please fix. Thanks, Jane
Crafter 16201
Apr 20, 2010
I couldn't see the picture of the bee and hive craft , can you help me. Thanks, Nancy
Report Inappropriate Comment
Are you sure you would like to report this comment? It will be flagged for our moderators to take action.
Thank you for taking the time to improve the content on our site.