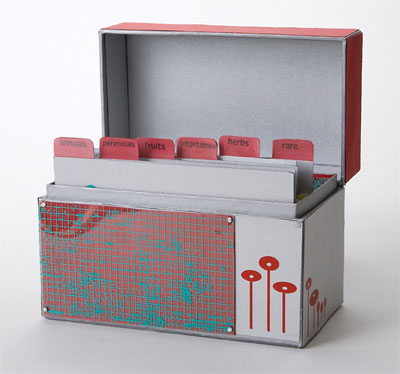
How to Organize Seeds
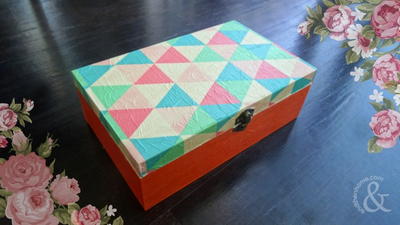
Create a cute, garden-themed box in which to organize seeds with tabbed dividers, from C&T Publishing. Gardeners can create sections for fruits, vegetables, herbs, perennials, annuals and more. You can also add magazine clippings to the different sections.
Materials:
- Bazzil Basics tomato classic texture 12″ × 12″ cardstock
- 3-4 Bazzil Basics platinum metallic texture 12″ × 12″ cardstock
- Sakura Pen-touch™ Calligrapher 5.0mm Line in Silver
- Sakura Pen-touch™ Fine Point 1.0mm in Silver
- Ready-to-Go!® Blank Board Indie File Box with Tabbed Dividers
- Hambly Mini Graph 12″ × 12″ Teal Blue Overlay
- Hambly Vintage Plaid 12″ × 12″ Orange Ink on Lagoon Blue Metallic Paper
- Mod Flowers teal blue rub-ons
- Mod Flowers red rub-ons
- Beacon Adhesives Gem Tac
- Beacon Adhesives Zip Dry
- 11 round crystal rhinestones, 3mm
- Toothpick
- Craft stick
Instructions:
- Following the instructions for using the Sakura metallic marker, ink every edge and corner on the outside of the Indie File Box, including the top edges, bottom edges, side edges, back edges, and the seam on the back that connects the box lid with the base. Make these lines at least 1/4″ thick. Where the surface of the lid top meets the surface of the lid back, make your line 1/2″ thick from the edge. Also use the Sakura metallic marker to paint the white ribbon silver. Wait a few minutes for the ink to dry.
- Cut the following pieces of paper:
Silver cardstock:
2 pieces 2 7/8″ × 6 5/8″ for the front and back of the base
1 piece 3 1/2″ × 2 7/8″ for the right side of the base
1 piece 1 1/2″ × 6 5/8″ for the back of the lid
Red cardstock (when you cut, make sure the grooves in the paper are oriented horizontally):
1 piece 6 5/8″ × 3 1/4″ for the top of the lid
2 pieces 3 1/2″ × 1 1/2″ for the left and right sides of the lid
1 piece 6 5/8″ × 1 1/2″ for the front of the lid
1 piece 3 1/2″ × 2 7/8″ for the left side of the base
1 piece 5″ × 2 7/8″ for the front left side of the base
Mini-graph overlay:
1 piece 5″ × 2 7/8″ for the front of the base
1 piece 3 1/2″ × 2 7/8″ for the left side of the base
- Use Zip Dry to glue the cut papers onto the box. Adhere the silver papers to the box, starting with the front. Glue the red papers on the outside of the box base and lid.
- Put the 3 1/2″ × 2 7/8″ piece of clear overlay on your work surface, screen-printed side up. Using Gem Tac and a toothpick, put tiny dabs of glue in each corner of the overlay. Wait a minute for the glue to become tacky, then adhere the overlay to the red paper on the left side of the box base. When it has dried firmly in place, do the same with the piece of overlay for the front of the box base and let dry.
- Adhere a tiny rhinestone to each corner of each piece of overlay (8 rhinestones in all). Let dry.
- Apply rub-ons to the box base and lid with a craft stick. Use any extra rhinestones to accent your rub-ons.
Inside of the Box
- Use the metallic marker to ink all the edges and corners on the inside of the box, including the top edges, bottom edges, side edges, back edges, and the entire inner ridge of the base. Make these lines at least 1/2″ thick so you won’t have any white areas under the papers you’ll glue on later.
- Cut the following pieces of paper:
Silver cardstock:
2 pieces 3 3/8″ × 1 1/4″ for inside left and right sides of the lid
2 pieces 6 1/2″ × 1 1/4″ for inside front and back sides of the lid
2 pieces 3 3/8″ × 6 1/2″ for inside roof of lid and inside bottom of the box base
Mini-graph overlay:
1 piece 3 3/8″ × 6 1/2″ for inside bottom of base
Vintage plaid paper:
2 pieces 6 1/2″ × 3 1/4″ for the inside front and back sides of the box base
2 pieces 3 3/8″ × 3 1/4″ for the inside left and right sides of the box base
- Use Zip Dry to glue the cut papers to the inside of the lid and bottom of the base. Glue the silver cardstock to the inside of the lid and the bottom of the base. Glue the patterned paper to the inside front, back, and sides of the box base.
- Using Gem Tac and a toothpick, place a small dab of glue in each corner on the screen-printed side of the clear overlay. Wait a minute for the glue to become tacky, then glue the overlay into place on the inside bottom of the base.
Tabbed Dividers
- Use the metallic marker to ink the tabs of all six dividers included with the Indie File Box.
- Cut 6 pieces of silver cardstock 6″ × 4″.
- Glue a piece of silver paper to each divider.
- Using an archival pen, write the following category names on each divider tab or, come up with your own categories. You can also type up your category names, print them out, and glue them on each tab.
Annuals
Perennials
Vegetables
Fruits
Herbs
Rare
Read NextYarn Storage Box
Your Recently Viewed Projects
Thanks for your comment. Don't forget to share!
thauno 3425913
Sep 06, 2011
No more misplaced seeds and buying more because you could not find your good selected seeds in spring.
gyngersf
Nov 11, 2010
That looks really cool! My mom is always very unorganized with all of her seeds, and this would DEFINATELY be a big help in keeping her gardening quick and easy!
Eileen C
Apr 26, 2010
Cute box. To have seeds last very long, they really need to be kept in a cool dry place. Like in a sealed plastic container in the fridge. I've had 5 year old tomato seeds grow, when stored like this.
Report Inappropriate Comment
Are you sure you would like to report this comment? It will be flagged for our moderators to take action.
Thank you for taking the time to improve the content on our site.