Snowman Purse
Follow this easy guide for a Snowman "purse" decoration for you own winter wonderland!
Materials:
- FIMO® Soft Polymer Clay — White, Peppermint, Brilliant Blue, Mandarin
- AMACO® WireForm® Armature Wire: 1/16"
- AMACO® Pasta Machine
- AMACO® WireForm® Diamond Mesh
- 2 Small Black Beads
- Miscellaneous Bugle Bead Mix Light Blue — Halcraft
- Miscellaneous Beads — Halcraft
- Loew-Cornell — Square Stick Soft Pastels
- White Embroidery Floss and Large Embroidery Needle
- Flat Brush or Cotton Swab
- Dremel Tool or Small Hand Drill
- Ruler
- Typing Paper
- Tape
Instructions:
-
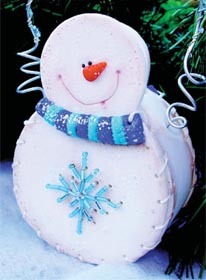
Flatten White FIMO® Soft to the thickest setting of the pasta machine. Cut out four snowman pieces from pattern. With pencil, make a tiny indentation where holes will be drilled on both pieces. Mark the snowflake on the front piece.
-
Cut two pieces from snowman pattern from WireForm®. Cut 1/4" around WireForm® so it will embed inside snowman.
-
Layer WireForm® between two pieces of snowman. Smooth edges to hide seam. Repeat for back of snowman.
-
Roll a small nose from Mandarin. Place onto face. Press in beads for eyes and draw smile.
-
SCARF: Roll one log from Peppermint and Brilliant Blue approximately 3" long by 1/4" diameter. Cut into 1/4" sections. Lay onto neckline alternating colors.
-
Lay flat and bake both pieces in pre-heated oven set at 265°F (130°C) for 1 hour. Allow to cool.
-
PURSE CENTER: Draw a pattern from paper 91/4" long x 3" wide. Beginning 1/8" from edge mark hole lines every 1/4". Cut out pattern and create two pieces from clay and once piece slightly smaller from WireForm®. Layer the WireForm® between the two clay pieces. Smooth edges and seams. Mark drill holes with pencil.
-
Cut another piece of paper in half lengthwise and tape into an 11" circle. Wrap center of purse around this circle as a guide. Place the purse center and guide into oven and bake for 1 hour.
-
Drill holes into front and back pieces of snowmen according to the marks. After center has cooled, check alignment with front and back and adjust if necessary. Drill holes.
-
Drill a hole in the center of each end for the armature wire.
-
Sew beads onto front of snowman with embroidery floss. Shade snowman with brown chalk around edges and add blush for cheeks.
-
Sew sides of snowman with embroidery floss.
- Curl armature wire as desired, add beads and press ends through holes in center of snowman for handle.
Read NextGlitter Paint Galaxy Home Decoration