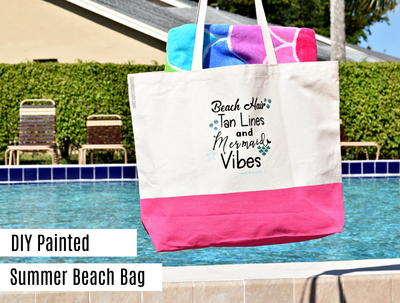
Painted Tote Bag

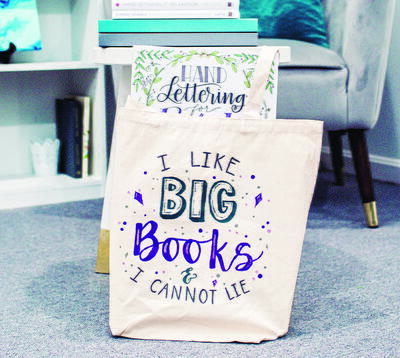
I don’t know about you, but I constantly find myself in need of a tote bag. Sometimes it’s to carry my art supplies so I can letter on the go. Other times, it carries my iPad or Surface Pro so I can work on location at Starbucks. When my kids are not in school, it often serves as a method of transportation for games and my son’s collection of Minecraft minifigures. No matter what happens to be on the inside of the bag, I like making sure that the outside is visually appealing. We’re going to use our lettering, combined with fabric paint, to do just that as we create a humorous design featuring the phrase, “I like big books and I cannot lie.” We’ll be using a combination of fonts and embellishments you’ve already learned, as well as a lettered ampersand. Let’s get started!
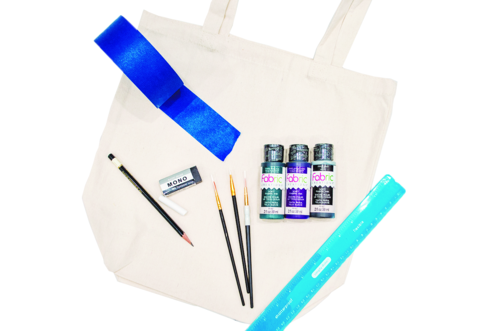
Materials List
- Pencil and eraser
- Cardboard
- Canvas tote bag
- Ruler
- Painter’s tape
- Chalk
- Fabric paint (I used Fabric Creations Soft Fabric Ink in black, white, Deep Teal, Grey Mist and African Violet) or paint markers
- Fine detail paintbrushes
- Iron
- Cloth pillowcase or other scrap fabric
Writing Tool: Fabric Paint or Fabric Markers
Surface: Canvas Tote Bag
Techniques: Bubble Letters, Straight-Line Script, Caps-Lock Print, Dots and Diamonds, Highlights, Ampersands
Instructions
-
Plan your design.
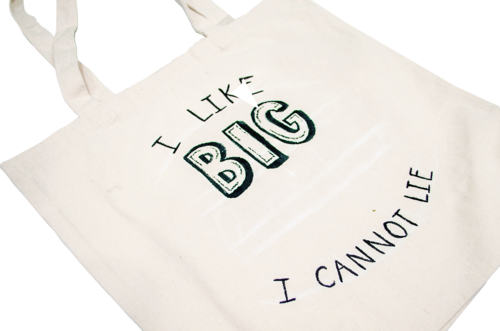
As always, a big part of creating a successful project is making a plan, so you’ll want to start by using a pencil to come up with exactly what you’re going to letter. Remember, you can use the blank page at the end of the tutorial for practice (page 101). Feel free to use the design I’m about to share or to create something completely different. I am a huge book lover and former English teacher who often uses a tote bag to carry books. So, I thought it would be fun to letter the quote, “I like big books and I cannot lie.” To emphasize “big books,” you’ll want to write those words larger than the others in the center of the design. Use Bubble Letters (page 72) for “big” and Faux Calligraphy (page 12) for “books.” Draw semicircles above and below those words to shape the rest of the text, which looks great printed in Caps-Lock Print (page 18). To finish off the design, add dots and diamonds (page 74) in some of the empty spaces and draw an ampersand.
There are lots of ways you can draw ampersands; some look a lot like a capital script “E” while others are even more stylized. For this project, my ampersand is like a capital “E” with a swirling tail on the end. You can also make ampersands stand out by using the Faux Calligraphy technique to thicken some lines more than others. Check out the Alphabet Reference Guide on page 166 for examples of different ways you can draw this symbol, then choose your favorite and add it to the design. -
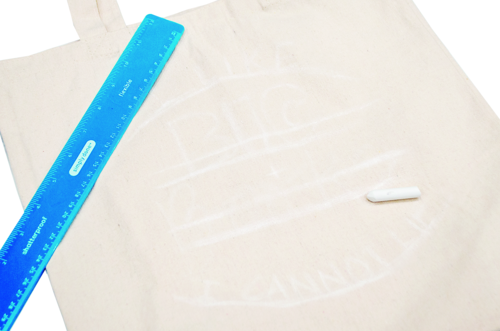
Prepare your tote bag and sketch the design.
First, place a piece of cardboard inside your tote bag to keep the paint from bleeding through from the front to the back. The cardboard will also prevent the front and back layers of the bag from sticking together.
Next, use a ruler to find the center of the bag, then use painter’s tape to mark the center. Mark guidelines for your lettering with chalk. You’ll want to mark one line for “big” and another for “books.”
Finally, use chalk to trace the top of the tape and make a guideline. -
Letter on your bag using a fine detail paintbrush and fabric paint.
You could also use paint markers if you prefer, but I wanted to use the fabric paint so my bag would be machine washable. I used black paint for the words at the top and bottom of the design. Then I used Deep Teal and African Violet for the focal words. -
Add details such as highlights on the downstrokes of “books” and dots and diamonds embellishments.
Make sure the word is dry before adding your highlights (page 81), and dots and diamonds (page 74) or the new paint will blend with your letter color instead of sitting on top.
Pro Tip: A great way to get round, evenly sized dots is to use the non-brush end of your paintbrushes. Just flip them over, tip the bottom in your paint and then touch it to your fabric. Voilà, a great-looking dot! -
Heat-set your fabric paint with an iron.
Allow the fabric paint to dry overnight. Then heat an iron to the highest setting allowed for the decorated fabric (in this case, canvas). Position the fabric decorated side up and lay a clean cloth or pillowcase on top. Without using steam, press the iron to the painted area for 15 seconds, then lift the iron and move to another section. Continue until the entire design area has been heat-set.
Once your bag is heat-set, it can be washed, either on the gentle cycle in a machine or by hand in cold water. No matter how you use it, this bag will be both functional and stylish. In fact, I bet you’ll find yourself wanting to create more.


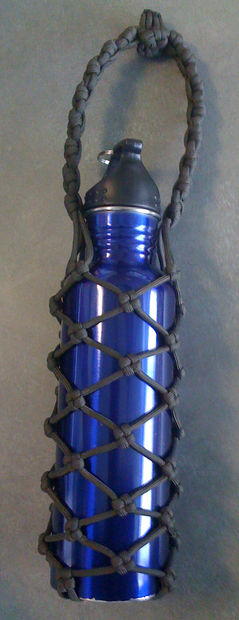
Read NextParacord Bottle Wrap