This project was submitted by one of our readers, just like you.
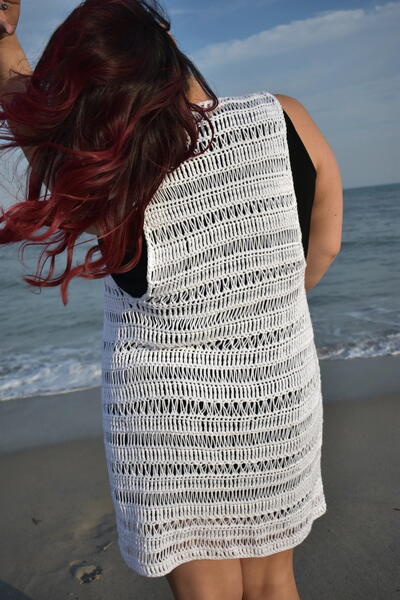
Some Days are Diamonds Shawl

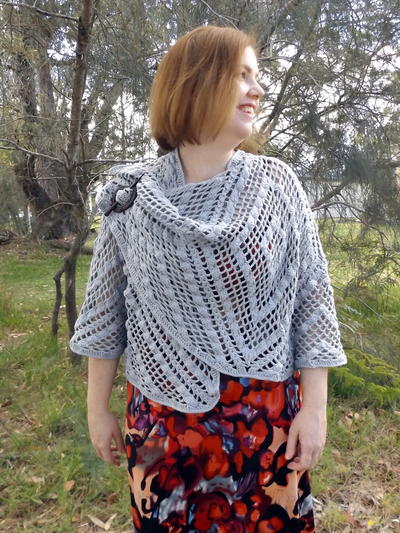
Some Days are Diamonds Shawl
"This geometrically-designed shawl is made by sewing together five crocheted triangles. The diamonds are a secondary pattern that become clear when the pieces are joined. Made with the recommended yarn, this shawl has a full shape and lovely weight. The sample is made of a cotton/acrylic blend in 8 ply (DK) but there is no reason not to try it in 100% cotton or a smooth acrylic yarn. Using a heavier weight yarn would give a bigger result if needed for a fuller figure. The sample measures 60cm (24") from the neck edge down the center back."

Crochet HookH/8 or 5 mm hook
Yarn Weight(3) Light/DK (21-24 stitches to 4 inches)
Crochet GaugeGauge is not crucial to this pattern.
Finished Size24" (60cm) from neck edge down center back.
Materials List
- Valley Yarns 'Conway' x 11 (50g) balls
Instructions
Triangle A – Make 2 Begin with a magic ring. Rnd 1: Ch 3 (counts as dc here and throughout), dc into ring, ch 1, 2dc cl in ring *ch 6, 2dc cl in ring, ch 1, 2dc cl in ring, repeat from * once more, ch 6, ss into top of first ch 3. Rnd 2: Ss into ch 1 sp, ch 3, FLIP WORK, dc in same sp, ch 1, 2dc cl in same sp, *ch 6, sc in next ch 6 sp, ch 6, 2dc cl in ch 1 sp, ch 1, 2dc cl in same sp, repeat from * once more, ch 6, sc in next ch 6 sp, ch 6, ss into top of first 3 ch. Rnd 3: Ss into ch 1 sp, ch 3, FLIP WORK, dc in same sp, ch 1, 2dc cl in same sp, *ch 6, sc in next ch 6 sp, 5 dc in next sc, sc in next ch 6 sp, ch 6, 2dc cl in next ch 1 sp, ch 1, 2dc cl in same sp, repeat from * once more, ch 6, sc in next ch 6 sp, 5 dc in next sc, sc in next ch 6 sp, ch 6, ss into top of first ch 3. Rnd 4: Ss into ch 1 sp, ch 3, FLIP WORK, dc in same sp, ch 1, 2dc cl in same sp, *ch 6, sc in next ch 6 sp, 5 dc in next sc, sk 2 dc, sc in next dc, 5 dc in next sc, sc in next ch 6 sp, ch 6, 2dc cl in next ch 1 sp, ch 1, 2dc cl in same sp, repeat from * once more, ch 6, sc in next ch 6 sp, dc 5 in next sc, sk 2 dc, sc in next dc, 5 dc in next sc, sc in next ch 6 sp, ch 6, ss into top of first ch 3. Rnd 5: Ss into ch 1 sp, ch 3, FLIP WORK, dc in same sp, ch 1, 2dc cl in same sp, *ch 6, sc in next ch 6 sp, 5 dc in next sc, sk 2 dc, sc in next dc, ch 6, sk (2 dc, sc and 2 dc), sc in next dc, 5 dc in next sc, sc in ch 6 sp, ch 6, 2dc cl in next ch 1 sp, ch 1, 2dc cl in same sp, repeat from * once more, ch 6, sc in ch 6 sp, 5 dc in next sc, sk 2 dc, sc in next dc, ch 6, sk (2 dc, sc and 2 dc), sc in next dc, 5 dc in next sc, sc in ch 6 sp, ch 6, ss into top of first ch 3. Rnd 6: Ss into ch 1 sp, ch 3, FLIP WORK, dc in same sp, ch 1, 2dc cl in same sp, *ch 6, sc in next ch 6 sp, 5 dc in next sc, sk 2 dc, sc in next dc, ch 6, sk (2 dc, sc and 2 dc), sc in next ch 6 sp, ch 6, sk (rest of ch 6 sp, sc and 2 dc), sc in next dc, 5 dc in next sc, sc in next ch 6 sp, ch 6, 2dc cl in next ch 1 sp, ch 1, 2dc cl in same sp, repeat from * once more, ch 6, sc in next ch 6 sp, 5 dc in next sc, sk 2 dc, sc in next dc, ch 6, sk (2 dc, sc and 2 dc), sc in next ch 6 sp, ch 6, sk (rest of ch 6 sp, sc and 2 dc), sc in next dc, 5 dc in next sc, sc in next ch 6 sp, ch 6, ss into top of first ch 3. Keep the pattern as set, increasing the number of ch 6 sps between the 5 dc shells in each round. Be careful NOT to forget to flip your work every round as instructed. Once you have completed the round with 6 ch 6 sps between 5 dc shells, begin another 5 dc shell in the center of the ch 6 sps, so it is 3 ch 6 sps from the line of 5 dc shells to either side. Continue with the new diamond point as before, until you have completed the round with 6 ch 6 sps between the second lines of 5 dc shells. Begin the third diamond point in the next round. Continue until you have 3 ch 6 sps between the last 5 dc shells in the center of each side. Finish with ss into top of first ch 3. Fasten off but leave a long tail with which to sew the pieces together. Triangle B – Make 3 Follow the instructions for Triangle A as described above, then add another round in the following way: Flip work and ss back to the center of the ch 6 sp just made, ch 1, sc in same sp, dc 5 in next sc, continue pattern in the usual way until you make the last 5 dc shell, sc in ch 6 sp. Fasten off, leaving a long tail as before. Finishing Use the long tails and tapestry needle to sew the two A Triangles between the three B Triangles. Make sure that the ‘hills’ of the shells and ch 6 fit into the ‘valleys’ between the shells and ch 6 of the neighboring triangle. You will notice that the diamond triangles of the B Triangles are a bit wider than the A Triangles, but this is necessary for them to form the top and bottom points of the completed diamonds. Once you have stitched all five triangles together, start the two edging rounds: 1) Start anywhere on the edge you want, making 3 dc in each ch 3 sp, 1 dc in each sc, 1 dc in the top of each 2dc cl, 1 dc in the ch 1 sp between 2dc cls, and for each shell, work hdc, sc, sc, sc and hdc in each dc. Please note: the exception to these instructions occurs on the bottom edge where the triangles are joined – on the last 2dc cl group before a join, work dc in the top of the first 2dc cl, tr in ch 1 sp, tr in the top of the second 2dc cl, sk ch 3, tr in the top of the next 2dc cl, tr in ch 1 sp, dc in top of next 2dc cl. Continue all the way around, ss into top of first edge st. 2) Ch 1, sc in first st, sc in each st around, ss into first sc. Fasten off, weave in ends and block work.
Edging

Your Recently Viewed Projects
Thanks for your comment. Don't forget to share!
Report Inappropriate Comment
Are you sure you would like to report this comment? It will be flagged for our moderators to take action.
Thank you for taking the time to improve the content on our site.