Scrap Yarn Crochet Slippers
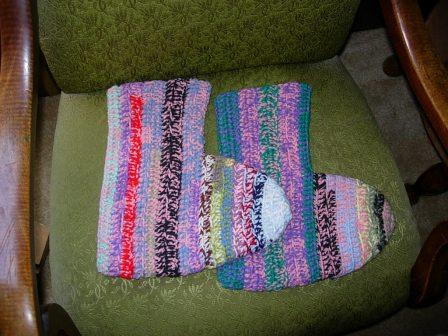
These easy slippers, perfect for beginners are very warm and very comfortable. I've been making them for years, and have many family and friends that request a pair at least once a year if not more. These slippers can be made so that they cover only the ankle or past the knee and any length between. Senior citizens like the warm up to just below their knees.
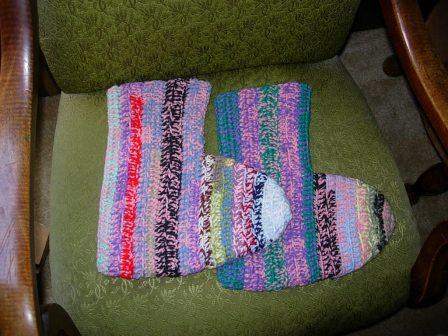
These slippers end up oversize. Wearers often find this very comfortable, due to their toes not being squeezed. Sock stays up and with the 2 strands they last forever.
Use 2 strands at a time. A quick pattern of 4 pieces (2 socks and 2 toes), often done in a weekend, depending on the size desired.
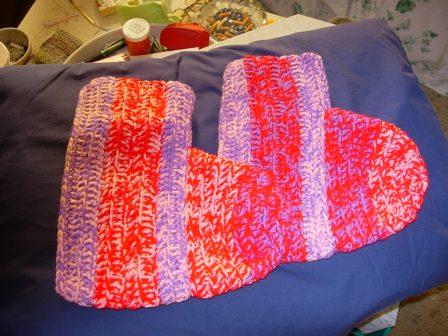
Materials:
- Size "F", "G", or "H" needle is recommended.
- Any amount and any color or type of yarn
Tips:
- If you want slippers to MATCH, remember to use only about 1/2 of your yarn ball(s) so that you can use the same color in the second slipper. Also, if a toe and sock match, switch with the other toe and sock, so that they seem to be more of a pair.
- When changing a color, change only one at a time. This provides greater diversity in the color scheme. DO NOT CHANGE COLOR in change of center of the sock piece, but try to change closer to the edges. The wearer will walk on the middle portion of this piece.
- The 2 strands that you are crocheting with develop certain patterns and intensities. For a man, use darker colors together and masculine colors. For a woman, use a darker color with a lighter color for your 2 strands or both lighter colors. The lighter the brighter.
- Colors that you may not think look good together really do in this pattern. If you try to create a pattern, you may become frustrated. Let the colors flow and don't worry about how.
- The taller the sock, the tighter it will be to put on. Add an extra row(s) for allowance as needed.
SOCK
To determine how tall you want the sock portion (the part that goes over your ankle and up your leg) to be, measure from back of heel up the back of leg to the desired height. Double that measurement--that will be the length of the piece you'll be crocheting and will determine how many chain stitches to make. (As an example, If I want my slippers to extend 2 inches above my ankle, I chain 80 + 3 for the turning chain.)
The width of the piece, from back of heel to arch, will be determined by how many rows you work. Typically, I work 9 rows, but adjust this number as needed.
Row 1: Using 2 STRANDS of yarn, leave a foot long or longer tail (Tail A) and chain the desired length as explained above.
Row 2-9 (or as needed): Turn and double-crochet (dc) each row, adding 3 chain for turning. Tie off, leaving a tail as long as the rectangle (Tail B). This sock piece will cover your ankle/calf from back of heel to arch, with the fold at the bottom of your foot, a seam in the back and front of your ankle, and the short edges at the top of the sock.
Repeat for second foot.
TOE
Measure bottom of foot, from heel to longest toe(s), for 'toe' part of slipper. This toe section will be like a cap, worked in the round. The last row will meet up with the front edge of the sock portion, just in front of your ankle.
Chain 5, st into 1st chain to form a ring.
Row 1: Chain 3, and then double crochet 12 stitches through the center of circle. Slip stitch into 1st stitch, chain 3.
Row 2: double crochet 2 x in each stitch, making 24 stitches around.
Slip stitch into 1st stitch, chain 3.
Row 3: double crochet 2 x in 1st stitch. double crochet 1 x in next
2 stitches. double crochet in 4th stitch 2x. Follow this count around to last stitch. Slip stitch into 1st stitch, chain 3.
Row 4: double crochet 2x in 1st stitch. double crochet 1x in next 9 stitches. Follow this count around to last stitch. Slip stitch into 1st stitch, chain 3.
If toes fit into this crocheted "toe cap" without causing crowding, go to row 5. If toes are crowded, repeat Row 4.
Rows 5-8: double crochet in 1st stitch, and 1x in each stitch around to last stitch. Slip stitch into 1st stitch. Chain 3.
Adjust as necessary - a short foot may only need 8 rows, or a long foot may need 10 rows.
Row 9 (last row): Work as row 5, but at the end, tie off, leaving a tail that is longer than the circumference of the toe piece (Tail C).
Repeat for second foot.
PUT IT ALL TOGETHER
- Using Tail A, put first stitch and last stitch of the foundation chain row together, and pull tail through. This will hold the top back of the slipper together; edges should meet but not ov. Pulling the tail around the next stitch, continue stitching sides together until you reach the fold. Separate the ends and pull to the inside through different stitches but close enough not to cause gap. Tie off, weave through. Cut.
- Turn the 'Toe' inside out, and slip it inside the sock part so the tip of the toe is pointed toward the heel (which you just stitched closed). Align the last row of the sock part and the last row of the toe section, having Tail C (the tail from the toe section) positioned at the folded edge of the sock part. Separate the 2 strands and begin stitching the two edges together, around stitch after stitch as before. Use 1 strand to work the right side up to the top of the toe and the other for the left side. Strands will meet at the top of the toe. Pull through.
- At the top of the sock (front of the sock portion), pull Tail B through the first stitch of the other side of the sock, and continue stitching each stitch together as you did for the back of the slipper until you meet where the toe is added. Pull all tails (4 strands) through to the inside, and tie off with each other.
- Push toe out to front.
Variations:
- Do not close front side of sock, allowing for fold over. This may be an option for taller 'socks', and a long chain piece added as laces, hand stitch Velcro pieces so the sock can be wrapped around. For this you may need to add an extra row.
- Have fun with this pattern. Each pair can be unique for each wearer.
Read NextCoastal Granny Square Bag
Your Recently Viewed Projects
princess6860504
Nov 11, 2017
You could not get an easier slipper sock pattern if you tried. This is a perfect project for beginner crocheters. Great for diabetics, older folks and frankly, those with larger feet and lower legs who may find it hard to fit. Gift for a special someone in a nursing home or assisted living? You got it. I would just take care to take that extra step of sewing on a felt bottom or perhaps use some fabric puff paint and paint on a few rows of dots on the bottom for some kind of slip resistance.
mulberrygalprinces s
Dec 23, 2016
These are so cute and so easy. I guess I saw it after the directions were made clearer because I don't see any problems. As with most any slippers or socks that I make, if they come up the leg, I always put a piece of elastic around the top edge. I use a wider piece so many t doesn't cut into the leg. Then they stay up even after repeated washings. Thank you so much for this idea, it will clean out my yarn stash, giving me an excuse to go buy more.
jerit 7725546
Nov 26, 2014
I want to make the Baby Raspberry crochet pattern hat but they do not tell how to make a puff sticht if knows how to a puff st please let explane how to make a puff st
FaveCrafts Editor JL
Dec 01, 2014
Hi there, The answer to this question can be found in the comments section of the Baby Raspberry Hat. Thanks! - Julia from FaveCrafts
patstubbs44 571188 8
May 04, 2014
Like "one flower"mine too was larger than I wanted,so I threaded elastic all the way round .Problem solved,I made another pair and halved the stitches,Perfect!.depending on your wool that you are using,it is a case of trial and error,I suggest if you do decide to alter your length or stitches from the pattern,write them down.
blissfulbeader
Apr 05, 2013
It would be nice to be able to print this pattern but it doesn't work!
oneflower 0931001
Mar 16, 2013
I finished these today, then I spent the evening adjusting them because the toe part was HUGE and made navigating the stairs very dangerous. They flopped around on my feet (and I have huge feet - size 11, wide width) far too much to be safe. I ended up folding the top of the toe part over on itself and slip stitching it together, all while the slipper was on my foot. I won't be making these again.
wvjeanc1 0776470
Mar 31, 2012
The black text for this pattern will not print. The colors in the document print but the black text will not. I even tried copying the text and pasting it into a Word Document, but the text still will not print. Anyone else having this problem?
Caitlin
Feb 10, 2011
Hi Everyone, We have updated the pattern instructions. I hope that they are more clear. Thank you for letting us know about the confusion.
hminick 2862942
Feb 04, 2011
Very hard to understand the directions. How do you put the toe and the flat piece together?
hminick 2862942
Jan 27, 2011
Please post directions on this pattern. It said to measure from heel up the leg. The toe part doesn't cover the whole foot. This is confusing. PLEASE HELP! ! ! ! ! !
hminick 2862942
Jan 23, 2011
The instructions were very confusing. Does the toe part fit up to the arch? Does the other part go down over the heel and part of the foot? It said to measure from the heel up the leg. Please show pictures of each piece before they are put together. Thanks.
gratefullyinhisgra ce
Jan 18, 2011
From reading the pattern it appears that the sock part of the assembly is merely folding the sock piece together the fold being the bottom of the foot and the piece is stitched together with the hanging ends along the back of the leg For assembly of the toe toe is first turned inside out and placed within the cavity opening of the sock area for proper assembly With hanging strands placed at the bottom of the foot one strand is weaved into the sock piece on one side up and around to top of toe part and the other piece up around the other side until they meet Next to close up the front of the opening at the top of the sock the ends are weaved down towards the toe piece and strands from here and the toe part all meet at the top of the toe where they…Read More are finished off and toe is popped back out
ambigelow 0088501
Dec 26, 2010
These slipper socks are just the thing for wheelchair/bed confined patients in a nursing home. Will be making many pairs for donation.
new to you
Mar 17, 2010
Please send clear instructions on the "put it together" stage. I was completely lost--made several tries--couldn't do it. Please send them to me at mar39paints@yahoo.com Up to that point, they are neat. Thank you.
beverly largent
Mar 13, 2010
I'm not quite sure this is beginner, more like intermediate. Give a GUIDE for abbreviations for a BEGINNER! I AM a beginner and I BARELY understand this. Can the writer PLEASE revise this as I would LIKE to DO THIS PROJECT!!! Thankyou Beverly Beverly8858@aol.com
Christine Dal Port o
Feb 28, 2010
I am always looking for fast and easy designs due to my arthritis and having to also be economical. This design provides something easy for me to do that won't cost much and provides something very useable in the process. I love them....Off I go to use up some of my vast supply of well intended yarn purchases.....
bhill
Jan 16, 2010
progress pictures would be nice. Especially at the put it together stage. I got lost. Thanks
Report Inappropriate Comment
Are you sure you would like to report this comment? It will be flagged for our moderators to take action.
Thank you for taking the time to improve the content on our site.

