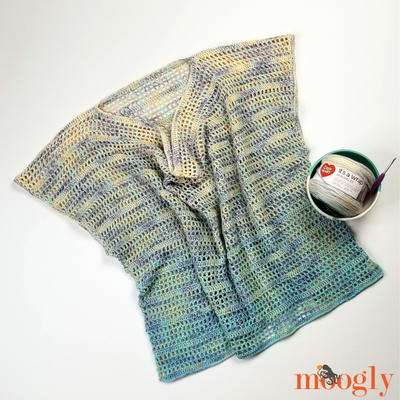
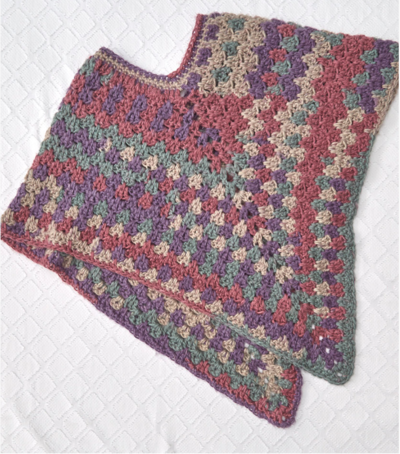
Mountain Breeze Crochet Poncho Pattern

Who needs a jacket when panchos exist? This Mountain Breeze Crochet Poncho Pattern is a lovely pattern that you must crochet if you're looking for a warm clothing piece to replace your jacket. The crochet poncho's beautiful colors are perfect for every season, and it's easy to match with other colors. This poncho is a great piece to throw over any outfit on those breezy summer nights or extra cold winter mornings. You'll look super fashionable wherever you go, even if you're trying to dress down. And let's not forget how warm and cozy you'll be. Jackets are so overrated anyway.
Note: Pattern corrections can be found here.
Additionally, please read this helpful note from one of our readers before you get started: "THEY MISSED A CORRECTION on the last round with the single crochets around the bottom edge. You do 3 single crochet and then an exdc when there is an exdc 2 rows below, but they don't tell you to do a treble when there are trebles below. When you look at the picture, they have trebles above trebles and exdc's above exdc's. It only tells you to do exdc's throughout the last round." - rhamlettpoms 45336 02

Crochet HookM/13 or 9 mm hook
Yarn Weight(5) Bulky/Chunky (12-15 stitches for 4 inches)
Crochet Gauge2 pattern repeats = 4 inches (10 cm); 5 rows = 4 inches (10 cm)
Materials List
- 2 balls Red Heart Dreamy Stripes in Mountain Top
- 9 mm (US M-13) crochet hook
- Yarn needle
- Stitch marker
Instructions:
Poncho
Ch 70 (70, 70, 78, 78, 78); taking care not to twist, join with slip st in first ch to form a circle
-
Round 1 (right side): Ch 3 (counts as first dc here and throughout), dc in next 2 ch, ch 2, dc in next 3 ch, [ch 1, skip next ch, dc in next 3 ch] 8 (8, 8, 9, 9, 9) times, ch 2, dc in next 3 ch; repeat between [ ] 7 (7, 7, 8, 8, 8) times, ch 1, skip next ch; join with slip st in top of beginning ch, turn—18 (18, 18, 20, 20, 20) groups of 3 dc, 16 (16, 16, 18, 18, 18) ch-1 spaces, and 2 ch-2 spaces.
-
Round 2: Working exdc in next skipped ch of foundation ch, beg dc fan; [working exdc in next skipped ch of foundation ch, ch 1, dc fan] 7 (7, 7, 8, 8, 8) times, ch 1, V-st in next ch-2 space, place marker on ch-2 space of V-st just made for front of piece; repeat between [ ] 8 (8, 8, 9, 9, 9) times, ch 1, V-st in next ch-2 space, ch 1; join with slip st in top of beginning ch, turn—16 (16, 16, 18, 18, 18) dc fans, 2 V-sts, and 18 (18, 18, 20, 20, 20) ch-1 spaces.
-
Round 3: Working exdc in next dc 2 rounds below, beg dc fan, ch 1, V-st in next V-st; [working exdc in center dc of each fan 2 rounds below, ch 1, dc fan] 8 (8, 8, 9, 9, 9) times, *working fptr around center dc of next fan 2 rounds below, ch 1, fptr fan*, ch 1, V-st in next V-st; repeat from * to *; repeat between [ ] 7 (7, 7, 8, 8, 8) times, ch 1; join with slip st in top of beginning ch, turn—2 fptr fans, 16 (16, 16, 18, 18, 18) dc fans, 2 V-sts, and 20 (20, 20, 22, 22, 22) ch-1 spaces.
-
Round 4: Working exdc in next dc 2 rounds below, beg dc fan; [working exdc in center dc of each fan 2 rounds below, ch 1, dc fan] 7 (7, 8, 8, 9, 9) times; *working exdc in 2nd dc of next V-st 2 rounds below, ch 1, dc fan, ch 1, V-st in next V-st; working exdc in 3rd dc of same V-st 2 rounds below, ch 1, dc fan*; repeat between [ ] 8 (8, 8, 9, 9, 9) times; repeat from * to *, ch 1; join with slip st in top of beginning ch, turn—20 (20, 20, 22, 22, 22) dc fans, 2 V-sts, and 22 (22, 22, 24, 24, 24) ch-1 spaces
-
Round 5: Working exdc in next dc 2 rounds below, beg dc fan, *working exdc in 2nd dc of next V-st 2 rounds below, ch 1, dc fan, ch 1, V-st in next V-st; working exdc in 3rd dc of same V-st 2 rounds below, ch 1, dc fan*; [working exdc in center dc of each fan 2 rounds below, ch 1, dc fan] around to ch-1 space above next fptr fan 2 rounds below; working around fptr 2 rounds below, ch 1, fptr fan; working fptr around 2nd dc of next V-st 2 rounds below, ch 1, fptr fan, ch 1, V-st in next V-st; working fptr around 3rd dc of same V-st 2 rounds below, ch 1, fptr fan; [working exdc in center dc of each fan 2 rounds below, ch 1, dc fan] around to beginning ch, ch 1; join with slip st in top of beginning ch, turn—4 fptr fans, 18 (18, 18, 20, 20, 20) dc fans, 2 V-sts, and 24 (24, 24, 26, 26, 26) ch-1 spaces.
-
Round 6: Working exdc in next dc 2 rounds below, beg dc fan, *[ch 1, exdc] around to ch-1 space before next V-st, ch 1, dc in next ch-1 space; working in front of same ch-1 space, exdc in 2nd dc of next V-st 2 rounds below, dc in same ch-1 space, ch 1, V-st in next V-st, ch 1, dc in next ch-1 space; working in front of same ch-1 space, exdc in 3rd dc of same V-st 2 rounds below, dc in same ch-1 space; repeat from * around to last ch-1 space; ch 1, dc fan, ch 1; join with slip st in top of beginning ch, turn—24 (24, 24, 26, 26, 26) dc fans, 2 V-sts, and 26 (26, 26, 28, 28, 28) ch-1 spaces
-
Round 7: Working exdc in next dc 2 rounds below, beg dc fan; [working exdc in center dc of each fan 2 rounds below, ch 1, dc fan] around to ch-1 space before next V-st; *working exdc in 2nd dc of next V-st 2 rounds below, ch 1, dc fan, ch 1, V-st in next V-st; working exdc in 3rd dc of same V-st 2 rounds below, ch 1, dc fan*; repeat between [ ] around to ch-1 space above next fptr fan 2 rounds below; {working around fptr 2 rounds below, ch 1, fptr fan} around to ch-1 space before next V-st; working fptr around 2nd dc of next V-st 2 rounds below, ch 1, fptr fan, ch 1, V-st in next V-st; working fptr around 3rd dc of same V-st 2 rounds below, ch 1, fptr fan; repeat between [ ] around to beginning ch, ch 1; join with slip st in top of beginning ch, turn—6 fptr fans, 20 (20, 20, 22, 22, 22) dc fans, 2 V-sts, and 28 (28, 28, 30, 30, 30) ch-1 spaces.
-
Round 8: Repeat Round 6—28 (28, 28, 30, 30, 30) dc fans, 2 V-sts, and 30 (30, 30, 32, 32, 32) ch-1 spaces
-
Rows 9–24 (24, 26, 26, 28, 28): Repeat last 2 rows 8 (8, 9, 9, 10, 10) times—60 (60, 64, 66, 70, 70) dc fans, 2 V-sts, and 62 (62, 66, 68, 72, 72) ch-1 spaces.
-
Edging round: Ch 1, working in front of first ch-1 space, exdc in next dc 2 rounds below, *[sc in each st of next fan, working in front of next ch-1 space, exdc in center st of next fan 2 rounds below] around to ch-1 space before next V-st, working in front of next ch-1 space, exdc in 2nd dc of next V-st 2 rounds below, (sc in first 2 dc, 2 sc in ch-2 space, sc in last 2 dc) of next V-st, working in front of next ch-1 space, exdc in 3rd dc of same V-st 2 rounds below, working in front of next ch-1 space, exdc in 2nd dc of next V-st 2 rounds below; repeat from * around; [sc in each st of next fan**, working in front of next ch-1 space, exdc in center st of next fan 2 rounds below] around, ending last repeat at ** and working last sc in top of beginning ch of previous round; join with slip st in first sc. Fasten off.
Neckband
-
Round 1: With right side of back facing and working in opposite side of foundation ch, join with sc in base of beginning ch-3, sc in each ch around, working sc2tog in ch before and after each ch-2 space; join with slip st in first sc. Do not turn.
-
Rounds 2 and 3: Ch 1, [sc in each st around to last st before next sc2tog, sc2tog-over-3] twice, sc in each remaining st around; join with slip st in first sc. Fasten off.
Abbreviations
- ch
- chain(s)
- dc
- double crochet
- hdc
- half double crochet
- sc
- single crochet
- st(s)
- stitch(es)
- tr
- treble (triple) crochet
- ( )
- work directions in parentheses into same st
- [ ]
- work directions in brackets the number of times specified
- *
- repeat whatever follows the * as indicated
Read NextCupcake Tee Crochet Shirt
Your Recently Viewed Projects
Thanks for your comment. Don't forget to share!
Newarkgin
Jul 10, 2020
I'd like to begin this poncho but the link to the corrections is no longer active...can it be refreshed or can someone please send me the corrections? thank you!
rhamlettpoms 45336 02
Mar 05, 2019
I love the look of this and it was easy once I discovered the pattern had mistakes. It would rate higher if it weren't for that. There are several mistakes on this pattern, but I found the corrections and downloaded it. THEY MISSED A CORRECTION on the last round with the single crochets around the bottom edge. You do 3 single crochet and then an exdc when there is an exdc 2 rows below, but they don't tell you to do a treble when there are trebles below. When you look at the picture, they have trebles above trebles and exdc's above exdc's. It only tells you to do exdc's throughout the last round. The funny thing is, I just VERY recently downloaded it and you would think that they would have already put ALL the corrections in the original download.
Editor Dana
Mar 11, 2019
Hi there, thanks so much for your comment. I added a link to the pattern corrections PDF above, and I also included your comment so our readers will know what to look for before they get started. Thank you so much for taking the time to comment, and I love your photo of how the pattern turned out! Beautiful!
Cheryl Y
Sep 17, 2018
I like the look of this Mountain Breeze Crochet Poncho. It reminds me of the poncho I had as a kid, Nice and warm. The pattern is easy to follow and understand and I think anyone who knows how to crochet could make this one. Looking forward to having this one.. Thank you so much for sharing this free crochet poncho pattern.
princess6860504
Jul 15, 2018
This poncho is awesome to wear in the fall while I am out at my favorite pumpkin patch and farm stand, while I eat my caramel apple and browse the shop for kooky Halloween decorations! Can you feel it? know I can. All in all it seems like a fairly easy pattern to complete. I think I can do this!
Report Inappropriate Comment
Are you sure you would like to report this comment? It will be flagged for our moderators to take action.
Thank you for taking the time to improve the content on our site.