This project was submitted by one of our readers, just like you.
Easy Diy Snail Bookmark Craft

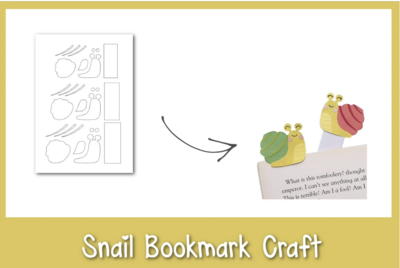
Easy Diy Snail Bookmark Craft
"Colored Construction Paper Glue Sharpie Pencil Scissors Select different colored papers for the snail pattern. You will also need to select a cardstock paper to make the bookmark base. The template includes the shell, body base, belly, blush, and shell patterns (thin stripes. Trace and cut out the snail patterns from the selected craft papers. Glue the belly cutout near the bottom-front side of the body base cutout. Glue the shell patterns on the shell cutout, matching their narrow ends with the shell’s border curves. Glue the blush cutouts on the head part of the body base or, you can also use a pink highlighter if the circles are too difficult to cut out. Cut off extra parts of the attached shell patterns to align them with the shell’s base. Use a sharpie to draw the face of the papercraft snail figure. Glue the shell pattern with the body pattern, keeping the body to the front. Apply glue on the backside of the papercraft snail pattern but keep 1 cm part along the bottom side free from glue. Have the bookmark base (rectangle-shaped paper) ready. Attach the glued part of the papercraft snail on the bookmark base, on any one side. The 1 cm intact part along the bottom side of the snail can be used to slide a page under it (between the bookmark base and the snail pattern)."
Primary TechniquePaper Crafts

Materials List
-
Colored Construction Paper
- Glue
- Sharpie
- Pencil
- Scissors
Instructions
-
Select different colored papers for the snail pattern. You will also need to select a cardstock paper to make the bookmark base. The template includes the shell, body base, belly, blush, and shell patterns (thin stripes. Trace and cut out the snail patterns from the selected craft papers.
-
Glue the belly cutout near the bottom-front side of the body base cutout.
-
Glue the shell patterns on the shell cutout, matching their narrow ends with the shell’s border curves.
-
Glue the blush cutouts on the head part of the body base or, you can also use a pink highlighter if the circles are too difficult to cut out. Cut off extra parts of the attached shell patterns to align them with the shell’s base. Use a sharpie to draw the face of the papercraft snail figure. Glue the shell pattern with the body pattern, keeping the body to the front.
-
Apply glue on the backside of the papercraft snail pattern but keep 1 cm part along the bottom side free from glue. Have the bookmark base (rectangle-shaped paper) ready
-
Attach the glued part of the papercraft snail on the bookmark base, on any one side. The 1 cm intact part along the bottom side of the snail can be used to slide a page under it (between the bookmark base and the snail pattern).

Read NextToy Slinky Dog

![Pill Bottle Crafts: Reuse Pill Bottles [15 Ideas]](http://irepo.primecp.com/2017/06/334076/PILL-BOTTLE-CRAFTS-Header_Category-CategoryPageDefault_ID-2274135.jpg?v=2274135)