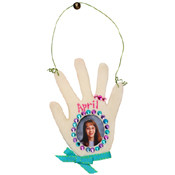
Dough Hand Photo Frame
Aleene’s Original Tacky Glue and cornstarch make quite the pair! Just mix them together and you'll have an awesome dough to create unique projects! Find this craft and 21 other crafts for kids in our FREE Summer Crafts for Kids eBook.
Materials:
- Tulip 3D Fashion Paint
- 65010 Pink
- Aleene's Original Tacky Glue
- Plastic baggie
- Measuring cups
- Wire cutter
- Acrylic gems
- Plastic bowl
- Crayon
- Cornstarch
- Wood spoon
- Lightweight cardboard
- Photo
- Tape
- Colored wire
- Ribbon, ½” wide, 12” length per hand, desired color
- Rolling pin
- Paper towel
- Scissors
- Ruler
- Cardboard for work surface
- Toothpick
- Empty can
- Wire baking cooling rack
- Pencil
- Plastic knife
- Freezer paper
Instructions:
- Cover cardboard with freezer paper, shiny side up, to create work surface. Tape excess paper to back.
- Measure 2 parts cornstarch and 1 part glue into bowl. Make only a small amount of dough at a time.
- Mix, using spoon. Dust work surface with a small amount of cornstarch. Pour mixture onto work surface. Knead for about 10 minutes to form dough. Add more cornstarch as needed if dough is sticky, add more glue if mixture is too stiff. Store in plastic baggie until needed.
- Trace child’s hand onto lightweight cardboard, using pencil. Cut out to make template.
- Dust work surface and rolling pin with cornstarch. Roll a baseball size amount of dough to about ¼” thickness. Place template onto dough. Cut around template, using knife. Cut a hole in center of hand for photo, using can.
- Dip finger in water and smooth cut edges. Make a hole at tips of fingers, being sure they are large enough for wire to pass through. Set aside on freezer paper to dry. Heat, humidity and thickness of dough determine drying time. After first day, carefully peel from paper. Turn over. Transfer to cookie cooling rack. Let dry completely.
- Cut a 14” length from wire, using wire cutter. Thread wire through holes. Twist ends to secure.
- Cut a length from ribbon 1” wider than wrist of frame. Apply a bead of glue onto back of ribbon. Smooth glue with finger. Center ribbon over wrist, folding ends to back of frame. Smooth into place. Tie a bow, using remaining ribbon. Glue in place.
- Place a dot of glue where gems are desired, using toothpick. Press crayon onto top of a gem. It will hold gem just long enough to press into glue. Repeat procedure to apply remaining gems.
- Start flow of paint on paper towel, using an even pressure on bottle for a smooth line. Write name where desired. Let dry.
- Trim photo to fit slightly larger than frame opening. Apply a bead of glue around edge of opening on back. Press photo into place. Let dry.
Read NextHomemade Fidget Spinner

