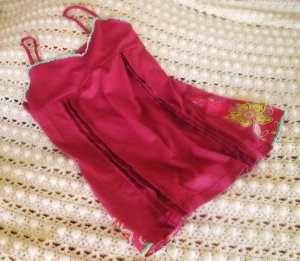
Anthropologie Inspired Camisole
Don't break the bank on simple clothes from boutique shops! If you want a make a simple camisole like the ones you see in stores, check out this Anthropologie Inspired Camisole. This pattern tells you how to make a tank top out of a t-shirt.
Materials:
- 1 standard T-shirt in your size
- 1 camisole that fits you well, for sizing
- Scraps of patterned fabric
- Sewing machine
- Matching thread
- Scissors
- Straight pins
- Water soluble pen
- Yard stick
- 1-2 yards of trim – velvet rickrack shown
Instructions:
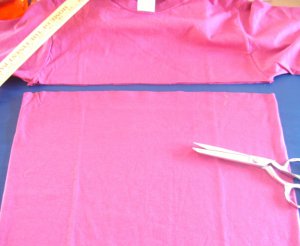
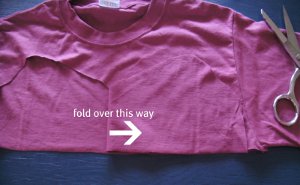
- Cut the T-shirt straight across from armpit to armpit. Hold on to that top part; you will use it later.
- Measure the front of the cut top and make a mark at the center point of the width. Then make a mark 4 inches to the left and right of the center. To make the first right tuck, fold the shirt at the right 4-inch mark all the way down to the hem.

- Press well. Sew along that pressed fold at about ¼ inch all the way down. Be sure to sew through only the front side of the shirt.
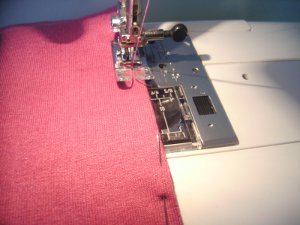
- Open it up. The sewn fold should look like this:

- Make a mark with a pin about ½ inch to the right of the first tuck. Fold it at that mark all the way down to the hem. Press and repeat the stitching as for first fold.

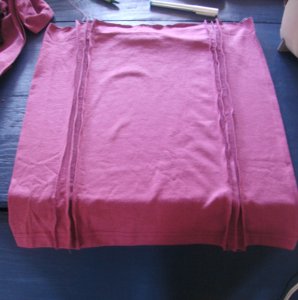
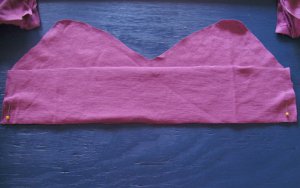
- Do this one more time. You should have 3 tucks on the right side. Now repeat this process starting with the left 4-inch marking. When you finish it should look like this:
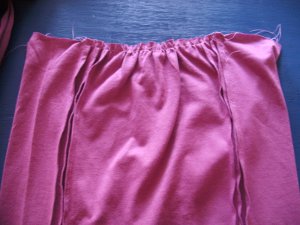
- Using a basting stitch, sew along the cut edge from the last tuck on the left side to the last tuck on the right side. Gather this stitch slightly and tie off the ends. Press it well.
- Find the center at the top of the back of the shirt. Measure 3 inches from the center in each direction. Sew a basting stitch from mark to mark. Gather, tie off the threads, and press.

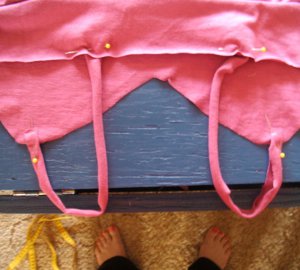
- Lay the top out flat, and cut a slit along both sides, stopping about 8 inches from the top.

- Now is the time to have your first fitting. Try it on to make sure you haven’t gathered it too much or not enough. When you slip it over your head, it should sit right under your chest and flow comfortably over your hips.
- Make the bodice. Lay out the top of the T-shirt you originally cut off. Using a cami that fits you well, trace an outline of the top.

- Cut out the outline in only the front layer of the T-shirt. When you get half way through, fold over what you have already cut onto the uncut portion and use it as the rest of your pattern. This way both sides will be symmetrical.
- Set that piece aside. Using another piece of the top of the T-shirt, cut out a strip 2 1/2 inches wide by the width of the shirt. Lay this strip on the bodice front, right sides together, and stitch along the sideseam using a 3/8-inch seam.
- Slide the bodice down over the tunic so that the bodice and tunic are right sides together. Pin well, making sure the bodice sideseams are lined up evenly with the side of the tunic.

- Sew around the top using a 3/8” seam. Flip the bodice right side out and press well.

- Add the fabric panels on the side of the tunic. Lay a scrap piece of fabric underneath the split on one side of the tunic.

- Spread the split so that it is comfortably open. Slide the fabric down so that it is about ½ inch longer than the bottom of the tunic. Pin the T-shirt fabric to the patterned fabric.

- Topstitch along the edge of the T-shirt fabric, about ¼ inch from where it meets the fabric.
- Fold the bottom edge of the fabric under twice and press, making it even with the edge of the T-shirt hem. Topstitch to finish the edge. Trim away any excess fabric on the inside of the tunic. Repeat on the other side.

- Cut two strips off the remaining original top of the T-shirt. These strips should be 1 inch wide and as long as the T-shirt is wide.
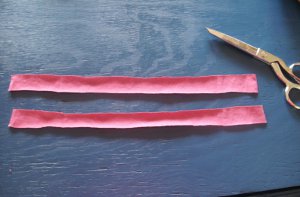
- Stretch these strips so that they roll up, essentially creating two pieces of knit yarn. These will be your spaghetti straps.

- Again, use a tank that fits you well and measure the length of the straps and the placement. Pin your straps in place.
- Very carefully slip the camisole over your head to make sure the length and placement of the straps is correct. If not, make adjustments. Use a stationary zig-zag stitch to sew the straps onto the bodice.
- Add the trim! You can be creative here: add whatever you like wherever you want it. I stitched the rickrack along the top of the front bodice and along the bottom edge of my fabric inserts. You could of course put trim all the way around the top or bottom.

Read NextAnthropologie Inspired Camisole
Your Recently Viewed Projects

Thanks for your comment. Don't forget to share!
MandyInPink
Jan 08, 2013
Kudos for making something so nice. Definitely doesn't look cheap, like some hand crafted things. I would actually pay for something like that.
bluecactuskitten
Jun 02, 2011
WOW! I never would have thought of using a tee for this! It opens up so much creation! Thank you for sharing!
Member 15424
Jun 02, 2011
This is just the cutest, and just think of the colors you could have these in.
taurusborn61 56652 75
May 21, 2011
If you are using a cotton fabric for the insert, I would add a 5/8" hem to the top and long sides and finish them before sewing them to the knit fabric. Or use a zigzag stitch to enclose the cotton edges when adding the ensert. This way the cotton edges will not fray.
Report Inappropriate Comment
Are you sure you would like to report this comment? It will be flagged for our moderators to take action.
Thank you for taking the time to improve the content on our site.