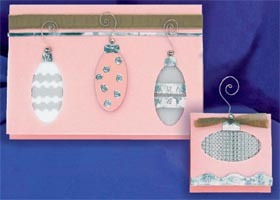
Pretty in Pink Retro Ornament Card and Gift Tag
Make a matching card and gift tag from AMACO to accompany a stylish Christmas present.

Materials:
- AMACO® ArtEmboss® PEEL ‘n STICK Metal Accent Sheets — used here were design patterns #2 (50144P) and #4 (50146T)
- AMACO® Keepsakes & Cards™ metal and mesh decorating sheets — used here were ?" WireForm® Aluminum Sparkle Mesh and ArtEmboss® light aluminum sheets from set #50122L
- AMACO® Fun Wire™ — 22 gauge clear silver
- AMACO® Friendly Plastic® Needle Tool
- 12" x 12" card stock in light pink and white
- 12" x 12" clear vellum
- Sheer sage wired edge ribbon
- ¼" sheer sage ribbon
- 3 round silver mini-brads
- McGill®: Super giant oval paper punch
- Decorative edge scissors, used here was FISKARS® corkscrew pattern
- FISKARS® paper crimper
- Therm O Web® PEELnSTICK double-sided adhesive: 5½" x 4½" sheet and ¼" tape
- Therm O Web® PEELnSTICK ½" white foam mounting squares
- Round nose jewelry pliers
- Wire cutters
- Scissors
- Ruler
- Old magazine
Making more than a few cards? AMACO® ArtEmboss® soft metal sheets and WireForm® mesh is available in packages with larger sheets. Look for them in the metals section at your local arts and crafts stores or by visiting the AMACO® website: www.amaco.com
Assorted other paper punch shapes can be used to make ornaments on your cards and tags. Some suggested shapes: Square (side ways looks like a diamond shape), circle, egg, heart, star, and others.
Card (finished size: 5" x 7")
Steps:
- Cut a 10" x 7" piece of pink cardstock and a 10½" x 7" piece of clear vellum. Place vellum on top of pink cardstock matching three edges. Fold the two in half, bringing 7" pink ends together and leaving ½" of vellum extending below bottom side of card front. With card face down on a hard surface, place ruler along bottom of card front and use as a straight edge to fold the ½" vellum extension to inside of card, creating a flap. Do not adhere flap to inside of card yet.
- Center an 8" length of ?" sage green ribbon approximately ½" from top front of card. Ribbon ends should extend ½" beyond each side edge. Fold the ends to inside of card and adhere in place using ¼" wide double stick tape.
- ORNAMENTS: Punch two oval shapes near side outside edges of card front, going through both the vellum and cardstock layers at the same time. Caps for these two ornaments are made by cutting upside-down cup shaped pieces of the Metal Accent Sheet (any pattern). Peel backing and adhere as shown at top of the punched oval, wrapping bottom edge through to adhere on inside of card.
Ornament at left — Use decorative edge scissors to cut thin strips of WireForm® Sparkle Mesh. Attach on inside of card with ¼" wide double-sided tape.
Ornament at right — Cut a 1¾" x 2¾" piece of WireForm® Sparkle Mesh and two strips from the Metal Accent Sheet. Apply strips onto center of mesh. Attach mesh to inside of card behind the punched oval using ¼" double-sided tape.
Center ornament — Apply double-sided adhesive sheet to back of one of the pink ovals previously punched from side edges of card. Cut around edges to remove oval from the tape sheet, peel backing and apply onto thin silver aluminum sheet. Trim metal to leave a slight border exposed around outer edges of pink oval. For cap, cut a ½" x ?" piece from the Metal Accent Sheet, peel backing, and attach one ½" end to top of the prepared pink ornament. Fold the piece in half, adhering opposite ½" end to back side of ornament. Trim top to create curved cap shape shown here then decorate front of ornament with small swirls cut from Metal Accent Sheet #2. Attach ornament at center of card using two foam mounting squares.
- Cut three 3" lengths of clear silver Fun Wire™ and with round nose jewelry pliers bend to create “hangers" shown at top of each ornament. Bend a small loop at bottom of each hanger. Open card, lay face up on an old magazine and use needle tool to punch a small hole at top of each ornament. Use holes to attach each hanger with a silver brad.
- CARD LINER: Cut a 5" x 7" piece of white cardstock and insert on back side of card front. Fold the vellum flap at bottom front of card over liner; securing to hold in place using ¼" double-sided tape. Cut a plain (not embossed) ?" x 7¾" strip from long side edge of a Metal Accent Sheet and apply to front of card just below ribbon. Wrap ends around liner on inside of card to help secure the liner in place.
Gift Tag:
- Cut a 3" x 5?" piece of both clear vellum and pink cardstock. With cardstock on top of vellum, fold the two pieces nearly in half, leaving ?" lip extending at one end.
- Punch an oval shape on front of tag going through both vellum and cardstock at same time. Cut a 3½" x 2½" piece of ArtEmboss® light aluminum sheets. Use paper crimper to crimp the metal twice, going in two different directions to create a “waffle-like" appearance. Use ¼" double-stick tape to attach on inside of card behind the punched oval.
- Cut 2½" x 3" piece of white cardstock and tape to back side of tag front, concealing metal. Cut a decorative piece of Metal Accent Sheet 3½" long, center, then attach to bottom of tag front, wrapping ends to inside around the white liner. Cut a small cup shaped piece of Metal Accent Sheet to apply for ornament cap.
- Form a hanger same as with card (see card instructions #4), punch a hole then attach at top of ornament cap using a silver brad. Cut two 6" lengths of ¼" sage ribbon and tie in a knot around base of hanger. Trim excess ribbon.
Read NextSuper Simple Shaker Ornament
Your Recently Viewed Projects
Thanks for your comment. Don't forget to share!
Report Inappropriate Comment
Are you sure you would like to report this comment? It will be flagged for our moderators to take action.
Thank you for taking the time to improve the content on our site.