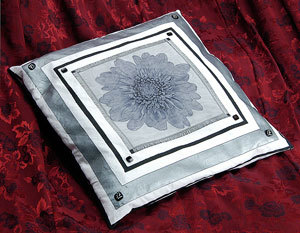
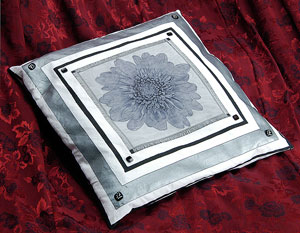
Flowery Decorative Throw Pillow
As I looked through a home décor magazine the other day, I was inspired by an ad for fabrics by a noted designer. The images were bold, the palette black and white. I imagined how easy it would be to create a pillow using ExtravOrganza, Lumiere, and Neopaque in the style of the ad. The result is dramatic and strong, a fun departure from my normally ornate sensibilities. Project from Jacquard Products.
Materials:
- Jacquard ExtravOrganza (2 sheets)
- Jacquard Neopaque (Black)
- Jacquard Lumiere (Pewter)
- square pillow blank (white)
- masking tape
- buttons
- needle and thread
- paint brushes
Instrustions:
- Print Images: I started with a close up, digital photo of a flower, manipulating the image in Photoshop until I came up with two versions; one outline, and the other with details amplified, color set to grayscale. Experiment with whatever graphic program you have available to you. The important thing is to have good visual contrast between the two images. Although it would be possible to get one image containing both the outline and amplified details, the beauty comes in layering the two pieces of ExtravOrganza on top of each other. When you are satisfied with the quality of your images, print them on ExtravOrganza, one sheet at a time. Before you peel off the paper back, trim images to desired size for your pillow. Be sure to leave room for stitching and fringing. I made sure there was at least 1/2" between the edges of my flower image and the edge of the ExtravOrganza. Set aside.
- Prepare Pillow for Painting: Find the center of the pillow by laying a long ruler corner to corner as shown. Draw a short line with an auto fade pen approximately in the center. Move ruler to opposite corners and repeat. The two lines will intersect in the exact center of the pillow. To place the first square of masking tape, keep the long ruler spanning the pillow from corner to corner, measure 5 3/4" from the center point toward one corner and make a dot with the auto fade pen. Repeat for all corners. Connect the dots with masking tape (dots should be on the inside edge of tape). Trim the corners.
- NOTE: Your dimensions may vary depending on the size of your pillow and the image you are using. Don’t worry—you can use the same process, just adjust your measurements accordingly. The important part is to get a field of color behind the ExtravOrganza image roughly the same size as the image. To place the second square of masking tape, repeat the above process, marking the next set of dots 1/4" from the outside edge of first taped square. The last square of masking tape is placed 1/4" from the outside edge of the pillow.
- NOTE: Be sure to press the masking tape down very firmly, especially on the edges, to keep the paint from bleeding underneath.
- Paint the pillow: Use Neopaque Black to paint the inside square, the next color band and the outside edge. Paint the remaining large band with Lumiere Pewter. Let dry. Remove tape and heat set with a dry iron, following instructions on the bottles.
- Attach ExtravOrganza images: Layer the ExtravOrganza images with the outlined image underneath. Use small pieces of double stick tape very close to the edges to keep the pieces in place. Postition the ExtravOrganza on the pillow centered in the painted square. Hold in place with small pieces of double stick tape. Carefully sew a straight stitch 1/2" from the edge of the ExtravOrganza all around the square using black thread. Sew a second line 1/8’’ inside that line. (If you have a double needle you can save a step there). Remove the double stick tape, trim the top layer of ExtravOrganza to about 1/4" from the stitching line and fringe both layers. The double line of stitching keeps the ExtravOrganza in place after fringing.
- Details: Outline the painted Pewter band with black straight stitching. Sew accent buttons in corners as shown.
- This pillow could be very effective in different colors and it’s so easy you could make several in an afternoon. So elegant your friends may think you’ve been shopping in expensive boutiques!
Read NextFabric Floral Trinket Box