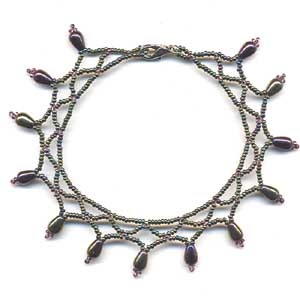
Lacy Woven Anklet
Weave this fashionable anklet for you or a friend, from The Bead Studio!
Can't get enough of anklets? Check out How to Make an Anklet: 7 Jewelry Patterns for more projects like this one.
Read more at http://www.favecrafts.com/preview_article/DIY-Accessories-DIYJewelry-HowtoMakePaperBeads#rEM6Tjl2smHuQSxq.99
Read more at http://www.favecrafts.com/preview_article/DIY-Accessories-DIYJewelry-HowtoMakePaperBeads#rEM6Tjl2smHuQSxq.99
Read more at http://www.favecrafts.com/preview_article/DIY-Accessories-DIYJewelry-HowtoMakePaperBeads#rEM6Tjl2smHuQSxq.99
Materials:
- Size 12 needle
- 3 colors, size 11/0 seed beads
- Nymo, size "B" thread
- Clasp & 2 oval jump rings
- Beeswax
Instructions:
-
Thread needle with doubled thread and wax. Tie a knot at the end. Thread on 6 beads color “A”, one bead color “B” then 7 beads color “A”. Run needle through the one bead of color “B” and through the 6 beads, creating a beaded loop.
-
Add one bead of color “B” and 6 beads color “A”. Continue to repeat this pattern until the desired length is reached. (An anklet is usually about 9” long>) Remember to allow for the length of the clasp.
-
The end bead should be 1 of color “B”. Add 7 more color “A”, then bring needle back through the last color “B”, creating a bead loop.
-
Keeping the beads tight, add 3 beads color “B”, one bead color “C”, and three more color “B”. Thread the needle through the next color “B” bead on the base strand. Pull firmly, checking to be sure there are no gaps of thread.
-
Continue beading, repeating pattern until you reach the end of the strand. Remember to keep the thread pulled tight.
-
Run needle back through all the beads of the beaded loop, then through 4 beads of second row. The needle should exit from the color “C” bead.
-
Add 7 beads color “C”, (if desired, add bells or dangle on this row) then thread needle through the color “C” bead of the second row. Repeat until you come to the last color “C” bead in the second row.
-
After running needle into last color “C” bead, continue to run through the beads in the second row and through the bead loop.
-
Thread the needle through the first 7 beads on the first row and tie a half hitch.
-
Trim the threads and put a drop of glue or clear nail polish on knots.
- To attach clasp, gently open jumprings to the side, slip onto bead rings, hook on clasp and close.
Read NextLacy Woven Anklet
Your Recently Viewed Projects
Thanks for your comment. Don't forget to share!
flowergirl
Sep 17, 2017
I know the best person to make this for. The pattern is well detailed but you should probably only use three colours for this project.
wackswork 1931264
Apr 15, 2014
Such a beautiful and delicate design. It will be a precious addition to any wedding!
Vivismstigerhawk
Jun 11, 2013
love the idea and the pattern but if i can suggest...next time kindly print your photo and the pattern in color
adeyemoomobolanle 1008125
Sep 13, 2012
I have tried it and it really so lovely. I first of all tried it with the three colours specified and then tried it with different colours all together...Waooh! I love both ways.Thanks for this idea...I love your site!
Report Inappropriate Comment
Are you sure you would like to report this comment? It will be flagged for our moderators to take action.
Thank you for taking the time to improve the content on our site.