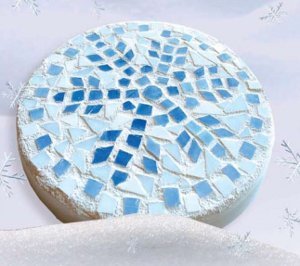
Snowflake Mosaic Stepping Stone
Place this snowflake mosaic stepping stone in your yard or garden for a pretty winter accent. This mosaic from Diamond Tech also makes a great holiday accent for indoor or outdoor decor. For another snowflake mosaic project, check out the Snowflake Mosaic Serving Tray.

Materials:
- 8” Round Stepping Stone Mold
- 1 pkg. Stained Glass Chips Blue
- 1 pkg. Stained Glass Chips White
- 20 lb Jennifer’s Mosaics Outdoor Cement
- 2 lb White Grout
- Wheeled Glass Nippers
- Plastic Bowl and Mixing Spoon
- Newspaper
- Scrubby or Sponge
- Safety Glasses
- Petroleum Jelly
- Rubber Gloves
- Soft Cloth
- Paper Towel
- Mosaic Glue
- Carbon Paper
- Pen
- Snowflake Pattern (Enlarge by 425% for 8" stone)
Step 1: Get Ready!
- Cover your work area with newspaper to protect surface.
- Collect all supplies needed for the project and place them on your work table.
- Using a paper towel, apply a thin coat of petroleum jelly to the interior of the mold.
Step 2: Pour Cement!
- Place 5 cups of Jennifer’s Outdoor Cement into a mixing bowl and slowly add 10 ounces of water, mix thoroughly. Wear a dust mask while mixing.
- Pour cement slowly and evenly into mold; gently tap sides of mold to release air bubbles in cement.
- Do not move mold while the cement is drying. Cement will warm as it hardens: wait approximately one hour (time may vary due to climate) for cement to harden.
- Once cooled and set, remove the stone from the mold by turning mold over and lifting the edges.
- Allow stone to completely dry/cure for 24 hours on newspaper before proceeding to the next steps.
Step 3: Place the Glass!
- Enlarge pattern once by 400%., return pattern to copier and enlarge again by 125%.
- Transfer pattern onto the stepping stone by taping carbon transfer paper and pattern in the center of the stone. Trace over pattern with a pen.
- Remove pattern and carbon paper. Hard-line the pattern onto the stone by tracing over the carbon lines with a marker.
- Nip blue and white chips into quarters. Start 1/8” from the stepping stone edge, alternate blue and white chips in a checker board pattern around the stone. This will create the border ; glue into place.
- Nip blue chips into various shapes to fit the snowflake pattern, use photo as a guide. When pleased with design, glue into place.
- Nip white chips into random sized pieces, fill in the background around the snowflake. Glue into place.
Step 4: Time to Grout!
- Reserve a few tablespoons of grout and set aside. Place remaining 8 oz. of grout into a mixing bowl and slowly add water, 1 tablespoon at a time. Mix with craft stick or spoon until the grout reaches “fudge-like” consistency. If it is too watery, add the reserved dry grout in small amounts until the consistency is correct.
- Wearing a disposable glove spread the grout into all the nooks and crannies. Wait about 15 minutes for grout to set.
- Begin to gently wipe away the excess grout using a paper towel, taking care not to pull grout out of glass spaces. Use your finger to smooth the grout around the outer edge of the stone. It is important to remove grout from the glass surface before it is completly dry.
- Using the soft cloth, buff the glass to a clean shine. Allow 24 hours for the mosaic to dry before placing outside.
Read NextAdorable DIY Snowflake Centerpiece


