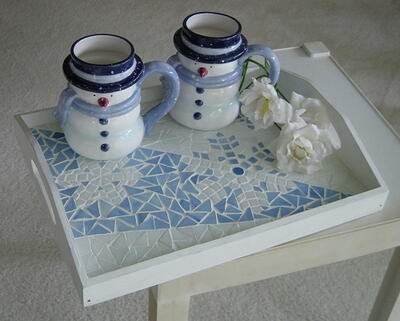
Snowflake Mosaic Serving Tray
During the snowy months, serve hot cocoa on this lovely snowflake mosaic serving tray from Diamond Tech. This makes for a lovely holiday accent. A pattern makes this mosaic project a breeze. For another great snowflake mosaic project, check out the Snowflake Mosaic Stepping Stone.

Materials:
- 1 Wooden Serving Tray 14 ½” x 11”
- 1 package each Blue and White Iridescent Glass Chips
- 1 package White Glass Chips and Blue Glass Chips
- 8 oz. White Unsanded Grout
- Mosaic Adhesive
- Latex Glove
- 2 oz. White Latex Paint
- Foam Brush
- Mixing Spoon
- Carbon paper and pencil
- Snowflake pattern
- Project pattern
- Paper Towels or soft cloth
- Disposable or plastic bowl
- Wheeled Glass Nippers
- Snowflake Pattern
Step 1 - Preparation
- Begin by wiping the wooden tray lightly with a soft cloth or paper towel to remove surface dust or dirt. Paint the tray with white latex paint and allow to dry.
- Determine the center of the tray and align with the center of the pattern. Place carbon paper between the pattern and the surface of the tray and trace the pattern onto the tray.
Step 2 – Glass Placement
- Create the snowflakes by nipping Iridescent Blue and White Glass Chips into various shapes using the pattern as a guide. For more accurate shapes, use a Sharpie™ marker to create an outline of the shape you wish to create. Using wheeled glass nippers, nip along the outline of the shape.
- Arrange the tiles on the tray following the pattern.
- Lift each glass piece and apply a thin layer of glue to the back. Firmly press each glass piece onto the tray matching the pattern.
- Create Blue and White triangles by nipping the glass chips in half on the diagonal. Use the triangles to fill in the background of the tray. Some triangles may need to be cut at various angles for best fit. Working in small sections, apply a thin layer of glue to the back of each piece and press firmly in place. Allow glue to dry approximately 4 hours.
Step 3 – Grouting
- Measure grout following the manufacturer’s recommended instructions. Reserve a few tablespoons of grout and set aside. Adding 1 tablespoon of water at a time to remaining grout, mix with a craft stick until the grout reaches “fudgelike” consistency. If it is too watery, add the reserved dry grout in small amounts until the consistency is correct.
- Wearing a disposable glove, spread the grout into all the nooks and crannies. Wait about 15 minutes for grout to set.
- Begin to gently wipe away the excess grout using a paper towel taking care not to pull grout out of tile spaces. It is very important to remove any grout on the tiles surface before grout is completely dry.
- Using the soft cloth, buff the tiles to a clean shine. Allow 24 hours for the mosaic piece to dry thoroughly.
MOSAIC TIPS:
1. Always use protective eye wear when nipping glass.
2. Never dispose of grout directly down a drain. Kit contains small
3. If grouting without latex gloves, pour vinegar over hands to restore skin PH.
4. Transfer patterns easily by rubbing a #2 pencil or a soft lead over the back of the pattern, place on a surface and trace the pattern outline.
5. Avoid boring areas of flat color in a mosaic by missing different shades of the similar color.
6. Opus (Latin for work) is the word used to describe the way tiles are laid. The opera of a mosaic dictates the overall flow or movement of the mosaic.
7. When your fingers are just too big to maneuver small pieces of tesserae, use a pencil or tweezers to push them into tight fitting areas.
8. Look for books on mosaics for inspiration.
9. When creating a mosaic with rounded or curved sides, fill a quart size Ziploc back with 2 -3 cups of rice and place the item on top to prevent it from rolling. A bean bag or pillow will also work.
10. To prevent glass from flying about, nip item inside a bowl or pail. The sides of the container will prevent fly away pieces.
Read NextWinter Wonderland Candle Jars
Your Recently Viewed Projects
Thanks for your comment. Don't forget to share!
onecraftymomma4lif e
Aug 27, 2012
Do you HAVE to use latex paint ? is there a reason Latex is listed insed of acrylic ... I'm allergic to latex but think this is gourgous , anyone know if theres any reason for the latex , like because of the grout or something ? ... Also trays like this are about 5 8$ at a craft store and most craft stores around me weekly have coupons on there websites , for 40 to 50% off , and all the stores will take the others coupons so you can get a good discount
wizardelf 1207863
Dec 17, 2010
If you get trays at Dollar General, 99 cent store, Dollar Tree, the supplies shouldn't cost that much, keep track at Salvation Army stores or Goodwill stores and you get lucky with wood trays and other items for mosaics Great project
Nana Crystal
Dec 16, 2010
This is a beautiful gift idea! If you find a supplier to buy the trays from in bulk, this shouldn't be very expensive at all! And you can always change the colors to suit the recipient! I LOVE snowflakes!! Thank you!! Crystal
Patty Rivera
Jul 01, 2010
I LOVE THIS IDEA. IT WOULD BE NICE IF YOU COULD PUT A BALL PARK FIGURE ON HOW MUCH IT MIGHT COST. KEEP UP THE GOOD WORK
Report Inappropriate Comment
Are you sure you would like to report this comment? It will be flagged for our moderators to take action.
Thank you for taking the time to improve the content on our site.


