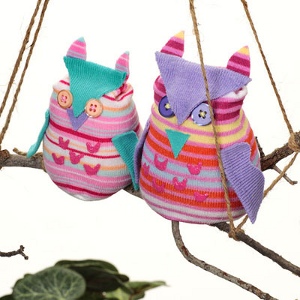
Repurposed Old Sock Owls
Got a bunch of old socks lying around? Rurpurposing old socks with crafting is the way to go! These repurposed old sock owls from I Love to Create are cute toys or decorations made from mateless or holey socks.
You can use old socks to make a lot more than sock owls! Check out these other sock crafts: Sock Wreath, Sock Rabbit and Chick Friends, and Totally Tubular Pumpkins.
Materials:
- Stick
- Rice
- Kids socks: assorted sizes
- Paper towels
- Needle and thread to match
- Buttons: ½” (2) per owl in desired color
- Clothespins
- Raffia
- Sewing pins
- Jute for hanger, 2 yards
- Masking tape, low tack
- Scissors
Instructions:
- For body, cut across sock, just under heel, using scissors.
- Pin forehead, beak and wing patterns onto ribbing of socks. Cut out.
- To create ears, glue two scrap sections of socks together. Let dry. Cut out ear shapes.
- Fill body section with rice to within 1-1/2” from top. Pinch in sides and apply a dot of glue in pinch to hold in place. Hold with clothespins until dry. Fold excess to back, applying glue on back of flap and press in place creating head of owl. Hold with clothespins until dry.
- Thread needle with contrasting thread to buttons. Sew a few times in holes of buttons. Tie knots at back of button then trim ends.
- Apply glue to back of forehead triangle, smooth with finger to edges then press in place slightly above fold of body. Apply a thin bead of glue along bottom of edge of ear then press in place on back of forehead holding in place with tape if needed until dry.
- Glue buttons, beak and wings in place. Let dry.
- Start flow of Pink Slick Paint on paper towel using an even pressure on bottle for a smooth line. Lay owls on back and flatten. Paint semi-circles on sock to create look of feathers. Let dry.
- Cut a stiff branch with several branches. If needed, several smaller branches can be tied together with raffia to create a wider area for owls to sit on.
- Position owls on branch then remove and apply a thick bead of glue in place. Replace owl and press into glue. Repeat with other owl. Let dry.
- Tie a knot with raffia on one side of branch; determine length of hanger then tie knot on other side. Hold up to see if it hangs straight, if not add another length of raffia and knot at top.
Read NextVintage Handmade Handkerchief Doll


Thanks for your comment. Don't forget to share!
goldengirl 5237724
Dec 29, 2018
It is now Dec. 28, 4 days until 2019, and as far as I can tell there is still no pattern download. Any chance it will be appearing soon?
Editor Dana
Dec 31, 2018
HI there! Unfortunately even after locating the original source, I was not able to find the printable patterns. I recommend reaching out to ILovetoCreate to see if they have the original patterns in their archives. Here is the URL where you can see the original pattern and reach out: http://ilovetocreateblog.blogspot.com/2010/03/sock-it-to-me-owls.html Good luck! Happy New Year!
cochranejan 273998 2
Jan 30, 2012
any news on pattern pieces ? Would love to make the owls for my grandson
snow6140 2429482
Jan 07, 2012
I love all of your projects so much that sometime I open my email just to see what nice new patterns that you posted today. I have been using the save project in you site but I would love to be able to print my pattern that I want to work on to carry along with me when I leave home. I have not been able to print your patterns from the site. What am I doing wrong?
Sewthatsit
Jan 04, 2012
Not clear on where "under heel" is...the body would consist of the toe and main part of sock, cutting off heel and ankle...does that sound correct?
JennyBee1
Jan 03, 2012
Hi everyone! Thanks for bringing this to our attention! We have contacted the company regarding the pattern that seems to be missing. We'll keep you posted! We apologize for any inconvenience, --editors of FaveCrafts
tlballantine 64218 95
Jan 01, 2012
These are adorable, but like the other comments where are the patterns?
cochranejan 273998 2
Dec 31, 2011
Cute owls,where is the pattern for wings, beak and forehead?
Report Inappropriate Comment
Are you sure you would like to report this comment? It will be flagged for our moderators to take action.
Thank you for taking the time to improve the content on our site.