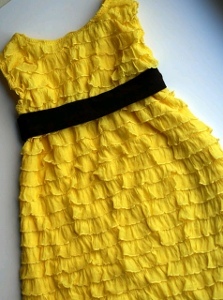
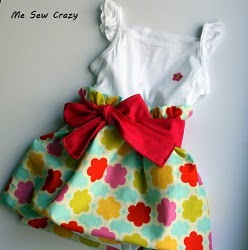
Little Girl Bubble Dress
When Spring rolls around you'll want to have adorable outfits for your little girl. The Little Girl Bubble Dress by Jessica Gerblick is perfect for family gatherings or picnics. Let this free sewing tutorial show you how to make a dress they'll love to wear.

Materials:
- A T-Shirt or onesie that fits well / slightly away from the body (not tight, as the cotton will not stretch with the knit material once sewn on)
- anywhere from ½ yd to ¾ yd fabric, depending on size on child
- Coordinating thread
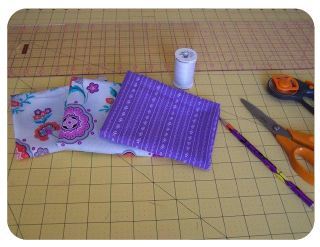
Let’s Get Cutting:
You will need to determine how long you want the skirt to be, based on where the waist of your dress. Once you have that length measurement, double it.
Cut (1) of your Length x 44" W fabric.

Add about 2” to that, and this will give you the Length.
For the Width, I simply cut a long strip, as we will be gathering the waist around the top of the dress...mine happens to be 36”W x 22” Long.
Let’s Get Sewing:
Fold the fabric in half, right sides together, matching the Length seam. Pin and sew for a back skirt seam. You will now have a tube of fabric. Press seam.
Sew a line of gathering stitches along the top edge of the skirt, and another line of gathering stitches approx. 2" beneath that row.
Gather the top line of stitches until the skirt is the same width around as the shirt.
With fabric wrong side out, slip around shirt upside down with skirt seam in the back center, and with right sides together, pin to shirt. Sew. See Photo:

It helps to use zig zag stitches when sewing cotton to knit for a little extra stretchy room.
You will now have this:

Now, gather the 2nd line of gathering stitches until they are the size of the shirt. Match the 2nd line of gathered stitches to where the skirt currently meets the shirt seam and pin in place. This will result in a ruffle pushing up 1" around the top. See Photo:

Zig Zag stitch or sew a straight line over the gathered stitch line, securing ruffle in place. Zig Zag stitch will afford a bit more stretch, but straight stitch is more secure.
The top of your skirt is now in place. To turn this into a bubble skirt, we will now be doing the following...
Sew a line of gathering stitches along the bottom edge of the skirt.
Gather the third set of gathering stitches at the bottom of the skirt to the size of the shirt.
Fold bottom hem under 1/4" and Press.
Now lift the entire skirt up towards the neckline, so that the bottom of the shirt is showing.
Take the bottom skirt hem and pin to the shirt. This will result in enclosing the raw gathered edges of the hem. (You can alter your skirt length here by determining where you pin the bottom of the skirt to the shirt.)
Stitch in place. See Photo:


Flip skirt down and you are finished!
To make the tie sash waste, simply take a 5” x 44” piece of fabric, fold in half right sides together and sew along outer raw edge, leaving a 4” opening to turn. Turn right side out and Press. Slip stitch opening closed. Sew along outer edge for a finished look.
*Note - if you want to use a tighter fitting shirt or onesie, I would suggest making this bubble skirt portion over a 1/4" - 1/2" piece of elastic and zig zag stitching that to the shirt instead. This will result in allowing the cotton to stretch more easily with the knit.
Read NextMomster Stuffed Animal Pattern
Your Recently Viewed Projects
Thanks for your comment. Don't forget to share!
Weberme
Apr 07, 2016
This is so cute. I have loved these bubble dresses but have not attempted one because I could not understand how to make the bubble skirt to look right. I love that you attached it to a onesie. I would have made the top part and it would take me forever.Thank you for posting this tutorial so I can try this again. Anyone new to bubble dresses attempt this yet?
belleyarbro 949181 9
Jun 17, 2011
I love this little skirt addition to a plain onesie or t-shirt. You went to great lengths to explain every step in detail. Thanks for a great project. Can also be made larger for older toddlers and little girls, especially adding the skirt to the elastic as you indicated. Thanks
CreativityGoddess
May 23, 2011
Hello all, We can contact the designer for clarification on this project. Please let us know specifically what you are having trouble with/what questions you have and we will contact her. Thank you, -The editors of FaveCrafts
motherbd 4657097
May 23, 2011
has creator responded to above 3 calls for help? need clarification also....
toliverfamily 2529 548
May 15, 2011
directions not clear at all, part of the way done and stuck, help!!!!!
Report Inappropriate Comment
Are you sure you would like to report this comment? It will be flagged for our moderators to take action.
Thank you for taking the time to improve the content on our site.