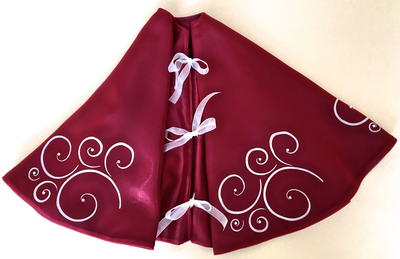
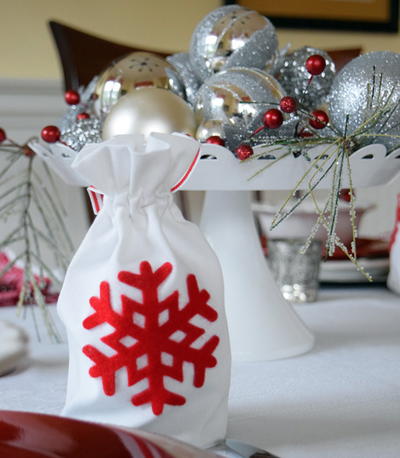
Grandma's Wonderful Gift Tote
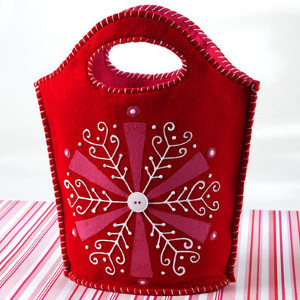
You already have the perfect gift for your loved one, so now all you need is a homemade gift idea to put it in. Grandma's Wonderful Gift Tote will fill the receiver with joy even before they peek inside. Once you sew this lovely bag, everyone will wonder what treasures are held within. This homemade Christmas gift wrapping idea is just as special as the gift itself. Sew Grandma's Wonderful Gift Tote for picture-perfect reusable fun all holiday season long.
Primary TechniqueSewing

SeasonWinter
Sewn byEither Hand or Machine
Materials:
- Tulip® Dimensional Fabric Paint
- Pink (65010)
- White (65000)
- Tracing paper
- (1) Button –1” white
- Permanent felt pen
- White chalk – sharpened to a point
- Foil
- Sewing machine with matching thread
- Embroidery floss – white
- Sewing pins
- Pencil
- Needle with large eye
- Scissors
- Self-adhesive shelf paper
- Paper towels
- Plastic knife
- Felt yardage – pink, red – ½ yard each
- Pattern
Instructions:
- Enlarge bag pattern to 14” from handle to base and 12” at widest part, then draw in hole for handle. Cut an oval base for bag that’s 8 ½” x 4 ½”.
- Pin tote and base pattern onto double layer of red felt then cut out. Repeat on a double layer of pink felt.
- Layer and pin together pink and red felt pieces with red facing outward. Sew a ¼” seam along top edge and around inside handle on both sections. Trim seams if necessary to even out.
- Pin sides together then sew along edges.
- Thread a needle with three strands of white embroidery floss then tie a knot in ends, creating six strands. Whip stitch around sides, inside handle and along top edge.
- Use pencil to trace triangle pattern design onto tracing paper, then trace five more, equally spacing to create snowflake as shown.
- Place shelf paper shiny side up over pattern then use felt pen to trace design onto shelf paper. To create stencil, carefully cut out inside of each section, leaving outside edges intact.
- Position stencil on tote, press to secure then run a finger along inside cut edges to prevent paint seepage.
- Squeeze a puddle of Pink Slick 3D Fashion Paint onto foil. Use knife to spread paint into each section of design, leaving an even coat. Carefully remove stencil and let dry.
- Trace other design onto tracing paper. Flip pattern over then use chalk to trace over lines. Position design between each painted section on bag then run a finger along lines, transferring design in chalk onto bag. Repeat steps, retracing design with more chalk as needed.
- Start flow of White Slick on paper towel, using an even pressure on bottle for a smooth line. Trace over design lines with White Slick. Add pink dots with a white dot in center where shown. Squeeze a dot of Pink Slick at center of snowflake design then press button into paint. Refer to photo. Let dry.
- Pin bottom sections in place then whip stitch along edges.
Your Recently Viewed Projects
Thanks for your comment. Don't forget to share!
Weberme
Nov 10, 2017
I am always looking for something besides those simple paper bags you buy to put a gift in especially a homemade one and I love that you can reuse it later on. Seems like a lot of work but The reward of the person who receives it would be well worth it. You can even makeit to the size to fit the gift by changing the way you copy pattern. So cute. I love it.
Mary Sarah
Nov 07, 2017
Hi! I do not see the pattern for this project. Can you help? Thank you in advance for your time!
Editor Dana
Nov 07, 2017
Mary Sarah, it took quite a bit of sleuthing but I've found the pattern! The project is updated with a link to the pattern for the bag. Enjoy!!
Marilyn B
Jun 05, 2017
The photo of this gorgeous red tote really drew me in as it looks really spectacular! It does seem like quite a bit of work but the process is therapeutic and would bring a lot of calm and comfort as you progress through the steps. As an alternative. I might try using a thicker white cording and do a delicate zigzag stitch securing it into position, especially if that is an easier procedure for you personally. This tote would look pretty just sitting out, perhaps holding magazines or books in your den of living room. Thanks for sharing a pretty project!
SissieSass
May 17, 2017
I would never have thought to make the gift vessel something that guests could keep when they opened something at your home, or you dropped by during the holidays. These items are easy to repurpose, or just use to carry around crafts or other items. Such a pretty and useful item!
Linda
Feb 08, 2017
Truly adorable gift tote. I can hardly wait to make one to start with, and certain to make several for any gift giving occasion.
mulberrygalprinces s
Jul 13, 2016
This is beautiful. I love everything about it. After reading thru the instructions it's not hard just a little time consuming but well worth it. I may do it in a different color scheme though. After all, I am grandma and I can have it any color I want. Thank you for sharing this gorgeous pattern and idea.
Report Inappropriate Comment
Are you sure you would like to report this comment? It will be flagged for our moderators to take action.
Thank you for taking the time to improve the content on our site.