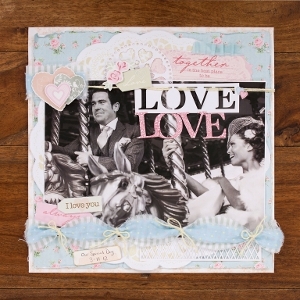
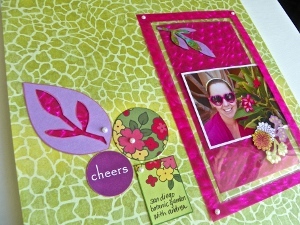
Repurposed Plastic Frame Scrapbook Layout
You'll never run out of scrapbook craft ideas when you have items from your home that you can rework and recycle. Capture memories by taking the window from a piece of plastic packaging and create a Repurposed Plastic Frame Scrapbook Layout. You can use this design for all kinds of occasions - celebrating a new arrival, graduation or remembering a fun vacation.

Materials:
- Scrapbook papers – background and accent
- Empty plastic packaging window
- Paper die-cuts
- Self-adhesive gems
- Photograph
- Clear gel craft glue
- Exacto blade, metal ruler
- Cutting mat
- Paper trimmer
- Craft paint, paintbrush
- 12” X 12” smooth foam panel
Instructions:
-
Paint the edges of the smooth foam panel and set aside to dry. OPTION: You may wish adhere the background paper to the foam panel first, then create your layout on top of it.
-
Measure the packaging window, add 1” to each dimension, then trim the accent paper to that final size.
-
Carefully slice out the center of the accent paper with an exacto blade, leaving a ½” wide open frame that will fill around the packaging window. Trim the center piece down by ½’ in both directions – this piece will be a backdrop for your photo.
-
Arrange your photo and die-cuts on top of the backdrop and position on the one side of the background paper, then arrange another cluster of die-cuts on the other side of the page that includes some wording and a journal card. TIP: Snap a picture of your layout so you remember where everything goes as you start moving things around to glue them down.
-
Adhere the die-cuts that surround your photo to the inside of the window with clear gel glue; set aside to dry. Adhere the photo and backdrop to the background paper.
-
Glue the window into position on top of your photo/backdrop – press and hold for a few moments, then allow to dry.
-
Glue the frame on to the edges of the window, and glue down the cluster of die-cuts on to the background paper (write on your journal card before gluing). Once everything is dry, embellish your layout with a few self-adhesive gems.
-
Adhere the layout to the foam panel – apply a thin, even coat of glue to the foam one quadrant at a time and press the layout into place.

Read NextBeach Day Scrapbook Layout
Your Recently Viewed Projects
Thanks for your comment. Don't forget to share!
Report Inappropriate Comment
Are you sure you would like to report this comment? It will be flagged for our moderators to take action.
Thank you for taking the time to improve the content on our site.