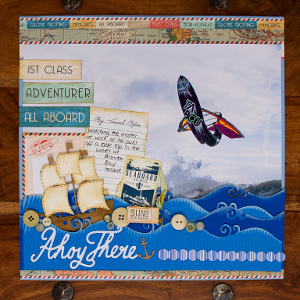
All Aboard for Adventure Layout
All aboard for adventure! With this adorable All Aboard for Adventure Layout, you can cherish and remember a favorite family vacation, a fun day at the beach, or a weekend road trip. Made from a combination of dyes and embellishments, this easy scrapbook layout design is great for paper crafters who are looking for a bit of a challenge.

Materials:
- A4 Premium Cardstock Textured (75pcs) - Capsule - Multi
- 8 x 8” Paper Pack (32pk) - Capsule - Burleigh Blue
- 8 x 8” Kraftstax (20pk)
- Pigment Ink Pads - White
- Dye Ink Pads - Chocolate
- Assorted Buttons (250g) - Vintage Notes
- Build A Scene Dies (16pcs) - Nautical
- 12 x 12” Paper Pack (32pk) - All Aboard
- Travel Labels (24pcs) - All Aboard
- Ribbon Clips (15pcs) - All Aboard
- Travel Notepad - All Aboard
Instructions:
-
Cut two strips of the border paper. Glue one to the top of the blue cardstock background and one at the bottom. Adhere the A4 photo towards the top of the cardstock.
-
Glue one of the Travel Labels about a third of the way up on the left hand side of the page. Glue one of the Travel Notes at an angle on the right hand side of the label.
-
Die cut the swirly wave shape from dark blue cardstock using a die-cutting machine, repositioning the die along the card until the full length of the sheet has been shaped. Cut two. Repeat twice on pale blue card and then feed through a paper crimper.
-
Ink the edges of each strip with white pigment ink to give a white water effect. Layer the strips at the bottom of the layout. Don’t glue right to the edges so you are still able to tuck items in to the waves.
-
Cut the ship’s base in kraft cardstock. Ink and then lightly draw some lines with pencil to create a wooden effect. Cut out the sails, ink the edges and draw some pencil line detail around the edge. Arrange on the masts of the ship. Tuck the ship behind the waves on the left side of the layout.
-
Add a cardstock sticker from the All Aboard collection to the right of the travel note overlapping the back wave. Cut ‘Ahoy There’ from the Burleigh Blue Capsule Collection paper and add to layout along with an anchor cut from kraft cardstock.
-
Die cut a border from paper using the scallop wave die. Line up the die and cut a second time to make a border of circles. Adhere to your layout on the right hand side.
- Finish by embellishing with buttons, ribbon clips and some words from the patterned paper glued to the left of the layout
Read NextRoad Trip Layout