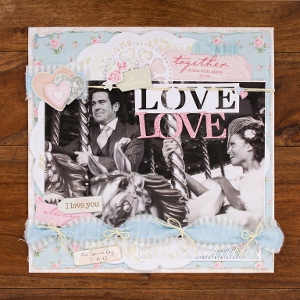
Love You Forever Layout
This precious Love You Forever Layout is a great way to remember your favorite wedding photos. With one simple photo and a variety of colorful embellishments, you can create a stunning scrapbook layout that's eye catching and beautiful. This would also make a lovely gift for a newly married couple if you frame the page in a 12x12 shadow box frame.
Materials:
- Die-cut Sentiments (2pk) - Vintage Notes
- Journaling Cards (24pcs) - Vintage Notes
- 12 x 12” Paper Pack Linen (32pk) - Vintage Notes
- Decoupage Medley (2pk) - Vintage Notes - Mum
- Decoupage Medley (2pk) - Vintage Notes - Love
- 20m Bakers Twine (3pcs) - Capsule - Spots & Stripes Pastels
- 6 x 6” Filigree Papers (5pk) - Vintage Notes
- 6 x 6” Cards/ Envelopes Delicate Filigree (6pk) - Vintage Notes
- Fat Quarters (5pcs) - Capsule - Spots & Stripes Pastels
Instructions:
-
Trim rose stripe paper to measure 29x29cm. Distress and pinch the edges forwards and adhere centrally onto a sheet of the peach doily paper.
-
Trim the large doily shape from the paper and adhere centrally.
-
Trim the bottom panel from the filigree Love card. Tuck beneath a large photo on the right hand side.
-
Tear a 2.5cm wide strip of the dotty fabric and a 4.5cm wide strip of the green stripe fabric. Knot together at regular intervals using the yellow Capsule Baker’s Twine.
-
Adhere to the bottom of the photo.
-
Trim the circle heart section from the filigree paper. Tuck behind the photo along with the ‘together’ journaling card.
-
Cut out the ‘LOVE’ section from the filigree card and thread a double row of Bakers Twine through. Wrap around the page, securing on the reverse.
-
Add some scraps of the fabric to the top left of the photo, folding the ends to the reverse of the page.
-
Pop out the die-cut hearts and cluster over the fabric strips to the top left, using 3D foam pads to add dimension.
-
Apply the die-cut ‘LOVE’ letters beneath the filigree section and the tag to the top left. Add a flower die cut.
- Cluster additional tags to state ‘I Love You’ and ‘Always’ to the bottom left of the photo, adding a final tag for the important dates.
Read NextLove You Forever Layout