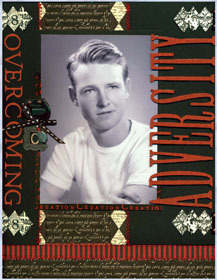
Overcoming Adversity Scrapbook Page
Create an overcoming adversity scrapbook page from AMACO using stamp art and rub 'n buff.

Materials:
- Black Cardstock — Doodlebug
- Patterned Paper — Scenic Route Paper Co. Leo’s Harlequin: Black & Cream, Creation: Black & Red, Italian Script: Black, Black & Red Stripe, Red Linen (“Overcoming”)
- Stamp — Limited Edition #8814G
- Ink — Ranger Distress Black Soot
- AMACO® Rub ’n Buff® — Ruby
- Embossing Powder — Ranger Fine Clear
- Ribbon — Making Memories
- Charm and Beads — Jewelry Supply Store
- Hinges and Latch — The Weathered Door
- Quickutz Letters — Paige “OVERCOMING”
- Chipboard Letters — Making Memories “ADVERSITY”
- Mini frame — K & Co
- Fonts — Journaling Inside (Book Antiqua), Charles W. Allred (AL Aunt Marie)
- Red Thread
- Sewing Needle
Steps:
- Cut the following paper to the sizes indicated:
Italian Script: Black — 8½" x 11"
Black & Red Stripe — ½" x 8½"
Creation: Black & Red — 5" x 7"
Harlequin: Black & Cream — ½" x 9½" and ¼" x 9½"
Cardstock: Black — 1½" x 9½" and 3½" x 9½" and 5" x 7" (photo mat)
- To make photo mat, cut Creation paper on the diagonal, 1" down from the upper left corner to 1" above the lower right corner. You can mark each spot with a pencil then draw a diagonal line to cut along. Mount Creation paper on the black cardstock photo mat. Attach photo.
- Sew the ½" piece of black and cream Harlequin paper to the 3½" piece of black cardstock. Sew the ¼" piece of black and cream Harlequin to the piece of 1½" black cardstock.
- Sew the strip of black and red Striped paper across the bottom, 1" up from the bottom.
- Either use your finger or a soft cloth to apply Ruby Rub ’n Buff® liberally over both the chipboard and Quickutz letters. Let dry then buff with a soft cloth to a glossy sheen.
- Using the Limited Edition stamp, stamp four times on white cardstock in black ink then cut out the outline.
- Attach the letters “Overcoming” to the 3½" piece of black cardstock.
- Attach a stamped piece (using only about 2/3 of the stamped piece) to the top and bottom of that black cardstock. Mount on the left side of the layout just above the black and red Striped piece.
- Mount the photo mat on the 3½" of black cardstock so it hangs over the center and covers the black and cream Harlequin piece on the other side of the layout.
- Attach the stamped pieces on the top and bottom of the 3½" piece of black cardstock and then attach it to the layout with the black hinges.
- Adhere the rub and buffed chipboard letters to spell the word ADVERSITY.
- Attach the latch to the left center of the photo mat and tie on a frame and charm with ribbon.
Read NextBeach Day Scrapbook Layout