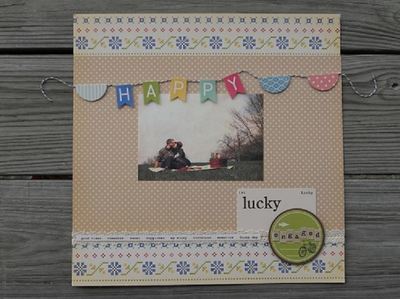
Happy Photo Layout
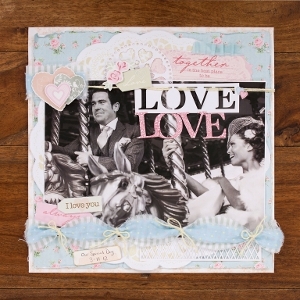
Do you love displaying your photos creatively? If so, this Happy Photo Layout is one of the great free paper craft projects Sue Eldred has to offer. Turn a photo that makes you happy into this pretty paper layout!

Materials:
October Afternoon’s 5 & Dime Collection:
- PP-578 Butterscotch 12 x 12 paper (background)
- PP-579 Root Beer Barrels 12 x 12 paper
- SS-277 Shape Stickers (“happy” banner)
- CB-826 5 & Dime Chip ‘n Stick (½ rounds on banner)
- SS-290 Mini Market Stickers
- SS-279 Label Stickers (bicycle circle)
- DC-146 Miscellany (Lucky Card & word strip)
Additional Supplies:
- LV-MCP40 Mega Circle Punch (Marvy Uchida)
- Brown Cardstock
- Black and White String
- Foam Mounting Squares (Scrapbook Adhesives by 3L)
- Crocheted Ribbon (May Arts)
- Glue Glider Pro (Glue Arts) permatac
- 1/8” Terifically Tacky Tape (Provo Craft)
- Baby Powder
- Small Paintbrush
Instructions:
- Start with a 12 x 12 sheet of Butterscotch scrapbook paper with the lines going horizontally.
- Cut a piece of Root Beer scrapbook paper 8” x 12” and adhere onto your Butterscotch background paper.
- Add a fun photo that makes you happy.
- Place one foam mounting square onto the back of each of the “h-a-p-p-y” letters. Lay letters onto a long piece of black and white string, leaving space in between each letter. After you put the letters onto the string and before you take off the backing on the mounting square, apply baby powder onto the back of each letter sticker with a paintbrush. This makes the remaining part of the sticker un-sticky so you can make it a die cut instead of a sticker.
- Arrange “Happy” banner over picture and remove backing off letters. Add Chipboard Rounds to finish off banner.
- Adhere “lucky” card to the bottom portion of the layout.
- Apply 1/8” Terifically Tacky tape to the bottom edge of the Root Beer scrapbook paper. Remove red protective strip and lay crocheted ribbon over tape. (I like to use extra ribbon and tape the ends to the back of the layout.)
- Punch a Circle from the Brown Cardstock and adhere the green “bicycle” journaling sticker onto the circle. Journal using Mini Market Stickers. Add several foam mounting squares to back of journaling circle and add to layout.
- Add word strip to the center of the lace trim.
Read NextBeach Day Scrapbook Layout