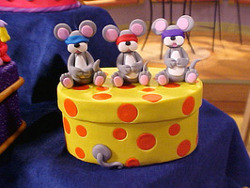
Three Blind Mice Trinket Box
This is such a cute polymer clay project by Becky Meverden. If you loved the story Three Blind Mice when you were a child then you'll love making this craft. Hold all your fun trinkets in this box.

Materials:
- Fimo Soft polymer clay 2 ounce packages – (6) sunflower, mandarin, black, (3) dolphin grey, white, pacific blue, violet and raspberry
- 5" x 3-1/2" x 2-1/8" oval paper mache box
- 5/8" and 7/16" Kemper circle cutters
- Pasta machine or acrylic roller
- Kato NuBlade
- Permanent glue stick
- Three straight pins
- Small paintbrush
- Craft knife
- E6000 adhesive
- Pencil
Steps:
Clay Colors
- Create pink by mixing a 7/16" ball of white with a 3/8" ball of raspberry.
Box
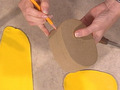
- Draw a line around the bottom of the paper mache box top to mark where the top meets the bottom (Figure A).
- To cover the box in clay: Condition all clay according to manufacturer’s instructions. Flatten several sheets of sunflower clay through the pasta machine at a #1 (1/8") setting. Place the bottom of the box on a sheet and use a knife to cut around it. Set the bottom aside.
- Rub a glue stick all over box top and bottom. Do not glue over the pencil line.
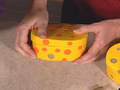
- Cut sheets of clay to go around the sides of the box bottom and to cover the top of the box. Press them in place; trim excess and smooth seams with your fingers (Figure C).
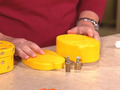
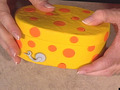
- For the holes, use the two different size circle cutters to randomly cut out holes all over box. Flatten a sheet of orange through the pasta machine at a #1 setting (1/8"). Use the circle cutters to cut out orange circles to fill in holes. Leave one large hole empty in the front open (Figure D).
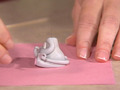
- For the mouse bottom, roll a 7/16" grey ball and press into the hole. For the tail: roll a 5/16" grey ball into a 1 1/2" long log, tapering to a tip. Press onto the center of the bottom (Figure E). Bake in a preheated 265 degree oven for 30 minutes. Set aside.
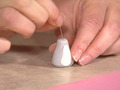
- For the mouse body, roll a 7/8" grey ball into a 1 1/8" long cone. Flatten a 5/16" white ball into a 3/4" long oval and press onto the center of the body. Press a straight pin halfway into the top of body (Figure F).
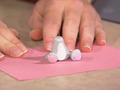
- For the legs, roll two 9/16" grey balls into 1" long tapered logs. Flatten the widest end against a flat surface to form a foot. Use a knife to indent three toe lines in each foot. For the pads, flatten two 3/16" pink balls into ovals and press onto the bottom of each foot. Press legs onto both sides of the body (Figure G).
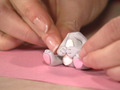
- For the arms, roll two 7/16" grey balls into 1" long tapered logs. Flatten slightly the widest end of each arm to create hands. Use a knife to indent two finger lines in each hand. Press arms to both sides of body (Figure H).
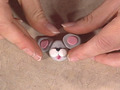
- For the head, roll an 11/16" grey ball into a rounded triangle. For the snout, flatten two 1/4" white balls and press together slightly and press onto the head. For the nose, roll a 3/32" black ball into an oval and press onto the snout. For the mouth, use the blunt end of a paintbrush to make a hole under the center the snout. Roll a 1/4" pink ball and press onto the end of a paintbrush. Press the paintbrush into hole.
- For the ears, flatten two 7/16" grey balls. For the inner ears, flatten two 7/32" pink balls and press onto the ears. Press the ears to both sides of the head (Figure I).
- For the blindfold, flatten a small sheet of pacific blue through the pasta machine at a #5 setting (1/32"). Use a NuBlade to cut a ¼" X 2 ½" rectangle. Press around head and twist ends at the back of the head. Press the head onto the top of the body (Figure J).
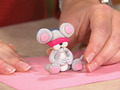
- For the tail, roll a 3/8" grey ball into a 2" long log, tapering to a tip. Press onto the back of the mouse and curl around to the front (Figure K).
- Make two additional mice, one with a raspberry and one with a violet blindfold. Bake all three mice in a 265 degree oven for 30 minutes.
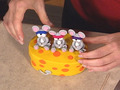
- When cooled, glue clay mice onto the top of the box (Figure L).
Read NextClay on Canvas Wall Art
Your Recently Viewed Projects
Thanks for your comment. Don't forget to share!
Sigo
Jan 06, 2018
This is too adorable! What a great idea. I never thought to cover a box with polymer clay. The blind mice are really cute and I especially like the little extra detail of the mouse tail at the base of the box.
Report Inappropriate Comment
Are you sure you would like to report this comment? It will be flagged for our moderators to take action.
Thank you for taking the time to improve the content on our site.