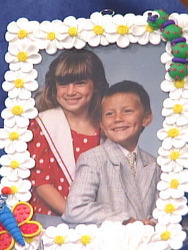
Daisy Polymer Clay Frame
Make a fun polymer clay frame from Becky Meverden for yourself or to give as a gift. The daisies make for fun embellishments and add a little color. Follow this step by step tutorial and you'll end up with a great frame for a spring day.

Materials:
- Kato Polyclay: 3 oz. packages, white, yellow, green, violet, magenta, turquoise, ultra blue, orange, black chartreuse clay: 3/4" ball green + 7/8" ball yellow pasta machine or acrylic brayer
- Two 3/4" binder clips
- Two 5" x 7" pieces of Plexiglas
- 9/16", 11/16", 13/16" Kemper leaf cutters
- 5/16" Kemper circle cutter
- 24-gauge blueberry Fun Wire
- Wire cutters
- Round toothpick
- Paintbrush
- E 6000 glue
- 8-1/2" x 11" paper
- Pencil
Steps:
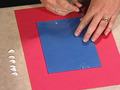
- For the frame template, take one of the pieces of Plexiglas and use a pencil to trace the frame onto a piece of paper (figure A).
- For the daisies, flatten a sheet of white clay through the pasta machine at a #4 setting (3/64 inch).
- Use the 9/16-inch teardrop cutter to cut out seven petals (figure B). Curl the narrowest ends slightly and press the seven petals together.
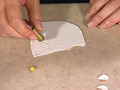
- Roll a 7/32-inch ball of yellow into a 1-1/8-inch long, tapered to a tip log. Starting at the narrowest end, roll into a lollipop and press onto the center of the flower (figure D).
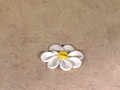
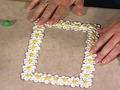
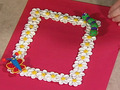
- Make 28 flowers. Center the flowers onto the template overlapping slightly. It will be seven flowers across and nine down (figure E). Set the frame aside.
- For the worm, roll four 5/8-inch balls of chartreuse. Flatten three 3/8-inch balls of violet. For the eyes, flatten two 1/8-inch balls of white into teardrops. Press narrowest ends together slightly and press onto one of the green balls. Roll two 1/16-inch balls of black and press onto eyes (figure F).
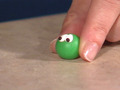
- For the eyebrows, use a toothpick to indent. For the nose, roll a 5/32-inch ball of violet into an oval and press onto head. For the mouth, use a circle cutter or a toothpick to indent (figure G).
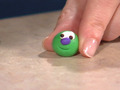
- For the spots, roll 1/16-inch balls of magenta and press randomly all over the green balls including the head.
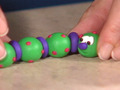
- Assemble worm: First the head, the flattened ultra marine ball, chartreuse ball and so on (figure H). Press worm onto the upper right corner of the frame.
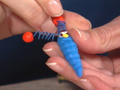
- For the butterfly, roll a 5/8-inch ball of turquoise into a 1-1/2-inch long tapered log. Round the widest end. Use a toothpick to indent lines around the log, leaving about 1/2 inch from the widest end (figure I).
- For the eyes, flatten two 3/32-inch balls of white into teardrops. Press narrowest ends together slightly and press onto the body. Roll two 1/16-inch balls of black and press onto eyes.
- For the nose, roll a 3/32-inch ball of yellow into an oval and press onto head.
- For the mouth, use a circle cutter or toothpick to indent.
- For the antennae, use wire cutters too cut two 4-inch lengths of blue wire and wrap each one around a paintbrush to coil. Press into the top of the head. Roll two 9/32-inch balls of orange and press onto the top of each antenna (figure J).
- For the wings: Flatten a sheet of magenta through the pasta machine at a #3 setting (1/16 inch). Use a 13/16-inch teardrop cutter to cut out two upper wings and use a 11/16-inch teardrop cutter to cut out two lower wings. Press the wings together.
- For the spots, roll 1/16-inch balls of orange and press randomly all over the wings. Roll a 3/32-inch diameter log of yellow and wrap the edge of the upper wings and around the outside edge of the lower wings (figure K). Press the body onto the center of the wings.
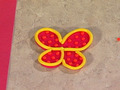
- Press the butterfly onto the lower left corner of the frame (figure L).
- Bake the frame in a preheated 265 F degree oven for 30 minutes.
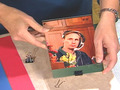
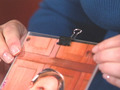
- Place the picture between the two pieces of Plexiglas. Clamp the bottom center with a binder clip. With your fingers, remove the metal paper clip hinge from both sides of the frame (figure M).
- Place a binder clip on the opposite end of the two binder clips and in the center. Flip the metal paper clip like hinge and this will be your hanger (figure N).
- Put a line of glue around the entire frame, about 1/2 inch from the sides. Press the flower frame onto the Plexiglas and let dry.
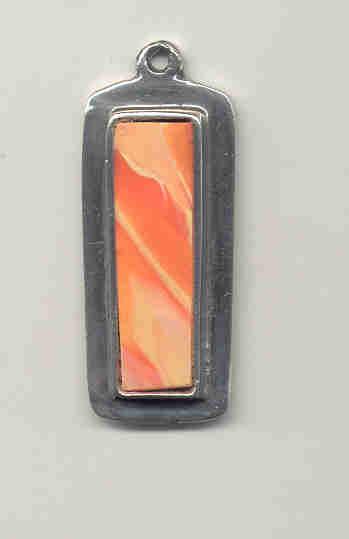
Read NextOrangesicle Joy Necklace Pendent