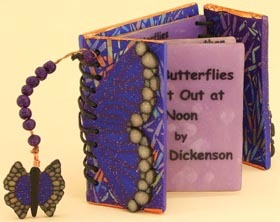
Polymer Clay Butterfly Bitty Book
A unique spin on a book cover, this polymer clay miniature book from AMACO of Emily Dickinson's "Two Butterflies Went Out at Noon" can also house your favorite poem or short story.

Materials:
- FIMO® Soft Polymer Clay—Black, Brilliant Blue, Translucent, Metallic White, Metallic Purple
- AMACO® WireForm®—Copper Impression Mesh
- AMACO® Rub ‘n Buff®—Grecian Gold, Spanish Copper
- AMACO® Metal Foil Tape—Copper
- AMACO® All-Purpose Sealer
- AMACO® Fun Wire—22 gauge Gold or Copper
- Gwen Gibson’s Image Library, the Petite Series: Bamboo
- Daniel Smith Luminescent Acrylics:
- Duochrome Saguaro Green, Duochrome Adobe, Duochrome Desert Bronze,
- Iridescent Electric Blue, Duochrome Mauve, Duochrome Aquamarine
- T-shirt transfer paper for inkjet printers
- Deli slice paper
- Waxed cord for binding book
- Gold thread
- Lisa Pavelka’s Polybinder
- AMACO® Pasta Machine
- AMACO® Polyblade
- 1/8" round hole paper punch
- Plastic Credit Card (or similar card that can be cleaned)
- Index cards
- Work surface
- Drill with 1/8" bit
- Wire cutters
- Bamboo skewer
- Toothpick
- 1/2" flat brush
TEXT
Page 1
Two Butterflies Went Out At Noon
By Emily Dickinson
Page 2
Two butterflies went out at noon
And waltzed above a stream,
Then stepped straight through the firmament
And rested on a beam;
Page 3
And then together bore away
Upon a shining sea,
Though never yet, in any port
Their coming mentioned be.
Page 4
If spoken by the distant bird,
If met in ether sea
By frigate or by merchantman,
Report was not to me.
Steps:
- Make a Skinner Blend using Brilliant Blue and Metallic Purple FIMO® Soft. The Skinner blend should be 4" x 31/2" and the clay rolled out on a #1 (or largest) setting on your pasta machine.
- Roll into a jellyroll and reduce to a 1/2" cane.
- Slice off a 2" length of the cane and press it flat until it is 11/2" across and 2" long.
- Take another 2" length of the cane and press one edge flat to make a teardrop shape.
- Lay this piece on top of the first flat piece, but move it down a small fraction.
- Cut the next 2" length and press it flat like the first piece and lay it down on the two previous pieces, but a fraction of an inch further down like before.
- Continue doing this until you have used up the cane or you have reached the bottom of the original piece. Remember that all of the teardrops go in the same direction.
- Make a bull’s-eye cane using the White metallic clay in the center and wrapped with a layer of Black clay rolled out on the #6 setting on the pasta machine. Reduce cane until it is small enough to place 2" pieces on the edges of the wings. Some should be smaller and some larger. You can even put a double layer of black around some pieces for variety.
- Cut 4 slices of cane to make a complete butterfly. Each slice is one quarter of the whole butterfly.
Making the Book:
- The back of the book is made from a 3" square piece of Brilliant Blue clay rolled out on the #3 setting on the pasta machine. Cut two pieces.
- Cut out a 23/4" piece of Copper WireForm® and glue it with Polybinder to the first piece of clay.
- Lay the second piece of clay on top of the wire form and seal it tight. Trim the edges so that they are even and 3" square.
- Lay the Gwen Gibson bamboo silkscreen on top of the clay and make sure it is firmly in place by GENTLY rubbing your finger over the screen. You don’t want to rub too hard and destroy the screen.
- Put little pea-sized dabs of the various colors of Daniel Smith acrylic paints randomly over the screen as desired. Take a plastic card and swipe it over the screen top to bottom and then again side to side.
- Remove screen carefully, clean screen and let the paint dry.
- Repeat the same procedure on the other side of the 3" square and let dry.
- When the paint is dry, mount two half butterflies with the tips of the wings facing into the center of the square.
- The front of the book uses the same steps as above, with one difference: cut the 3" square in half so the book can open and the wire will be cut into 23/4" x 11/4" pieces. Cut little peepholes on the back of the book to let some of the copper mesh show. I used a teardrop cutter to simulate half of a butterfly wing.
- Bake the book back and covers in a preheated 275Fº oven for 30 minutes.
- When the back and cover are cool, use the copper metal foil tape on the edges of the covers and back edges of the book to give it a finished look. The foil has an adhesive backing so burnish the sticky side down onto the clay. If it is wider than the edge fold it evenly over the front and back side of the edge.
- The next step is to make the pages for inside the book. Use translucent clay that is tinted with a pinch of the other colors: blue and purple. The pages will be 23/4" x 23/4".
- Place your clay and transfer (with writing reversed) between two layers of deli slice paper and run through the pasta machine on a #4 setting.
- Bake in 275Fº oven for 30 minutes between two ceramic tiles (leave the deli slice paper on the clay for baking).
- Carefully remove deli slice paper and transfer paper from clay and when clay is cool rub a thin layer of AMACO® Grecian Gold and Spanish Copper Rub ‘n Buff® along the edges of each page and let dry.
- Using a 21/2" flat brush, brush a thin layer of AMACO® All-purpose sealer over the surface of the page with the transfer on it and along the edges with the AMACO® Rub ‘n Buff® on them. Let them dry completely before moving on.
- Bake two small polymer clay beads out of Blue or Purple clay (1/4" diameter) and make a hole with a toothpick that is large enough to thread a single thickness of waxed cord through.
- The butterfly book has four pages (see text above). Take an index card and punch holes 1/4" in from the edge and 1/4" apart down the edge that is going to be bound. Remember that both sides of the front cover are bound…the pages will alternate between being bound on the right and then the left side. The edge of the cover to be bound is the long edge where the tip of the butterfly wing is facing away. In other words the edge that gets bound is where the body would be on the butterfly.
- Use the drill with 1/8" bit and drill holes on cover and back of book so that they line up with the holes in the pages.
- Put the pages inside the book (first page on the left side, second on the right, etc.) and, using the waxed cord, thread the cord through the holes in a spiral fashion.
- When the cording is threaded through the spine, put a small polymer clay bead that you have made with the blue or purple clay on the two ends and knot the cord. Trim the knot close to the bead.
- You can make a small butterfly as a bookmark to attach to the cord. Using a 2" piece of AMACO® Fun Wire™, make a bail, or loop, using a bamboo skewer. Wrap the middle of the wire around the skewer to make a loop and then wind the two ends tight by twisting them. Use the wire cutters to trim off the end of the twisted piece of wire to 3/8" long and slide off the bamboo skewer. The loop will become the bail that you put the gold thread through. The twisted end gets inserted in the top of the butterfly before baking (glue it in with Lisa Pavelka’s Polybinder). Loop a piece of gold thread through the bail and attach it to the cord spine of the book. When you open the book up, the back and front covers will make two complete butterflies.
Read NextDIY Clay Key Decorations