Terri O Video: Baby Shower Decorations
Make a set of matching baby shower decorations with this project by Spellbinders and video from Terri O. Customize and personalize these homemade baby shower decorations.
Materials:
Dies- Here are the exact dies used for this project with sku numbers so can recreate the projects you like quickly and easily.
- S4-230 Labels 6
- S4-214 Eyelet Borderabilities
- S4-205 Eyelet Pendant
- S3-148 Wizard Tags Trio
- S4-116 Standard Circles, Small
- I2-1004 Impressibilities Flowers
Other Materials Needed:
- Spellbinders Wizard
- Rubber stamps “you’re invited” & “thank you”
- Ribbon
- Green & Pink Printed paper
- Pink cardstock
- White Cardstock
- Green cardstock
- Gems
- Citrine, Pink Pigment Ink
- 3D Foam Squares Adhesives
- Mini Glue Dots
You’re Invited Card Instructions:
- Cut and emboss large green pendant using Eyelet Pendant Die template.
- Cut and emboss pink center using the Eyelet Pendant Center template.
- Stamp “You’re invited” with pink ink. Cut and emboss with Labels 6 die.
- Cut a piece of pink patterned paper to 3.25x4.25” and attach to right side of the front of 4.25x5.5” card.
- Tie white ribbon around the large pendant, leaving knot ends long enough to go around the top and bottom of the card.
- Using 3D Foam Squares, attach the pink center into the green pendant over the ribbon knot.
- Adhere the sentiment to the center.
- Attach the embellished pendant to the card at the border between the card and patterned paper.
- Adhere the ribbon with tape on the back and inside of card.
- Add printed invitation details inside card.
Thank You Card Instructions:
- Trim the white card base to 4.25x4.25.”
- Emboss a piece of 3 5/8” pink cardstock with the Impressibilities Flowers template.
- Attach a green 3.25” square of cardstock onto the embossed pink paper.
- Trim a piece of green striped paper to 2x3.25” and adhere to the bottom portion of the green square.
- Cut and emboss an Eyelet center using the Eyelet Pendant Center template and white cardstock.
- Using pink cardstock cut and emboss the Eyelet Borderabilities (the double sided border template) as well as one of each Eyelet Accent piece using the Eyelet Pendant die template.
- Trim the border to a length of 4.25” and attach to front of card.
- Adhere a strip of floral ribbon over the top of border.
- Attach white pendant center with 3D foam squares and adhere the pink accent over the top. Place gem with glue dots in the center of accent.
- Stamp “thank you” in pink ink onto white cardstock. Trim around the sentiment with scissors. Adhere in the bottom right corner of the green paper.
- Place a pink corner accent in the corner near the sentiment.
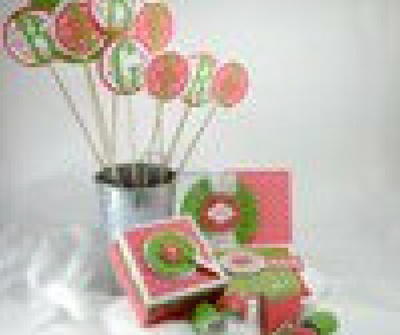
Eyelet Pendent Centerpiece:
The centerpiece was made by using both sizes of the eyelet pendent stacked on top of each other in two different colors. Glue a skewer to the back and place a chipboard letter to spell out the names. Try cutting the skewers in different lengths for pizzazz. We used a tin container filled with foam or you can use glass beads.
Read Next32 New Baby Craft Ideas