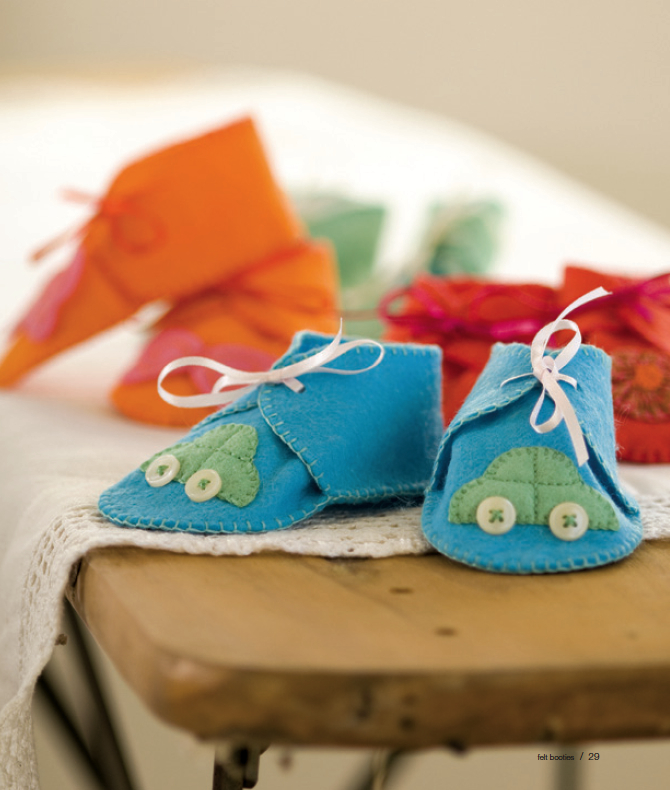
Felt Baby Booties
Use wool felt to create adorable baby booties with sweet embellishments. Cutting and embellishment templates are included for this fun baby craft project. Project from C&T Publishing.

Use felt and lace to make a matching floral headband for a baby girl! Learn how to make the Ruffled Lace Flower Headband.
Materials:
- 24cm x 30cm wide (9 1/2″ x 12″) piece of wool felt for one pair of booties
- 60cm (23 5/8″) narrow ribbon for the ties
- Threads
- Stranded cottons to complement the sea green and white color of the felt
- Tracing paper
- Sharp pencil
- Water-soluble fabric marker
- No. 8 sharp needle
- No. 22 chenille needle
- How to Make the Booties
Patterns and Templates:
Click here to download the bootie pattern, embroidery and appliqué templates PDF. Use the pencil to trace the pattern pieces and placement marks onto tracing paper. Cut out. Use the large needle to pierce holes at the marked positions for the shoelace and at the center front of the toe piece. Make a template for your chosen bootie motif in the same way.
CUTTING OUT
Referring to the cutting layout, trace each bootie piece twice onto the felt and mark the dots through the pierced holes using the fabric marker. Cut out the pieces.
CUTTING LAYOUT
1. Sole
2. Back
3. Toe
Green Booties with Stars
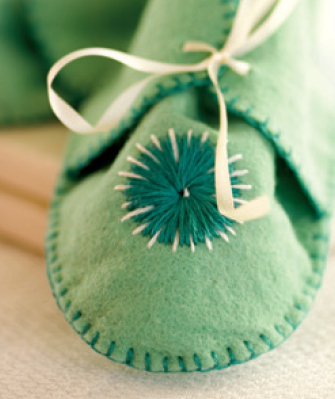
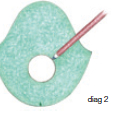
Center the star template over the marked dot on the bootie front. Trace around the circle with the fabric marker (diag 2). Repeat for the second bootie front piece.
STITCHING
Secure two strands of the green thread on the back and bring it to the front on the marked circle. Take the needle to the back at the center. Work a second straight stitch next to the first, taking the needle to the back through the same hole at the center (diag 3). Continue to work straight stitches around the entire circle in this way. Stitch the white highlights, using two strands of thread. Secure the thread and bring it to the front a short distance from the edge of the star. Take the needle to the back halfway along and between two green stitches (diag 4).
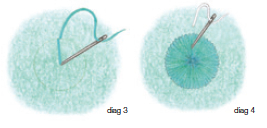
Continue to work white highlights around the circle in this way, spacing the stitches 3mm (1/8″) apart.
MAKE THE PERFECT GIFT FOR A SPECIAL BABY
By using the same small designs to decorate hats, singlets or bibs you can easily make a special gift that is sure to be treasured.
CONSTRUCTING THE BOOTIES
EDGING THE FRONT AND BACK PIECES
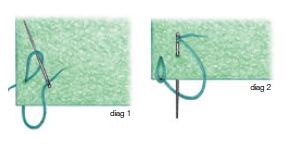
Use two strands of thread in a color to complement the felt to sew the booties together with blanket stitch. Tie a knot at the end of the thread. Bring it to the front at one side of the upper edge of the bootie front piece. Take the needle to the back through the same hole, leaving a loop. Slide the needle through the loop (diag 1). Pull the thread through, anchoring the loop around the thread. Take the needle through the felt a short distance from the first stitch. Push it through until the tip appears beyond the felt edge, keeping the thread under the tip of the needle (diag 2).
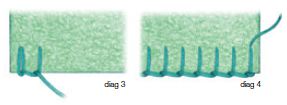
Pull the thread through. Work a second blanket stitch around the edge of the felt a short distance from the first (diag 3). Continue along the edge in this way until reaching the opposite side. After the last stitch, bring the needle to the front through the same hole in the fabric to anchor the last stitch (diag 4). Work a tiny stitch, taking the needle to the back.
Secure the thread under the stitches on the back. Work blanket stitch over the upper edge of the remaining front and two back pieces in the same way.
ASSEMBLING THE BOOTIES
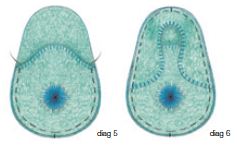
Matching placement marks at the center front, pin and tack a bootie toe piece to a sole piece (diag 5). Matching placement marks at the center back, pin and tack a bootie back to the sole, overlapping the toe piece at the sides (diag 6).
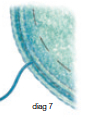
Secure the thread inside the bootie. Slide the needle between the layers to bring it to the front at the edge (diag 7).
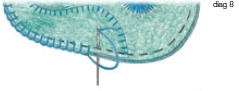
Work blanket stitch in a similar way to the edges of the upper pieces, stitching through all layers around the edge of the bootie to join the upper pieces to the sole (diag 8). Carefully remove the tacking stitches.
FINISHING
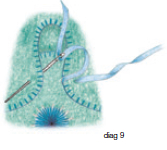
Cut the length of ribbon in half. Thread one piece into the large needle. Take the needle to the back at one marked position of the bootie back. Bring the needle to the front at the marked position at the opposite side (diag 9). Unthread the needle. Tie the laces in a bow.
Your Recently Viewed Projects

Thanks for your comment. Don't forget to share!
Weberme
Nov 28, 2018
Now this is a different twist on booties and I like them. Felt booties,I never would have thought to do this and I have a lot of feltleftover from other projects. They remind me of era booties and they are sewn by hand, I would love to make some and do out of 2 colors of thread to give it that pop.
mjpalmer12 5067813
Feb 21, 2015
Love the pattern. Tha amount of pop ups are too many. Almast made me not care for your lovely craft and just wanted to get out from under the baraugh
tylers82 6402863
Jan 20, 2013
I plan to make a couple pairs of these in pink for my newest granddaughter, due in April! Exciting!
KiiheleWest
May 29, 2011
I recently made a pair of felt booties which were cute but not nearly as cute as these. My question: has anyone ever used this pattern to make a pair of squaw-boots in leather? The pattern looks like it would be perfect. Instead of a star of thread, you could do beads.
thegranwan 2732224
Mar 05, 2011
I cannot get the template to print. The instructions print. What can I do to print the template?
kghornsten
Sep 20, 2010
Thanks for the sublime pattern. I think I will make two pair of these for my twin grandaughters expected around thanksgiving time.
Report Inappropriate Comment
Are you sure you would like to report this comment? It will be flagged for our moderators to take action.
Thank you for taking the time to improve the content on our site.