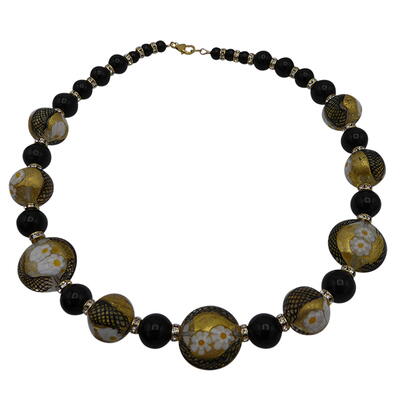
Silk Screen Statement Necklace
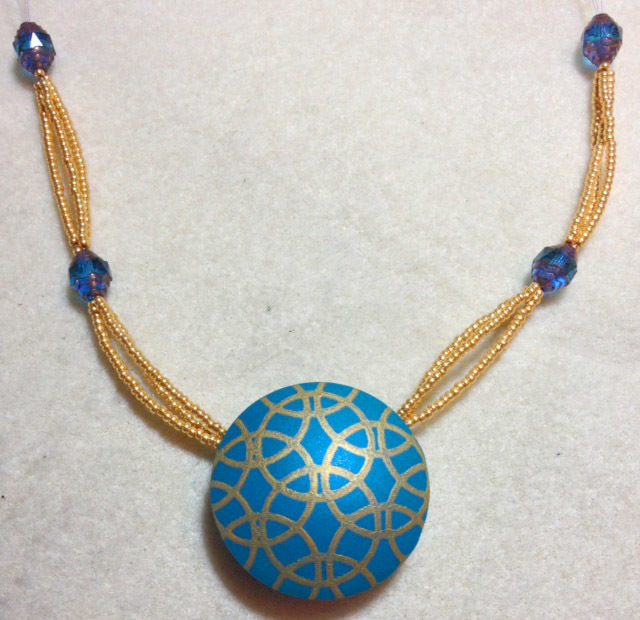
Jazz up your favorite outfit with this lovely Silk Screen Statement Necklace. Made with polymer clay, this DIY pendant is a great statement necklace for the spring and summer. Embellish this necklace with small beads to really make it stand out. Great for giving as a gift or keeping for yourself, this clay pendant is one that beginners and advanced clay crafters can make with ease. Don't forget to make matching earrings or a matching bracelet!
Primary TechniqueJewelry Making

SeasonSpring

You can find this project, and many more, in our new eBook, 13 Spring Crafts: Easter Craft Ideas, Spring DIY Home Decor, and More! Download your own free copy today!
Materials:
- 2 oz Premo! polymer clay in Peacock Pearl
- Sculpey Bake N’ Bond
- Sculpey Hollow Bead Maker
- Sculpey Clay Silk Screen Kit
- Sculpey Clay Conditioning Machine
- Sculpey Graduated Circle cutter set
- Sculpey Clay Tool Starter Set
- Sculpey Glaze in Glossy or Satin
- Small Pan filled with Warm Water
- Sculpey Clay Mat
- Sheet of Plain Copy Paper
- Eight 3 mm bi cone beads in blue color
- 500 seed beads in gold color
- Thin beading wire
- Clasp
Notes:
Polymer clay may stain. CLAY MAY DAMAGE UNPROTECTED FURNITURE OR FINISHED SURFACES. DO NOT USE polymer clay on unprotected surfaces. We recommend working on the Sculpey clay mat, wax paper, metal baking sheet, or disposable foil. Start with clean hands and work surface area. Knead clay until soft and smooth. For best results, clean your hands in between colors. Shape clay, pressing pieces together firmly. Bake on oven-proof glass or metal surface at 275°F (130 °C) for 30 minutes per ¼" (6 mm) thickness. For best baking results, use an oven thermometer. DO NOT USE MICROWAVE OVEN. DO NOT EXCEED THE ABOVE TEMPERATURE OR RECOMMENDED BAKING TIME. Wash hands after use. Baking should be completed by an adult.
Begin by preheating oven to 275 °F (130 °C). Test temperature with oven thermometer for perfectly cured clay. For best results, condition all clay by running it through the Clay Conditioning Machine for several passes on the widest setting. Fold the clay in half after each pass and insert the fold side into the rollers first.
Instructions:
- Using the clay condition machine roll out a sheet of Peacock Pearl clay on the # 1 setting. Choose the silk screen pattern and metallic paint for your project. Shake paint well before use. We used Gold paint and the Chain Link pattern.
- Remove the backing paper from silk screen and position the screen shiny side down on top of the sheet of clay, smoothing the screen down with your fingers to eliminate any wrinkles. Squeeze a line of paint above your pattern. Place the squeegee above the line of paint and pull down with light and even pressure. Do this until the entire design is covered with paint. While paint is still wet, carefully remove the silk screen and immediately place the silk screen and squeegee in warm water. Gently rub the paint off using your fingers and lay screen flat on a paper towel to dry. Do not allow paint to dry on the screen. NOTE: If the paint dries in the screen you cannot clean it off.

- Position the 1-3/4” circle cutter so it is centered over the pattern on the clay. Push the cutter all the way through and remove the excess clay. Set the clay you trimmed off to the side for later. Let the paint on your circle of clay dry for a few minutes. NOTE: Handling the clay circle before the paint has a chance to dry will cause the paint to smear. After the paint has dried lift the patterned clay off of your work surface and place on the largest dome on the Hollow Bead Maker. Gently press it down using the palm of your hand so that the edges of the circle make contact with the dome. Bake the clay according to the direction above.

- Roll the clay you set to the side in Step 2 back through the Clay Conditioning Machine on the number one setting. Place this sheet of clay on your piece of plain copy paper. Position the baked dome on top of the sheet of clay. Gently and evenly press the dome down into the sheet of clay. You do not want to push it all of the way through you just want it to go in far enough so the outside edge is about level with the sheet of clay. Pick up the Needle Tool from the Sculpey Clay Tool Starter Set and position it with the tip pointing straight down and directly up against the side of the domes piece. Keeping the Needle Tool pointed directly down push all the way through the sheet of clay to the paper and drag the needle all of the way around the dome. Lift away the excess clay and set it to the side. Lift the piece off of the paper and use your finger to smooth the clay against the edge of the domed piece. Bake according to the directions above. NOTE: Performing this step on the piece of paper allows you to turn the paper as you use the Needle Tool to cut the sheet of clay away from the dome and also to help lift it off of your work surface.

- Roll out a sheet of clay on a #3 setting and cut a 1-1/2” circle using the graduated cutter. Bake according to the directions above.
- Roll out a sheet of clay on a number 3 setting, fold in half and smooth together to remove any air bubbles and cut out a 1-1/2” circle using the graduated cutter. Rub a thin layer of the Bake N’ Bond onto the back of the domed piece and place your 1-1/2” circle on the center of the back. Pick up the 1-1/2” circle cutter, position it about ½” in from the edge of the circle of clay you just added to the back of your domed piece. Push all of the way in and lift the cutter out. Move the cutter about 3/16” of an inch closer towards the center of the circle of clay and push it through all of the way again. Remove the cutter and lift out the curved strip of clay between the two cuts you made. NOTE: The thickness of the sheet you cut your circle from can be adjusted to fit the type of cord or beaded strands you are going to hang your pendant on.

- Rub a small amount of Bake N’ Bond onto the back of the piece and add the 1-1/2” baked circle from Step 4 onto the back. Bake for approximately 30 minutes. When completely cooled paint a layer of Sculpey Glossy or Satin Glaze over the top of your pendant and let dry. NOTE: The glaze will protect the paint and highlight the metallic and pearlescent qualities of the paint and clay.

- Finish your piece by running 3 strands of thin beading wire through the curved channel on the back of the piece. Add 30 seed beads per strand to each side of the pendant and then add a larger bi cone bead to both sides. Continue this until all 8 of the bi cone beads are used. Once you have the necklace at your desired length add the clasps.
Celebrate National Craft Month All Month Long!

Read NextEasy Tee Shirt Necklace Tutorial