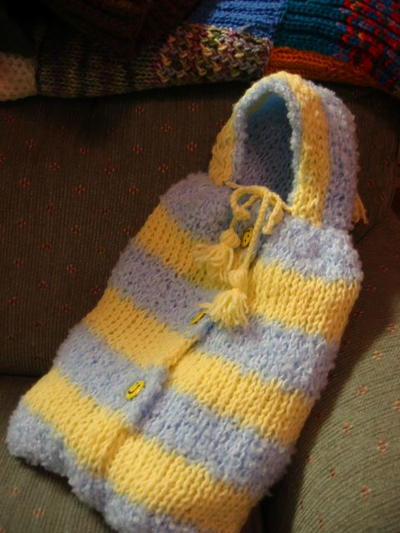
Angels Baby Bunting
Keep your newborn baby extra warm and cuddly with this adorable Angels Baby Bunting! This easy knitting pattern for your baby features an open button front and fuzzy drawstring hood from Authentic Knitting Board. This design makes it easy for you to get your little one in and out of the bunting. You can customize the colors of this pattern to be suitable for a boy or a girl. Follow the directions below to learn how to create this simple knitting project using a loom.


Find more adorable patterns to knit for your little boy or girl with these
17 Free Modern Baby Knitting Patterns.
Materials:
- Yarns: Blue=Bernat soft Boucle (1 skein) Yellow=Lion Brand Baby yarn (1 skein 200 yds) Blue smooth yarn for sewing and anchor yarn (10 yds). This sewing yarn should be same color as blue boucle (basic worsted weight)
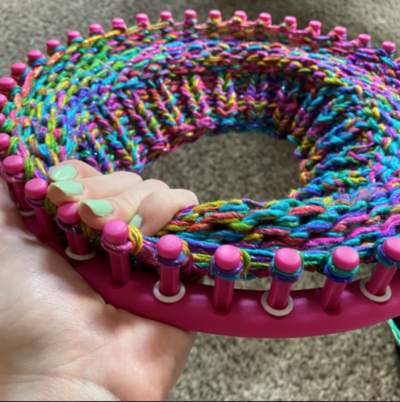
- Knitting board (22 needles)
- Knit hook
- Crochet hook
- Large eyed sewing needle
- (3) 1” novelty buttons (yellow)
Stitch: Stockinette
Size: 14.5” long and 11” wide at center. 20” long including the hood.
Gauge: 3 sts=1” 3.5 rows=1”
Body of bunting is knit in (3) pieces. These will be joined with invisible seams so that changing the size of the bunting is easy for all knitters. Hood is knit in separate piece.
Instructions:
- Body of bunting: (knit 3): Cast on 22 stitches in blue boucle yarn. Lay anchor yarn of smooth blue yarn.
- Knit 10 rows in blue. Cut yarn with 4” tail.
- Tie on yellow yarn. Lay yarn tails between the 2 rows of needles.
- Knit in stockinette for 6 rows. Cut yarn.
- Tie on blue yarn and knit 6 rows. Cut yarn.
- Tie on yellow yarn and knit 6 rows. Cut yarn.
- Tie on blue yarn and knit 6 rows. Cut yarn.
- Continue this change of color until you have a total of 4 sections of blue knitting. The ending blue section should have 8 rows. You will have 3 sections of yellow knitting. (note) to make a longer bunting, add more rows to each section of color.
- Bind Off of knitting board by picking up 3 loops, alternating boards. Start at end opposite the yarn tail. Pull 1 loop thru the other 2. Continue across the board until 1 loop remains.
- Pull yarn tail thru the loop for a knot. Do not remove the anchor yarn at this time.
- Button holes: (do this on last piece of bunting body) On the 3rd piece of bunting body, you will make a button hole on the 2nd, 3rd, and 4th blue section at beginning of row 4 of these sections. After hooking over the 3rd row of knitting, remove loop 4 and place onto needle 3, front and back boards. Leave needle #4 empty.
- Next row, weave over all needles. When you hook this row, do nothing to needle 4 as it will only have 1 loop. Be sure to lift both bottom loops from needle #3.
- Rows 5 and 6 will be regular and the button hole is complete.
- Set the 3 completed pieces aside.
- Hood: (one piece) Cast On 18 stitches in blue boucle. Lay anchor yarn of smooth blue yarn.
- Tie on the yellow yarn at 2nd stitch between the 2 rows of needles.
- Total of 34 rows of knitting:
- Weave needles 2,3,4,5 with yellow yarn front to back of each needle. Lay the yellow aside.
- Do not cut the yellow yarn.
- Start the blue boucle on first needle, skip the yellow 4 needles, and continue the stockinette weave across the row. End each row of weaving on first needle on front board. This will create 1 stitch in blue, 4 in yellow, and 13 in blue. Hook over all.
- Repeat this process for all 34 rows.
- Bind Off of board by lifting 2 loops, alternating the boards, and pull one loop thru the other.
- Knot by pulling the yarn tail thru the last loop. Bind off at anchor yarn of hood. Set aside.
- Sewing and Finishing: (use smooth blue yarn when sewing the blue boucle)
- Sew the 3 pieces of bunting body together with 2 seams using invisible stitch. Be sure to match all anchor yarns at same end, and, be sure to leave the side with buttonholes at outer edge. Match the blue and yellow stripes as you sew.
- Tie the 3 anchor yarns together to form one continuous strand. This is bottom of bunting.
- Fold the front edges together, overlapping the front edge 2” for buttons and buttonholes.
- Sew the front at bottom edge for the first blue stripe and the first yellow stripe. Be sure the side with the button holes in on top of other side edge.
- Draw the anchor yarn just tight enough to shape the bottom of the bunting. Tie the ends of anchor yarn and cut. Pull the ends into the bunting. Anchor yarn can stay in the knitting.
- Sew the bottom edge so that the button opening is centered in front of bunting.
- Fold the hood over so that the 2 bound off edges are together. Sew the back of the hood with invisible stitch using the smooth blue yarn.
- You want to draw up the bunting neck to match the length of the hood, front edge to front edge. With sewing needle and blue smooth yarn, weave a strand of yarn thru the neckline of the bunting. Draw it up until it measures the same as the hood plus 4”.
- Knot this strand at both ends to secure the size of the neckline.
- Now, sew the hood onto the neckline leaving 2” at each end of the bunting. These 2” will overlap for the button closing at center of bunting.
- Drawstring for the hood:
- Crochet a chain in yellow yarn. Leave yarn tails 2-3” long at each end for tying on the tassels. This chain should be aprox 30” long. With the crochet hook, weave the yarn chain thru the hood at front edge, in the yellow section of the hood. Include the 2” of overlap on the top buttonhole side of bunting. This will pull the front of bunting around the baby’s face and keep the neck warm.
- Tassels: Make (3) small tassels with yellow yarn. Each tassel should be aprox 2” in total length. Tie one onto each end of the drawstring with yarn tails. Trim tails or work into the tassel.
- The 3rd tassel is for the top of the hat. This can be tied directly onto the hat, or you can tie it onto a 2” crochet chain and tie onto the top of hat.
- Trim all yarn tails and pull into the knitting with crochet hook.
- Sew the 3 buttons at buttonholes with single strand of yarn. Bunting is complete.

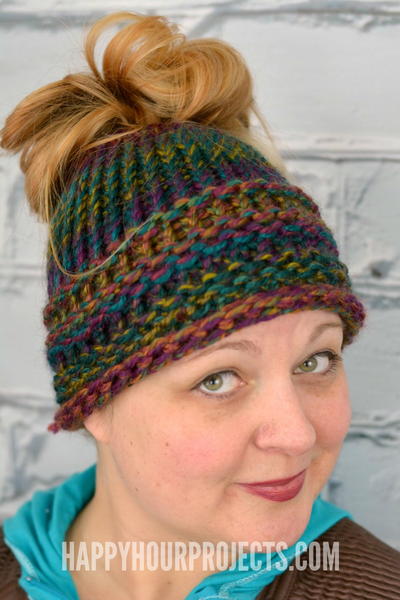
Make something to keep your little angel's head warm! Try one of
these 10 Adorable Patterns: How to Knit a Hat for Baby.
Read NextMade to Fit Double Knit Slippers
Your Recently Viewed Projects
Thanks for your comment. Don't forget to share!
Cristrout 6679243
Mar 06, 2013
I just bought a loom and my yarn and am anxious to get started. Watched a bunch of videos on youtube to get pointers on casting on and off and on how to work the stockinette stitch. Keeping my fingers crossed!
mandit1990 8747937
Jan 29, 2012
This pattern is really nice. I have not been loom knitting very long, so I don't understand the directions. Could you please explain the directions? I tried making a purse using directions with similar lingo, but it was a disaster. Thank you very much.
JennyBee1
Sep 07, 2011
@Ryann, We suggest you try contacting the original designer of this project for assistance; perhaps they can offer you a knitting or crochet pattern for this loom project. Here is the link for the contact information for Authentic Knitting Board: http://www.knittingboard.com/Articles.asp?ID=122 --Editor of FaveCrafts
dvw61
Sep 06, 2011
can this pattern be written for kniting needles or crocet hook.I dont own a loom and I love fhis pattternlbr br Thank You,br Donnabr
terriheyne 7062213
Aug 20, 2011
If someone is able to convert this to regular knitting, please let us know. I, too, do not have a knitting board but would like to knit this with circular needles. I'm thinking a size 9 or 10 needle would work. Then again I'm no designer.
JennyBee1
Aug 15, 2011
Hi dmstuntz 9394232, This is a loom pattern and unfortunately, you cannot use needles. -Editor of FaveCrafts
dmstuntz 9394232
Aug 12, 2011
I do not have a knitting board, what size knitting needles can I use?
sokewl 6909637
Aug 12, 2011
I just finished this bunting and it is beautiful. sewing pieces together is not my favorite thing to do so I just put all 66 stitches on the knitting board at once for the main piece. Just make all the buttonholes on one side. The rest of the directions are all the same. I did however make this in just one color and can't wait to give it to the next new baby at work.
Terri Hoy
Apr 30, 2011
I need Help, I want to try this but Im not sure how to count the stitches, Do you count one site of long loom or both. Example: L-1, L-2, L-3, L-4.........or L-1, R-2, L-3, R-4.........
Report Inappropriate Comment
Are you sure you would like to report this comment? It will be flagged for our moderators to take action.
Thank you for taking the time to improve the content on our site.