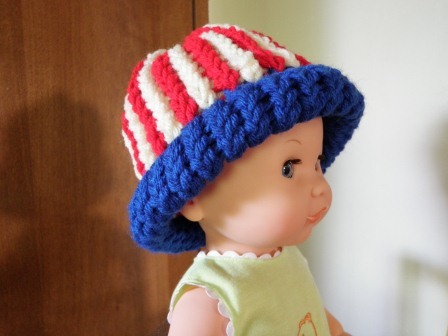
American Flag Loom Knit Hat: Version 2
Make a patriotic American flag hat with this loom knitting from Michael Sellick. Version 2 is done in vertical stripes, rather than horizontal stripes. You will find a complete video tutorial to help you follow this loom knitting pattern, as well as bonus videos to embellish your patriotic hat.

Materials:
- Standard Round Loom 31 Peg Loom - Most Good Crafting Stores and Huge Retailers will have these looms. They are usually provided in a standard package of 4 Size Looms.
- 3 Colours of Yarn. Red, White, and Blue. Ensure each colour is in the same family of brightness and colour tones. Yarn used was Bernat 4 Ply Worsted.
Tip: Due to the gauge (space between pegs). You need to wrap each row twice. You can either wrap two same colour yarns together at one time, or simple double wrap (going around the loom twice for each row). 1 Wrap or 1 String will produce poor results and a very loose look that is sloppy looking.
We are going to use the TWISTED KNIT STITCH during this entire project. Numbers in front of each description represents rows. I divide the project into two. You are creating the brim in part 1, then body in part 2
Starting With The Brim Creation
- Cast On Using BLUE Yarn Only. E-WRAP every peg and circle the loom twice to complete 1 row of work, the KNIT. This doubles up the yarn producing store quality looks and texture.
- BLUE ONLY, WRAP TWICE, then Knit.
- Repeat
- Repeat
- Repeat
- Repeat
- Repeat
- Repeat
- Repeat - TIE OFF BLUE on the last peg.
- Tie On RED & White to the starting peg of the round. E-Wrap entire loom ONLY ONCE. Then look at project, follow knitting line down from the peg, fold up and place the very bottom of the corresponding section onto the peg. At this time you will have 2 strings from the BLUE on the peg, 2 Strings of Red & White, and then 2 Blue strings from the bottom of the work due to the folding up. KNIT over the peg sending the RED & WHITE YARN OVER FIRST, FOLLOWED BY the two bottom BLUE YARN SECOND. This will leave on the pegs the bottom sections that were placed onto the peg. IT IS IMPORTANT THAT YOU GO IN THE ORDER AS MENTIONED... if you change up the order, the brim seam will look different for each knitted peg.
The Body of The Hat
- Using WHITE, E-WRAP TWICE starting at the first peg. JUMPING OVER OTHER PEG! SECURE THE LAST PEG by knitting it...but don't knit anything else yet. E-WRAP TWICE using RED, FILLING IN ALL THE PEGS YOU left blank. This will cause two white stripes to be in a row at the back of the hat. Due to the odd number of pegs on the loom, you have no choice but do this this. Secure the final peg of the Maroon. NOW KNIT ENTIRE LOOM.
- repeat (just a note, the stripes are vertical to each other... so where there's a peg with white on it, the next time you circle over the loom, the colours of what you are wrapping should be the same as the new line. So if you wrapped a maroon string around a peg with white string, you know you have done it wrong.
- repeat
- repeat
- repeat
- repeat
- repeat
- repeat
- repeat
- repeat
- repeat
- repeat
- Cast Off Using Sewing Needle picking up each loop sliding the needle from the bottom of the peg up under the loop and sliding loop onto the string. Picking up all the loops as you go. Once all loops are picked up, loom will come free of project. pull string tight which causes the top of the hat to form. Sew shut with 3 really tight loops over the top of the hat... then slide needle through the top of the project. Turn hat inside out and tie string off.
Video Tutorial- How to Loom Knit American Flag Hat- Version 2
Bonus Video Tutorials
Crochet Mini Star for American Hats
How To Make Pom-Pons For American Flag Hats
Read NextBeginner Hat Knitting Pattern
Your Recently Viewed Projects
Thanks for your comment. Don't forget to share!
conleycaroline51
Jul 12, 2011
I've watched your videos on these and I learned so much about making rows and stripes in different ways. Now I need to see how to do the wedge colors together. I hope to find you have these types of videos on all the stitches. I found the crochet on this one went too fast for a beginner here. I assumed you were talking to an audience who could crochet. I'll have to look for a crochet video too :)
Kristen Ohio
Dec 28, 2010
I was looking to learn how to make vertical stripes, and this was perfect! Thanks!
Report Inappropriate Comment
Are you sure you would like to report this comment? It will be flagged for our moderators to take action.
Thank you for taking the time to improve the content on our site.