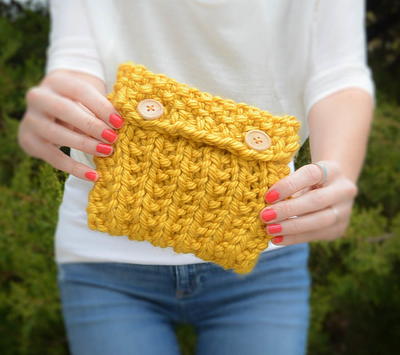
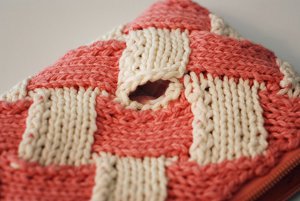
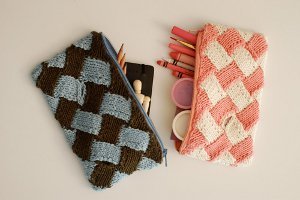
Knitted Weave Clutch
Store makeup, pens, or other small things in these cute Knitted Weave Clutches. These easy cosmetic bags are fun to make and make great gifts for all your friends and loved ones! They're also durable and great for travel. Send them to kids starting school to help them stay organized!

Materials:
Pink and White version:
- Spud & Chloë™ Sweater [55% wool, 45% organic cotton; 160 yards/146 meters per 100 gram hank];
- #7500 Ice Cream; 1 hank
- #7512 Watermelon; 1 hank
Brown and Blue version:
- Spud & Chloë™ Sweater [55% wool, 45% organic cotton; 160 yards/146 meters per 100 gram hank];
- #7511 Chipmunk; 1 hank
- Bernat® Cottontots™ [100% cotton; 171 yards/156 meters per 3 ounce/85 gram skein];
- #90105 Country Blue; 1 skein
- US #7/4.5 mm needles
- Cotton fabric, 11 x 12 inches for the simple lining or 11 x 25 inches for the advanced version
- Sewing pins
- 10 inch Zipper
- Sewing needles and thread
- Pattern
Gauge: 18 sts and 24 rows = 4 inches in St st after blocking. Exact gauge is not important in this project.
Pattern Notes: The case is worked in one piece using Entrelac technique throughout.
Instructions:
- Using MC cast on 24 sts – very loosely.
- Row 1: K2, turn.
- Row 2: P2, turn.
- Row 3: K3, turn.
- Row 4: P3, turn.
- Row 5: K4, turn.
- Row 6: P4, turn.
- Row 7: K5, turn.
- Row 8: P5, turn.
- Row 9: K8, turn.
- Repeat Rows 2- 9 two more time.
- Repeat Rows 2-8
- Last Row: K6 (all sts have been worked and you have now 4 triangles on the left needle), turn.
First Tier of Blocks
- This tier consists of 2 side triangles and 3 middle blocks:
- With WS facing change to CC and work as follows:
Left Side Triangle
- Row 1: P2, turn.
- Row 2: K1, m1, k1, turn.
- Row 3: P2, p2tog (one st from Side Triangle and one st from Base Triangle), turn.
- Row 4: K2, m1, k1.
- Row 5: P3, p2tog, turn.
- Row 6: K3, m1, k1, turn.
- Row 7: P4, p2tog, turn.
- Row 8: K4, m1, k1, turn.
- Row 9: P5, p2tog, do not turn.
Middle Blocks (right leaning blocks)
- *With WS facing, pick up 6 sts purlwise along side of the Base Triangle (or Blocks on subsequent tiers), turn.
- Row 1 (RS): K6, turn.
- Row 2: P5, p2tog, turn.
- Rows 3-12: Repeat Rows 1 and 2 five more times, do not turn on the 12th row.
- Repeat from * 2 more times (3 blocks made)
Right Side Triangle
- With WS facing, pick up 6 sts purlwise along side of the last Base Triangle (or Blocks on subsequent tiers), turn.
- Row 1 (RS): K6, turn.
- Row 2: P4, p2tog, turn.
- Row 3: K5, turn.
- Row 4: P3, p2tog, turn.
- Row 5: K4, turn.
- Row 6: P2, p2tog, turn.
- Row 7: K3, turn.
- Row 8: P1, p2tog, turn.
- Row 9: K2, turn.
- Row 10: P2tog, turn, slip last st to the right needle
- This completes the first tier of blocks.
Second Tier of Blocks
- This tier consists of all full blocks.
- Change to MC and proceed as follows:
Block
- *For the first block only: With RS facing, pick up 5 sts knitwise along the side of the triangle from the tier below, together with the 1 st in CC there are now 6 sts on the right needle. (For all remaining blocks pick up 6 sts), turn
- Row 1 (WS): P6, turn.
- Row 2: K5, ssk, turn.**
- Rows 3-12: Repeat Rows 1 and 2 five more times, do not turn on the 12th row.
Third –Fifth Tiers of Blocks
- Repeat First and Second Tiers, then repeat First Tier once more.
Sixth Tier – positioning the first pocket
- With MC and following the instructions for the Second Tier, work the first block stopping at **.
- Rows 3-9: Repeat Rows 1 and 2 three times, then repeat Row 1 once more.
- Row 10: K1, bind off 4 sts, slip last st back to left needle, ssk, turn.
- Row 11: P1, cast on 4 sts purlwise, p1, turn.
- Row 12: K5, ssk, do not turn.
- This completes the first block in the 6th tier .Work 3 more blocks as given for the 2th tier.
Seventh Tier – positioning the second pocket
- With CC and following the instruction for the First Tier, work the Left Side Triangle, then work Rows 1-9 of the first block.
- Row 10 (WS): P1, bind off 4 sts, slip the last st back to the left needle, p2tog, turn.
- Row 11: K1, cast on 4 sts, k1, turn.
- Row 12: P5, p2tog, do not turn.
- Complete next 2 blocks and the Right Side Triangle as instructed for the First Tier.
Eighth Tier
- Work same as the Second Tier.
Ninth Tier
- Work same as the First Tier.
Top Triangles – Last Tier
- *With RS facing and MC, pick up 5 sts along the side of the triangle of the tier below (together with the 1 st already on the right needle there are 6 sts on the right needle), turn.
- Row 1 (WS): P6, turn.
- Row 2: Ssk, k3, ssk, turn.
- Row 3: P5, turn.
- Row 4: Ssk, k2, ssk.
- Row 5: P4, turn.
- Row 6: Ssk k1, ssk, turn.
- Row 7: P3, turn.
- Row 8: Ssk, ssk, turn.
- Row 9: P2, turn.
- Row 10: K1, ssk, turn.
- Row 11: P2, turn
- Row 12: Slip 1, ssk, psso – 1 st remains, do not turn.
- Repeat from * 3 more times cut the yarn and pull through the last st.
FINISHING
- Weave in ends.
- Block the garment focusing on the edges to square sides; you might need to stretch the bottom a little more to match the length of the top of the garment.
Lining - simple version
- Measure the finished knitted item.
- Cut the lining fabric according to the final size of the knitted item – allowing a little extra for the seams.
- Fold the lining fabric in half with RS together and sew side seams using sewing thread.
- Fold knitted item in half with RS together so that cast on and top edges meet and sew side seams using the knitting yarn.
- Turn the knitted case so the RS is facing. Insert the lining fabric inside the case and pin down the fabric to the wrong side of the knitted item with wrong sides together. Fold the seam allowance at the top of the case to match the edge of the knitted item and sew together. With sewing thread, sew fold at bottom of lining to fold of knit piece.
- Insert a zipper and sew in place.
- With a sewing thread sew around the outer openings to create little pockets, (sewing together the knitted item and the lining fabric - take extra care not to sew to the other side of the case by mistake).
Lining - advanced version (internal divisions)
- The internal divider of the lining is approximately 1 inch shorter than the full height of the case.
- Measure the finished knitted item.
- Cut the lining fabric 8 inches longer than the final height of the knitted item, allowing a little extra on all sides for the seams.
- Fold the lining in half with WS together (A to A, B to B) (see diagram for guidance) – sew a line at the top of the fold to secure the fold, sew a second line 4 inches away from the center fold through both thicknesses of lines AB to create the internal divider.
- Fold the lining fabric with RS together, with the center fold inside and seam AB at bottom, sew side seams together through all thicknesses. The double thickness of fabric from the center fold to seam AB is the center divider of the lining.
- Fold knitted item in half with RS together so that cast on and top edges meet and sew side seams using the knitting yarn.
- With RS of knitted case facing, insert the lining fabric inside the case and pin down the fabric to the wrong side of the knitted item, making sure the center divider is in the middle of the case. Fold the seam allowance at the top of the case to match the edge of the knitted item and sew together. With sewing thread, sew line AB to folded edge of knitted piece.
- Insert a zipper and sew together.
- With a sewing thread sew around the outer openings to create little pockets, (sewing together the knitted item and the lining fabric - take extra care not to sew to the other side of the case by mistake).
Read NextAnything Knit Bag


Thanks for your comment. Don't forget to share!
Report Inappropriate Comment
Are you sure you would like to report this comment? It will be flagged for our moderators to take action.
Thank you for taking the time to improve the content on our site.