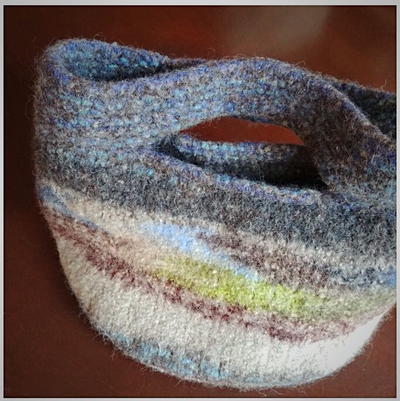
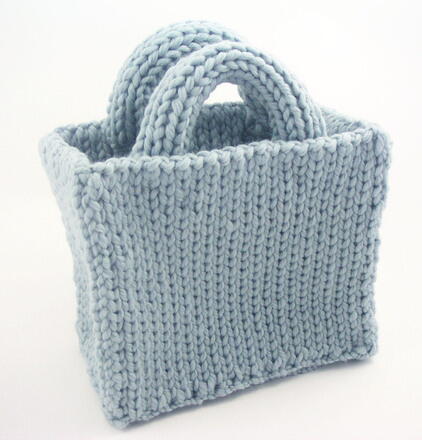
Bobble Felt Bag
This intermediate knitting pattern creates a large shoulder bag with bobble embellishments for texture. Felting after knitting helps to create a sturdy bag and smooths out any imperfections.

Materials:
- Yarn: Caron International's Felt-It! (100% wool; 1.76 oz/50 g, 93 yd/85 m ball): #0002 neon, 7 balls
- Knitting Needles: One pair size US 11 (8 mm) needles, or size to obtain gauge, One set double pointed needles size US 11 (8 mm) for Strap (optional)
- 13 5/8” x 22 1/8” sheet plastic canvas
- Stitch markers, 2 of one color for corners, see Helpful for additional optional markers
- Yarn needle
- Magnetic purse closure
- 1/2 yard of matching fabric (for lining bag) (optional)
- Sewing needle and thread to assemble fabric lining (optional)
Finished Size: Finished size may vary, depending on felting.
Tote shown measures approximately 8" wide by 19" long by 3" deep, after felting.
Gauge: Gauge is not critical for this project.
In Stockinette stitch, 13 sts and 16 rows = 4"/10 cm, before felting; 17 sts and 29 rows, after felting
Abbreviations:
MB (Make Bobble)
Row 1 (RS): [Knit 1, purl 1, knit 1] in same stitch to make 3 sts in 1, turn.
Row 2: Knit 3, turn.
Row 3: Purl 3, turn.
Row 4: Knit 3, turn.
Row 5: Sk2p (slip 1, k2tog, pass slipped over knit st), making 1 st from 3.
Stitches:
Garter stitch (Garter st): Knit every row.
Stockinette stitch (St st): Knit on RS, purl on WS.
Notes:
- Tote is worked in separate sections, with mitered corners on the Front and Back; Gussets and Strap worked separately.
- Bobbles are worked on the Front only, every 8 rows, with the Bobbles off set every other Bobble row (over the center st of the Stockinette section of the previous Bobble row).
- Tote is assembled, then felted.
- Plastic canvas liner is added after felting, to give the Tote shape.
- The last few rows of Front and Back will result in a slightly pointed end; it will be folded to the inside, after felting, and magnetic closure will be sewn to it.
- On the first Bobble row, place a marker (different color than the corner markers) before the third stitch of each k5 between Bobbles; on the next Bobble row, the Bobbles will be worked on the st after the marker (center st of the k5). Once Bobble pattern is established, discontinue these markers, if desired.
Instructions:
BACK
Cast on 35 sts for side edge, place a marker (pm) for corner; cast on 70 sts for center section, pm for corner; cast on 35 sts for side edge—140 sts.
(WS) Begin St st; purl 1 row.
Miter Corners
Decrease Row: Continuing in St st, knit across to 2 sts before first marker, ssk (1 st decreased), slip marker; k2tog (1 st decreased), knit across to 2 sts before second marker, ssk, slip marker; k2tog, knit to end—136 sts remain; 1 st decreased at each side, 2 sts decreased on center section.
Continue in this manner, working Decrease Row every other row, until 4 sts remain (1 st at each side and 2 sts between markers, end with a WS row.
Next Row: Ssk, k2tog—2 sts remain.
Bind off remaining sts.
FRONT
Rows 1 (WS) – 7: Work in St st, mitering corners (decrease 4 sts every other row) as for Back —128 sts remain.
Row 8 (RS) – Bobble Row: K4, [MB, knit 5 (see Helpful above)] 4 times, MB, k1 (ending 2 sts before corner marker); miter corner as for Back; k3, [MB, knit 5] 9 times, MB, k2 (ending 2 sts before corner marker); miter corner; k1, MB [knit 5, MB] 4 times, end k4—124 sts remain.
Rows 9 – 15: Work in St st, mitering corners as for Back—112 sts remain.
Row 16 – Bobble row: Knit 7, (next st is center st between first 2 Bobbles of Row 8), [MB, knit 5] 3 times, MB, (end 2 sts before corner marker); miter corner; continue in this manner, off setting Bobbles and mitering second corner—108 sts remain.
Rows 17 – 23: Work in St st, mitering corners as for Back—96 sts remain.
Row 24 (Bobble row): Continue as established, off setting Bobbles and mitering corners—92 sts remain.
Rows 25 – 48: Work as for Rows 17 – 24 in pattern as established, mitering corners—44 sts remain after Row 48 (last Bobble Row).
Complete Front as for Back, binding off last 2 sts.
SIDE GUSSETS (make 2)
Cast on 35 sts.
(WS) Begin St st; work even until piece measures 5" from beginning.
Bind off all sts.
BOTTOM
Cast on 70 sts.
Begin Garter st; work even until piece measures 5" from beginning.
Bind off all sts.
SHOULDER STRAP
Note: Strap may be worked in-the-round, using double pointed needles, or flat, then seamed.
Indications for RS and WS are if strap is being worked flat; in-the-round, all rows are worked with RS facing.
In-the-Round: Cast on with double pointed needles; join, placing a marker for beginning of round. Work in St st (knit every round), working Bobbles as indicated.
Flat: Cast on and work in St st (knit on RS, purl on WS), working Bobbles as indicated.
Cast on 13 sts.
Begin St st; work even for 9 rows, (if working flat, end with a WS row).
* Row 10 (RS) – Bobble Row: K6, MB, k6.
Work even for 9 rows, (end with a WS row).
Repeat from * 12 times.
Work Bobble row once more.
Work even for 10 rows.
Bind off all sts.
If worked flat, with wrong-sides facing each other, sew center Back seam.
FINISHING
Assembly
Sew Side Gussets to Bottom Gusset. Sew Gussets to Front and Back, aligning Gusset seams with mitered corners. With Bobbles facing toward the RS, sew one end of Strap to one corner of the Front (begin at seam joining Gusset to Front and attach toward center of Tote – Gusset will be folded under the Strap and pleated, after felting), and the other end to the opposite corner of the Back in the same manner, (see photo).
Felting
Place assembled Tote in a mesh sweater bag or pillowcase and close. Using hottest possible water and approximately 1 tablespoon liquid hand soap, fill washer 1/3 full. Place Tote in washer with an old pair of jeans (for agitation). Agitate for 6 minutes. After 6 minutes, remove Tote and check the felting progress every minute; depending on your washer, it will take 6 – 8 minutes of agitation to felt the desired amount. When you're pleased with the amount of felting, remove the Tote and drain water from machine; gently squeeze water from the Tote. Fill washer to the same water level with cold water. Place Tote into washer and rinse/agitate for another minute – the cold water will make the Tote felt just a bit more. Set machine to drain, then run spin cycle for approximately 30 seconds – creases caused by over spinning are difficult to remove from the finished piece. Remove Tote, gently stretching into shape. Insert the Plastic Canvas liner (see below) into the Tote, shaping to fit, and leave it in place while the Tote dries. Drying process may take up to 2 days, depending on humidity in the air.
Plastic Canvas Liner
Note: Liner will serve as a form to help shape Tote and to hold it open while it dries.
Measure the overall dimensions of the Front, Bottom Gusset and Back of the Tote; cut the plastic canvas lengthwise to this measurement, allowing approximately 1" less than the total length so that liner will sit approximately 1/2" down from the top edge, Back and Front (it will not extend all the way to each side – Tote is wider than the plastic canvas. Mark the center of the liner piece (this is the center of the Bottom Gusset); measure out from this line one-half the width of the Bottom Gusset on each side of center mark, then score across the width where you made the marks on either side of the center; this will enable the canvas to be folded up for the Front and Back.
When Tote has completely dried, fold the pointed ends at center Front and Back to the inside and baste in place, making the edge of the Tote straight. Fold the upper edge of each side Gusset to the inside of the Tote, pleating it evenly Back and Front and pin in place. Sew upper edges of Front and Back together under each end of Strap, beginning at seam, and across upper edge for approximately 4", catching upper edges of Gusset into seam.
Attach magnetic snaps to center Front and Back, on folded points; sew points neatly to inside of Tote, over the edge of Liner. Overcast edges of liner neatly to inside of Tote.
Optional: If desired, line Tote with fabric.
Read NextLittle Knit Tote Bag