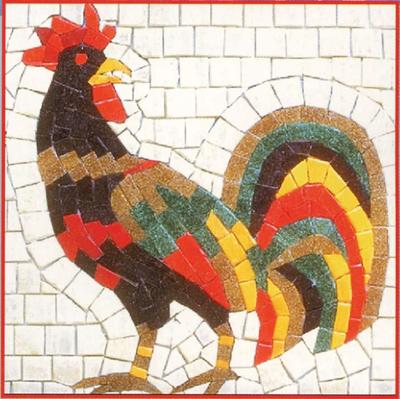
Rooster Mosaic
This mosaic from Diamond Tech features a feathered friend that will make a perfect trivet or tray for your breakfast. Remember, the early bird gets the worm!

Materials:
- 1 package each 3/4” Jennifer’s Mosaic™ Tile Mixes: Desert, Fire
- 1 package each 3/4” Jennifer’s Mosaic™ Tiles: Green, White
- package Mosaic Glass Nippers or Tile Nippers
- Sponge
- Mosaic Adhesive
- Newspaper
- 12” x 12” acrylic or chipboard surface
- Optional: grout, colorant, bowl, spoon, latex gloves, spatula, soft cloth
Steps:
- Prepare surface to be mosaiced by cleaning it and removing any oil. Wood surfaces can be slightly sanded. To create the mosaic panel use 12” square chipboard available at hardware and home suppliers.
- Lay newspaper over the working area. If grouting, also have a disposable bowl, rubber gloves, spatula and sponge.
- Modify design to fit the surface. Pattern can be reduced or enlarged to fit any flat surface.
- Transfer design to work surface using carbon paper.
- Work in sections, begin with the main subject, nip tile to fit pattern guidlines. Use the photo of the finished project for color and tile shape reference. Featured project was not grouted. If you wish to grout your project, leave 1/8” spacing between tiles. Cut tiles over a wide, empty, shallow box or bowl to collect tile shards.
- Once you have nipped the tile to fit a particular section, apply adhesive to the textured side of the tile and apply, adhesive side down, onto the surface. If making a project for outdoors be sure to use waterproof adhesive. Repeat nipping and gluing application until design is complete. Let project dry for 24 hours.
- No grouting is needed to achieve the look of the featured panel. However, if you evenly space tile 1/8” apart when gluing, this should leave enough room for grout.
- To apply grout, mix according to package directions, consistency should be equal to oatmeal.
- Grout can not be saved so mix as needed. Be creative - experiment with colored grouts or color your own grout with Jennifer’s Mosaics™ Colorants. Spread grout over project with a spatula or by hand wearing latex gloves. Make sure that every space is filled. Remove excess grout with a moist sponge.
- Wipe off the grout haze with a cloth, buff and shine tiles. Allow grout to dry. A sealer may be used to keep grout clean and protected. If the piece is to be used outdoors a transparent sealer is recommended to protect it from humidity.
- If making a panel, finish piece with your favorite frame, hang and enjoy the compliments.
Read NextFun n' Colorful Glass Canisters