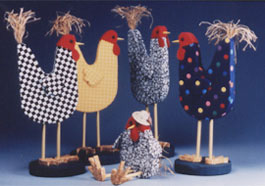
Rustic Country Chicken Figurines
Let these funky fabric chickens strut their stuff in your kitchen or family room. They are so easy to make and such a great country theme living room home decor idea! This project is featured in our 39 Low-Cost Kitchen Crafts eBook.
Materials:
-
STYROFOAM Brand Foam:
- Block, 1" x 10" x 12"
- Sheet, 1/2" x 12" x 36"
- Disc (standing chicken only), 6" x 1"
- 45-inch cotton fabrics: check, polka-dot, or mini-print for body, 1/3 yd.; gold tone-on-tone print for feet, 1/8 yd; solid green for base (standing chicken only), 1/4 yd.
- Red synthetic suede or felt for head and wattle, 9" x 12"
- Green self-adhesive felt (standing chicken only), 9" x 12"
- Needled cotton batting, 3" x 6"
- Fusible web
- Pencil
- Craft knife
- Iron
- Scissors
- Ruler
- Sandpaper or pencil sharpener
- Straight pins
- Sewing machine and matching thread OR needle and matching thread
- Wood dowels: 14" x 5/8"; 2" x 1/4"
- Acrylic paint, light yellow
- Natural raffia
- 1/4" half-round black beads for eyes, two
- Straw doll hat (sitting chicken only)
- White craft glue
- Serrated knife and old candle OR coping saw
Instructions:
Standing Chicken:
-
Using pattern, trace chicken body onto 1" foam block and cut out serrated knife or coping saw (if using serrated knife, wax knife blade first with old candle).
-
Place foam chicken on body print fabric. Cut out fabric 1" beyond edges of foam. Spread thin layer of glue on front of foam chicken; center and adhere fabric on front. Ref er to diagram to cut tabs in fabric allowance around entire chicken. Fold tabs onto 1" foam edge and glue. Repeat, covering back of chicken.
-
Fuse web to a 2" x 45" strip of body print fabric. Trim 1/2" from each long edge, resulting in a 1" x 45" strip. (Hint: Fusible web prevents fabric from raveling.) Glue fused strip to 1" edge of chicken, covering fabric tabs; trim as necessary.
-
Cut a 3" x 6" rectangle of body print fabric and a 3" square of needled cotton batting. Fold print fabric in half widthwise, right sides together, forming a 3" square; place on top of batting. Using pattern, trace wing onto doubled fabric and sew on traced line, completely around shape. Carefully cut a slit in top layer of fabric only and turn wing right side out. Repeat to make a second wing. Glue wings with slit face down to opposite sides of chicken (refer to photo).
-
Using patterns, cut two heads (reverse one), two wattles, and one 1" x 3-1/4" strip from red suede or felt. Align and glue heads, wattles, and bead eyes to opposite sides of fabric-covered chicken (refer to photo). Glue red strip to head along corresponding 1" edge.
-
Sand or sharpen one end of 1/4" dowel to a point for beak. Paint beak light yellow and let dry. Use craft knife to cut a tiny X in suede/felt head on 1" edge to attach beak (refer to photo). Glue and insert beak into foam.
-
Cut two 7" legs from 5/8" dowel. Paint light yellow and let dry. Cut two tiny X's in center bottom of chicken on 1" edge, approximately 1" apart to attach legs. Use a pencil point to start holes in foam at X's. Glue and insert legs, making sure they're even.
-
Using pattern, trace two feet onto 1/2" foam and cut out with craft knife. Follow Step 2 to cut gold print fabric 1/2" beyond foam and cover feet.
-
Cover top and sides of 6" disc with solid green fabric. Trace disc onto paper side of self-adhesive felt. Cut out and adhere circle to bottom of disc.
-
Stand legs on feet at center back and mark placement by gently pressing to create impressions in fabric and foam. Cut X's in fabric and insert legs. Stand chicken on disc base and mark placement. Cut X's in fabric, start holes, and glue legs with attached feet to base.
- Cut a small hole in tip of chicken's tail. Glue several lengths of raffia in hole and trim lengths as desired (refer to photo).
Sitting Chicken:
Follow Steps 1-8 of Standing Chicken with following modifications. Glue eyes, one wattle, and beak to front of chicken head (refer to photo). Follow Step 9 to attach legs to center bottom front of chicken in sitting position, then feet to legs. Glue hat angled on head.
Read NextAdorable Farmhouse Mason Jar Craft
Your Recently Viewed Projects

Thanks for your comment. Don't forget to share!
Marilyn B
Jun 05, 2017
My friend loves chicken decor for the kitchen, so I need to show this to her. I think using the styrofoam as a base to cut to pattern is a great way to get a project done without worry if needed to saw wood. This method is easier and more amenable to completing easily or even doing as a project with kids! You can even dress up your chickens with fabric ric rac trim outlining an area for the wings. Clever and cute project!
Report Inappropriate Comment
Are you sure you would like to report this comment? It will be flagged for our moderators to take action.
Thank you for taking the time to improve the content on our site.