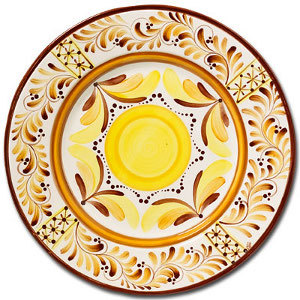
Amish Charger Plates
Amish Charger Plates from I Love to Create make wonderful DIY autumn and Thanksgiving table decorations. Serve up good food and good cheer to family members and friends as the leaves begin to fall, and paint ceramic plates and other ceramic projects for a uniquely autumnal atmosphere.

Materials:
- Duncan® Concepts® Underglazes for Bisque and Majolica
- C1 CN 012 Bright Straw
- C1 CN 032 Bright Butternut
- C1 CN 232 Bright Briarwood
- Signature Brushes
- C1 SB 802 No. 1 Liner
- C1 SB 803 No. 4 Liner
- C1 SB 811 No. 8 Round
- Clear Glaze - C1 CN 2000D Concepts Clear Dipping Glaze
- Scissors
- Banding Wheel
- Duncan mold, Charger Plate DM 2013
- Clay Carbon
- Sponge
- Pencil
- Dowloadable patterns
- pattern 1
- pattern 2
Instructions:
- Clean greenware and fire to shelf cone 04.
- Wipe with dampened sponge to remove dust and to condition ware.
- Center ware on banding wheel.
- Place colors on palette and thin to a light cream consistency with water.
- To circle in middle of charger band two (2) coats of CN 012 Bright Straw with the SB 811 No 8 Round.
- Side load brush with CN 032 Bright Butternut and band edge of circle and create an inside circle blending colors so there are no harsh transition lines.
- Load the SB 803 No 4 Liner with Butternut and band inside edge of rim of charger.
- Side load Liner with CN 232 Bright Briarwood and band accents to edge of rim completed in Step 7.
- Fully load Liner with Briarwood and band outer rim of charger.
- Use a pencil to divide rim into 4 sections, trim pattern with scissors and use the clay carbon and pencil to transfer patterns to rim and inside of charger.
- For larger brushstroke sprays load the Round with Bright Straw and pull in largest strokes. Work from outer edge of stroke with a press, pull and lift motion.
- The No 4 Liner and Bright Butternut is used for the medium strokes on the top side of the larger strokes.
- The smaller strokes are completed with the Liner and Bright Briarwood.
- For the rim design load the SB 802 No 1 Liner with Bright Straw and add the 4 criss-cross divisions.
- With the same brush repeat Step 14 with Bright Briarwood and a finer line. Also pull in the lifeline through the rim sprays.
- Load the No 4 Liner with Bright Butternut and tip in Bright Briarwood. Add press, pull and lift comma strokes to lifelines on rim.
- With the Bright Briarwood and No 1 Liner add tip, press and lift brush prints to the 4 criss-cross divisions.
- Add Bright Briarwood dots to the design with the handle end of the Round brush.
- Let dry, dip piece in CN 2000D Clear Dipping.
- When dry, stilt and fire to shelf cone 06.
Read NextHeirloom Recipes DIY Framed Wall Art