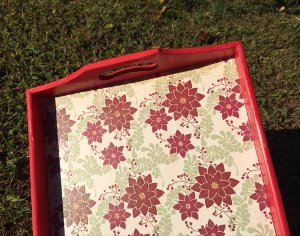
Mosaic Breakfast Tray
Give new life to unfinished wooden trays with this Mosaic Breakfast Tray project from Diamond Tech. Feel free to be creative with these mosaic patterns. Designs are included in most kits, but you can easily alter it to match your decor style.

Materials:
- Antiquity Mosaics™ – Ming Green 4 pkgs.
- Antiquity Mosaics™ – Crema Marfil 1 pkg.
- Antiquity Mosaics™ - Antique Silver Roma Inserts 1 pkg.
- Antiquity Mosaics™ Pattern enclosed in packaging
- Wooden Tray 11”x 14”
- Sandpaper
- White Latex Paint
- Grey Latex Paint
- Mosaic Adhesive or Clear Silicone
- Jennifer's Mosaics Grey Sanded Grout
- Mixing bowl and spoon
- Sponge
- Latex gloves
- Paper Towels and Newspaper
Instructions:
- To protect work area, cover with newspaper.
- Lightly sand the wooden tray. Use a soft cloth or paper towel to remove surface dust or dirt. Paint the tray with white latex paint and allow it to dry.
- Next, apply a second coat of grey paint to the surface to completely seal the wood.
- Find the center of the tray using a ruler and a pencil. Place the ruler so that it reaches from corner to corner diagonally. Draw a line on the tray along the edge of the ruler. Do the same to the remaining corners. Where the two lines intersect is the center of the tray and your starting point for your mosaic.
- Choose a pattern from the 6 enclosed in the Antiquity Mosaic package.
- Should you choose to use medallions, place these in the desired position before tiling. Peel the protective covering from the tile. Starting in the center, place tile on the tray following the color-coded pattern.
- Lift each piece and apply a thin layer of glue to the back. Firmly press each piece back into its place on the tray. Allow glue to dry.
- Measure grout; follow the manufacturer’s recommended instructions. Reserve a few tablespoons of grout and set aside. Adding 1 tablespoon of water at a time to remaining grout, mix with a craft stick until the grout reaches “fudge-like” consistency. If it is too watery, add the reserved dry grout in small amounts until the consistency is correct.
- Wearing a disposable glove/s spread the grout into the openings around the marble tile and along the outside edges. Wait about 15 minutes for grout to set.
- Begin to wipe away the excess grout using a paper towel or sponge, taking care not to pull grout out of tile spaces. It is very important to remove any grout on the tiles surface before it completely dry.
- Use the soft cloth; buff the tiles to a clean shine. Allow 24 hours for the mosaic piece to dry thoroughly before using your tray.
Read NextFun n' Colorful Glass Canisters


Thanks for your comment. Don't forget to share!
Hannah
Aug 22, 2017
This is just beautiful. I love the combination of the colors. Very earthly. How heavy would the tray be with the mosaic on it?
Report Inappropriate Comment
Are you sure you would like to report this comment? It will be flagged for our moderators to take action.
Thank you for taking the time to improve the content on our site.