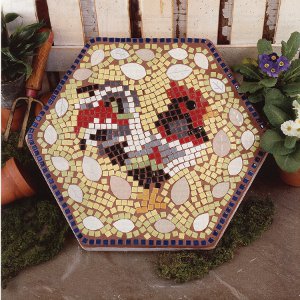
Chicken and Eggs Mosaic
This Chicken and Eggs Mosaic from Diamond Tech stone would be perfect in your kitchen. You can use this mosaic pattern as country decor or as a hot plate to keep your breakfast nice and warm! Tile mosaic patterns like this also make great housewarming gifts!
Materials:
- Jennifer’s Mosaics 16” Hexagon Stepping Stone Mold
- Silicone Adhesive
- 2 lbs Terra Cotta Sanded Grout
- Tile Nippers
- Mixing Spoon
- Outdoor Cement
- Masking Tape
- Marker
- Sponge
- Bowl
- Disposable Glove
- Safety glasses
- Contact paper
- Cardboard 2 pieces 17” x 17” square.
- Spoon or craft stick
- Soft Cloth
- 1 pkg. each of Jennifer’s Mosaics 3/8”Deco Ceramic Tiles: white, black, dark green, light green, grey, light grey, red
- 2 pkgs Jennifer’s Mosaics Deco Ceramic:3/8” yellow, Assorted leaves
- Pattern
Instructions:
- Cover work area with newspaper. Collect all supplies needed for the project. Place them on your work surface.
- Photo copy the pattern. Enlarge as needed to fit 16” mold.
- Place 24 cups of Jennifer’s Outdoor Cement into a mixing bowl and slowly add 48 ounces of water, mix thoroughly. Wear a dust mask while measuring and mixing.
- Pour cement slowly and evenly into mold; gently tap sides of mold to release air bubbles in cement.
- Do not move mold while the cement is drying. Cement will warm as it hardens; wait approximately 60 minutes for cement to harden (time may vary due to climate).
- Once cooled and set, remove the stone from the mold by turning over the mold and lifting the edges.
- Allow stone to completely dry/cure for 24 hours on a non porous surface with newspaper before proceeding to the next steps.
- Place a sturdy piece of cardboard down on your work surface. Center your pattern on the cardboard.
- Use the pattern to lay out your tiles.
- Cut clear contact paper the size of your pattern. Remove the paper back and center contact paper over your tile. Lower on top of the cut mosaic. Press down firmly from center to edge.
- Ensure all pieces are stuck to the contact paper. Place another piece of cardboard on top of the contact paper. Place you hand on both pieces of cardboard and flip the mosaic over. Your design should be adhered to the contact paper with the back of the tile facing up. Discard the cardboard.
- Apply adhesive to the surface of the stepping stone, approximately 1/8” thick. Lift the tiles and contact paper carefully. Place the back of tile into the adhesive. Press down on the surface of the contact paper to ensure all tile is seated in the adhesive.
- Gently pulling at a 45º angle, remove the contact paper. If a piece tries to remain on the contact paper, gently tap it back into the adhesive. Adjust any tile pieces that moved during this process.
- Let dry according to the adhesive manufacturers recommended time.
- Place 1 lb. of grout into a mixing bowl and slowly add water, 1 tablespoon at a time. Mix with craft stick or spoon until the grout reaches “fudge-like” consistency. If it is too watery, add more dry grout in small amounts until the consistency is correct.
- Tape off side edges of stepping stone so that grout does not stain the stone.
- Wearing a disposable glove; spread the grout with your hands into all the nooks and crannies between the tiles. Wait about 15 minutes for grout to set.
- Begin to gently wipe away the excess grout using a damp sponge, taking care not to pull grout out of spaces. It is important to remove grout from the tile surface before it is completely dry.
- Using the soft cloth, buff the tile to a clean shine. Allow to dry completely for 24 hours.
Read NextFun n' Colorful Glass Canisters


Thanks for your comment. Don't forget to share!
Report Inappropriate Comment
Are you sure you would like to report this comment? It will be flagged for our moderators to take action.
Thank you for taking the time to improve the content on our site.