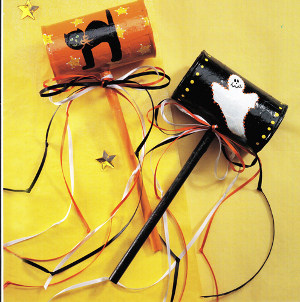
Halloween Noise Makers
Turn concentrated juice cans into noise makers for the little ghouls this Halloween. These noise makers designed by Heidi Borchers of Inspired at Home are a great craft to do with kids before Halloween.
Materials:
*Aleene’s® Super Thick Tacky Glue™
*For each: 6-oz. juice can with lid, washed and dried
*Drill with 3/8” bit
*10” length 3/8” diameter dowel
*Assorted nuts and bolts
*Newspaper
*Paintbrushes – ¼” flat, fine-tip
*Acrylic paints: orange, black, yellow, green, white
*1 yard each 1/8” wide satin ribbon: white, orange, black
* Patterns
For cat noisemaker:
*small star rubber stamp (or see designer tip below to make your own)
*Waxed paper
*Cosmetic sponge
Instructions:
For each, center and drill hole for dowel through 1 side of can. Dip 1 end of dowel into glue and push into hole until end of dowel touches opposite side of can. Apply additional glue to dowel on outside of can. Let dry.
Put handful of assorted nuts and bolts inside can. Glue lid onto can. Cut or tear newspaper into 1” squares. Glue newspaper pieces to cover entire can, overlapping pieces slightly. Let dry. Using photo as guide, paint entire can and dowel desired base color.
For cat noisemaker: transfer pattern to can and paint 1 cat on each side of can. Let dry. Pour small puddle of yellow paint onto waxed paper. Dip sponge into paint, dabbing excess off onto waxed paper. Dab sponge onto star stamp and press onto can. Repeat to stamp stars on can where desired. Let dry. Use toothpick to outline each star with dots of white paint. Let dry.
For ghost noisemaker: transfer patterns to can and paint 1 ghost on each side of can and 1 jack-o-lantern on each end of can. Let dry. Use toothpick to outline each ghost with dots of orange paint. Let dry. Use end of paintbrush to paint dots around each end of can with yellow. Let dry.
For each, handling all ribbon lengths as 1, tie ribbons in bow around dowel just below can. Tie knots in streamers.
Heidi’s Designer Tip: Whenever I can’t find a simple rubber stamp design that I like, I simply make one from a scrap of craft foam cut into the shape I desire and glue it onto a pencil eraser. If you are making a larger stamp design, just cut from craft foam and glue onto a piece of foamboard. This makes a quick and easy custom stamp that you can use over and over.
Your Recently Viewed Projects

Thanks for your comment. Don't forget to share!
acadiANNA
Oct 29, 2010
This is really a cute toy. Great design, colorful, creative recycle idea. I think I would rather use dry beans and elbow macaroni inside. Softer to the ear. It seems unlikely that this piece would come apart, but I worry about a small child ingesting the nuts and bolts. Now possibly I am in the percentage of overprotective moms.
Report Inappropriate Comment
Are you sure you would like to report this comment? It will be flagged for our moderators to take action.
Thank you for taking the time to improve the content on our site.