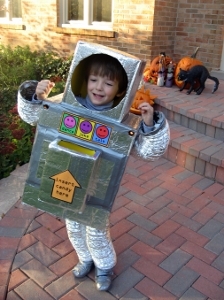
Retro Robot Costume
Make a retro robot costume for your child with these Halloween craft ideas. This fun costume, designed by Marisa Pawelko for Westcott, is adorable and easy to make, and it even comes with it's own candy storage!

Materials:
- 8” Westcott Titanium Bonded NonStick Scissors
- Westcott Hobby Knife
- 12” Westcott Titanium Bonded Trimmer
- Paintbrush
- Large rectangular cardboard box for torso
- Small square cardboard box for head
- Small rectangular box for treat depository
- Silver Duct Tape
- Aluminum Foil
- Dryer Duct Tubing
- Computer Generated Color Printouts
- 2 Small Flashlights
- Classic Glossy Mod Podge
- Elastic cord for leg tube suspenders
- Construction paper for lining visible interiors of boxes (tin foil may also be used)
- Sneakers
Instructions:
- With your 8” Westcott Titanium Bonded NonStick Scissors cut off the bottom of the torso box using child’s body as a sizing guide.
- Cut a square hole in the top of the torso box slightly smaller than the head box.
- Using your Westcott Hobby Knife cut 2 small holes in the front top corners of the torso box using the flashlights as a guide.
- Cut 2 round holes for arms in sides of torso box with your Westcott Hobby Knife, using the dryer duct tubing and the child’s body as a guide.
- Cut a round hole in the head box for the face.
- Cut a rectangular hole in the top of the treat depository box.
- Cover all cardboard boxes with aluminum foil by applying a thin coat of Classic Glossy Mod Podge, and folding excess foil around holes.
- Line the interior of the head and treat depository boxes with either colored construction paper or aluminum foil.
- Once glue has dried, neatly connect the head, torso and treat depository boxes with duct tape.
- Print out “Insert Candy Here” and paper command buttons using your home computer/printer and trim with the Westcott Titanium Bonded 12” Trimmer. You may also create them by hand with markers and construction paper.
- Have the child choose the commands for the tricks they would like to perform. Glue buttons and arrow onto costume.
- Using the child’s body as a guide cut lengths of dryer duct tubing for the arms and legs.
- For a finished look and to protect from the wire in the tubing, wrap duct tape around all 8 cut edges/ends of the dryer duct tubing.
- Connect the arm pieces to the torso box with duct tape on the inside of the tubes and box.
- Use duct tape to connect flashlights in place on inside of costume, leaving access to the power switches of the flashlights.
- Using the child’s body as a guide, create suspenders to hold up the leg tubes. Poke 2 holes in each leg tube and run the elastic cord through the holes. Tie the elastic cord to the leg tubes. The suspenders cross over each shoulder of the child (forming an X on the chest) on the inside of the costume, before putting on the rest of the costume.
- Wear thin pajamas under costume. Cover basic sneakers with duct tape, leaving access to laces or Velcro unobstructed and let the fun begin!
Read NextDIY Easy Halloween Magnets