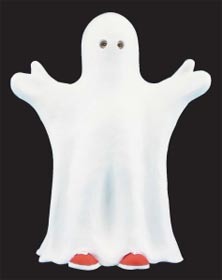
Stonex Ghost
Create a Stonex Ghost Halloween decoration from AMACO with clay and paint. This is a great craft for kids to help out with, they can get messy painting! Have a spooktacular time!

Materials:
- AMACO® Stonex™ Clay, 5 lb. Box
- Fettling Knife or Trim Knife
- Acrylic Paints: Flesh, Black, White, and Red
- 1" Diameter Wooden Dowel Rod (6" length)
- Plywood or Masonite (6" or 8" square)
- Drill and Drill bit (small)
- Screw (11/2" flat head)
- Ruler
- Pencil
- Small Brush (your choice)
Steps:
- Temporary Base: Measure and mark the center of the square piece of plywood. Drill a hole through the center. Drill a hole up into the center of the dowel rod about 1/2" deep. Insert screw from the bottom of the plywood up into the center of the dowel rod. You should now have a sturdy base to work with.
- Press the entire block of clay onto the dowel rod. Do not allow the rod to poke through the top. Then move the block up, down, and side to side so that it fits loosely and you are able to easily remove and replace the block of clay.
- Body: With the fettling knife, create a rough cone shape by slicing off the corners. Save the excess clay for later use. Use your fingers to model the folds in the “sheet” that your ghost is wearing. Try to create the look of fabric molding to the shape of the ghost’s legs. Round the top of the head.
- Eyes: Use the flat end of a pencil to create depressions about 1/8" deep where the eyes should be. Use a sharpened pencil to make holes in the center of the recessed flat area (like two bull’s eyes). Roll two small equal sized balls of clay and place them into the “eye sockets” you just created. The eyes should fit snugly.
- Shoes: Remove the figure from its base and use the handle of the fettling knife (or your thumb) to make depressions in the bottom of the figure where the shoes peek out from under the “sheet”. Roll a log of clay about 21/2" long and 3/4" diameter. Cut in half and press into the depressions you just made, leaving 1/3 to peek out from under the sheet. Replace the figure on the base. Round the end of the shoes and scratch in a line to indicate the soles. Roll small lengths of “shoe laces” and press into the shoes with the sharp end of the pencil.
- Arms: Scratch in cross hatch marks where the arms will attach. Roll a log of clay about 6" long and 1" diameter. Cut in half and scratch one end with cross hatch marks. Dip each marked end in water and press firmly to the body of the ghost. Form the hands and smooth the seams so you can no longer see them. More clay may be needed to create a smooth transition from the hands to the body. It should look like cloth draped over the figure.
- Drying: Cover figure loosely with a plastic bag and let dry overnight. When it is dry enough to stand on its own and not leave finger prints, uncover and remove from base. With the fettling knife, hollow out the insides from the bottom of the figure. Try to leave about 1/2" wall thickness all the way around. This is to help speed the drying process and more importantly, to prevent cracking. Place two books of equal thickness (over 1/2" thick) about 1" apart. Set the ghost on the books so it straddles the space between them (this will allow air to flow more evenly around the figure). The clay will whiten as it drys. It will take 2 to 3 days to dry completely.
- Paint: Once the piece is completely dry you may paint. Apply Flesh color to the area around the eyes. Paint the eyes Black with a White highlight. Paint the shoes Red with White soles and shoestrings. Paint the rest of the sheet covering your “Ghost” White.
Read NextMake Your Own Wand DIY