Recycled Steampunk Bat Necklace
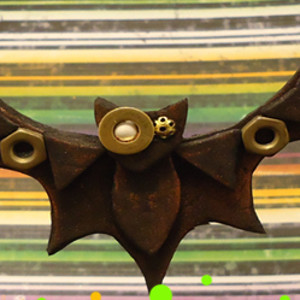
If you hear screeching while creating this Recycled Steampunk Bat Necklace, it could be one of two things: either spooky bats or rusty gears. Whatever it is, it sure makes for one cool jewelry making idea. This awesome necklace can be worn all October long. Show off your affinity for Halloween fun and cool steampunk accessories with this DIY jewelry idea. If you're wearing it as part of a Halloween costume or Comic Con cosplay, you will certainly be the talk of the village.
Primary TechniqueJewelry Making

SeasonFall
Materials:
- Aleene’s Super Thick Tacky Glue
- Craft foam
- Pen or pencil to trace pattern
- Metallic paste – copper
- Washers – no larger than 1/3″ wide
- Nuts – no larger than 1/4″
- Scissors
- Bead for one eye – should fit into the center of the washer
- Tiny bead cap for the other eye – it needs to fit next to the washer on the bat’s face
- Craft knife
- Hole punch – 1/8″
- String or ribbon
- Wire
- Bat necklace template
Instructions:
- Cut out the bat necklace template, trace on the foam and cut out.
- Cut the gray areas out of the paper bat, keeping the head and body as one piece. Trace all the pieces on the foam and cut out.
- Cut out the head on the paper bat, trace on the foam and cut out.
- Rub copper paste on the foam pieces. Do a tiny bit at a time. You can add more if you desire.
- Cut a tiny “x” on one side of the individual bat head. Cut just large enough for the eye bead.
- Place a tiny drop of glue on the cut “x” and push the bead in.
- Glue all the foam pieces in place. **You may want to cut the ears off the whole bat piece and the body with head piece, if they don’t line up with the individual head piece.**
- Punch holes just to the outsides of outer foam triangles.
- Glue the metal pieces according to the photo above, making sure to glue the outer metal pieces over the holes. Allow to dry.
- Thread string through the holes. Tie knots and wrap the wire around the string tails and trim off excess.
More Crafty Ideas For You
One fun and creative craft project idea that we recommend for fans of the Recycled Steampunk Bat Necklace is to upcycle old keys and gears to create a unique steampunk keychain. This project is perfect for intermediate crafters who enjoy working with metal and love the steampunk aesthetic. Keychains make fantastic gifts for friends and family, and they are a practical and stylish way to add a touch of steampunk flair to everyday items.
Another project idea for fans of the Recycled Steampunk Bat Necklace is to create a set of steampunk-inspired coasters using recycled watch parts and gears. This project is great for crafters of all skill levels, and it can be customized to fit any home decor style. Steampunk coasters are a fun and functional way to add a little bit of industrial charm to your living space, and they make great gifts for housewarmings or holidays.
Lastly, for crafters who enjoy making jewelry like the Recycled Steampunk Bat Necklace, we recommend trying your hand at creating a pair of steampunk earrings using old watch faces and gears. This project is perfect for advanced crafters who have experience with jewelry-making techniques like wire wrapping and beadwork. Steampunk earrings are a stylish and eye-catching accessory that can be worn with a variety of outfits, making them a versatile addition to any jewelry collection.